XL Release - Reference Manual
Introduction
Welcome to XL Release!
XL Release is an enterprise release coordination software solution that allows you to:
- Plan, track, and execute release plans from code drop to end user
- Proactively avoid release delays and failures by tracking pending tasks, risks, and dependencies
- Accelerate your delivery process by replacing manual with automated tasks and standardizing release plans
XL Release helps you deliver higher quality software faster by providing a single source of truth, increasing the level of automation, and standardizing the release process.
XL Release is for everyone who needs to work on, manage, or report on a release.
This is the reference manual of XL Release. It describes the core concepts of the application and all functionality available in the user interface.
Core concepts
This section briefly explains the concepts used in XL Release.
Releases are at the heart of XL Release. A release represents a number of activities in a certain time period, with people working on them. XL Release allows you to plan, track, and execute releases automatically. It acts as a single source of truth for everyone who is involved in making the release a success.
A release is divided into phases, which are logical stages in the process. For example, a release can be divided into Development, QA, and Deployment phases. In XL Release, a phase is a grouping of tasks, which are the activities that must be done to fulfill the release.
Tasks are activities in a release. In XL Release, everything that must be done is defined as a task. There are manual tasks, in which a human must do something, and automated tasks that the XL Release flow engine performs, unattended.
When a release is started, XL Release executes the release flow. This is the workflow of the release. XL Release determines the current task that needs to be picked up and executes it (if it is an automated task) or sends a message to the person responsible for it (if it is a manual task).
Each release has a release owner, the person that is responsible for correct performance of the release. If something goes wrong, the release owner will be notified. For example if an automated task produces an error, or one of the people working on a task indicates that he is in trouble.
A template is a blueprint for a release. You can use a template to start different releases that have the same flow. A template is very similar to a release; however, some functionality is different because a template is never executed directly. For example, there are no start or end dates in a template; most tasks are assigned to teams rather than actual people; and variables are used as placeholders for information that differs from release to release, such as an application's version number.
Each release or release template defines a set of teams. A team is a logical grouping of people who perform a certain role. For example, on a release you can define a Development team, a QA team, an OPS team, and a Release Management team.
Task overview
When you log in, you see the Task overview, which shows the active tasks that are assigned to you or to a team that you are in.

Tasks are grouped by release. To hide the tasks of a release, click the triangle to the left of it.
Task details

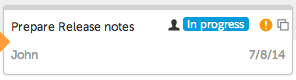
The following information appears for each task:
Status icon:
- Orange icon—The task is currently active.
- Clock icon—The task is waiting to start at a predefined time in the future (task state is 'pending').
Task type and Status label. Each task type has its own icon. For example a person icon identifies the task as a 'manual task'. The status label below it indicates the current execution state of the task.
Task title and assignee: The task title and the name of the person or team that is responsible for it.
Task actions: The actions on the task that are currently relevant and that you have permission to perform.
- Complete: Complete the task and advance to the next task in the release. You can optionally add a comment when completing a task.
- Skip: Skip the task and advance to the next task in the release. This action indicates that the work has not been done. You are required to enter a comment when skipping a task.
- Fail: Put the human task in 'failed' state and notify the release owner. This action halts the release process. You can use it to signal that something is wrong and you don't know how to resolve it. You are required to enter a comment when failing a task.
- Abort: Stops the automated task, put it in 'failed' state and notify the release owner. This action halts the release process. You are required to enter a comment when aborting a task.
- Assign to me: Assigns the task to you.
- View in Release: Opens the release flow for the task.
Number of comments: The number of comments that have been added to the task.
Phase: The phase the task is in.
Started, Planned, or Scheduled: If the task has already started, its start date appears. If the task is scheduled to start at a specific future date, that date appears. "Planned" indicates that the task is waiting for a previous task to complete, and "Scheduled" indicates that it is waiting for its start date. See the task lifecycle for more information.
Due: If a due date is set on the task, it appears.
Flag: You can flag a task to indicate that progress was not as smooth as intended and that timely completion may be at risk.
- Orange flag: Indicates that attention is needed
- Red flag: Indicates timely completion is at risk
When setting a flag, you can also set a status text. In the task overview, the status text appears below the task details with the color of the flag.
To see more information about a task, click it. See Task types for more information about each task type.
Filtering tasks
You can use filtering and search options to query the tasks in the system.
Click Filter options to toggle the options:
- Active tasks: Show tasks that are currently active. When deselected, you can also see tasks that are coming up (task state 'planned').
- Assigned to me: Show tasks that are assigned directly to you.
- Assigned to my teams: Show tasks that are assigned to the teams that you are in.
- Assigned to others: Show tasks that are signed to people other than you and teams that you are not in.
- Not assigned: Show tasks that are not assigned to anybody.
Tip: Select Not assigned and Active tasks to see all tasks that are active, but that no one is looking at.
To filter on task title, use the Filter by title box. Enter part of a task title, release title, task owner, or teams.
To filter on dates, use the From and To options.
Release overview
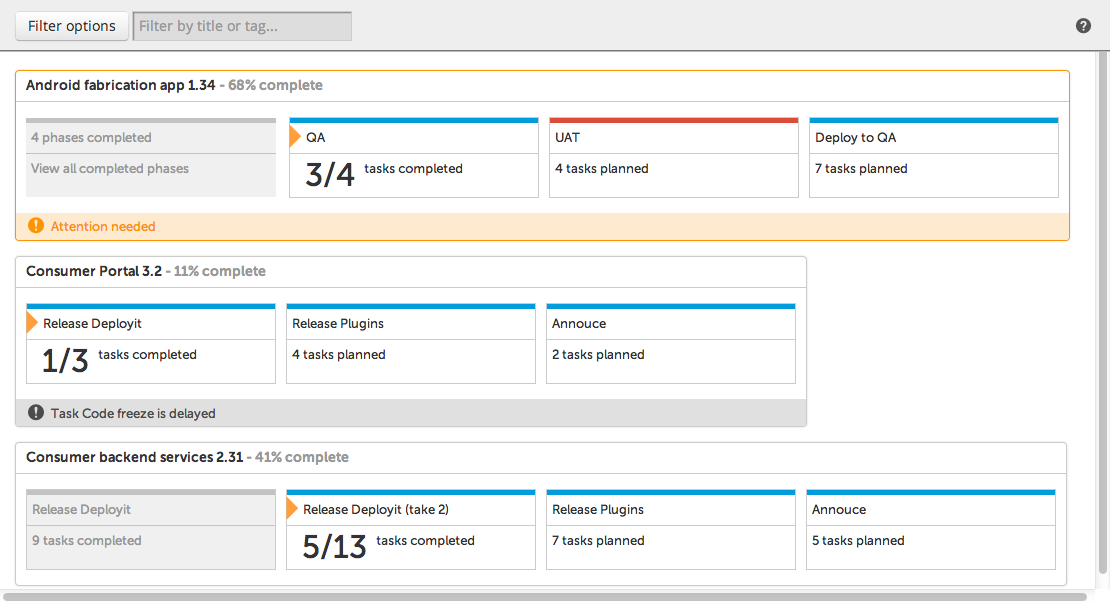
Go to Releases > Overview to see the list of currently active releases.
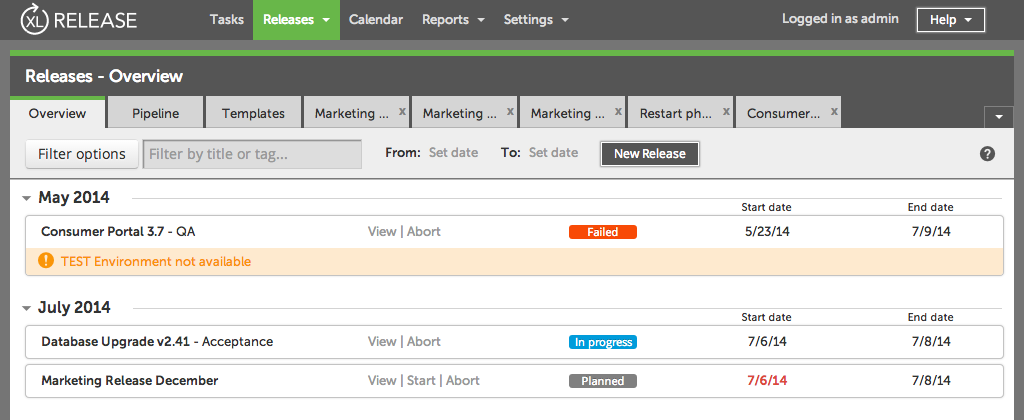
The releases that you have permission to view and that are currently active appear. This includes releases that are planned, in progress and failed.
Each release appears in a block. The first column contains the release title and the current phase (if the release is active).
The actions column contains shortcuts to actions that you can perform on a release:
- View: Open the release details screen on the release flow editor page.
- Start: Start the release; this is only available if the release is in the 'planned' state.
- Abort: Aborts the current release.
The status column shows where the release is in its lifecycle.
The Start date column shows the planned start date if the release is scheduled in the future or the actual start date if it has already started. The End date column shows the planned end date if the release is not complete or the actual end date otherwise. In both columns, an overdue date appears in red.
If a status flag is set on the release or on one of its tasks, it appears at the bottom of the release box.
Filtering releases
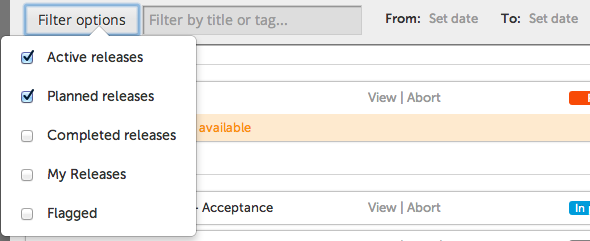
Click Filter options to toggle the options:
- Active releases: Show releases that are currently busy (release state 'in progress', 'failing', or 'failed').
- Planned releases: Show releases that have been created but that have not started yet (release state 'planned')
- Completed releases: Show releases that are complete (release states 'completed' and 'aborted').
- My releases: Show releases for which you are the release owner.
- Flagged: Only show releases that are flagged with a warning message. Use this option to show releases that are currently at risk.
To filter on release title, use the Filter by title or tag box. Enter part of a release title or tag.
To filter on dates, use the From and To options.
Release details
The release detail pages show information about a release and allows you to edit the release (if you have permission to do so).
Use the first button on the top bar to navigate through the release details.
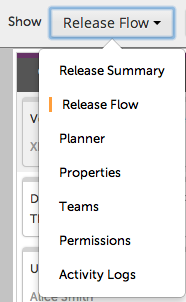
Release Summary
The Release Summary shows an overview of the current release.
Timeline
The first section shows a timeline of the release.
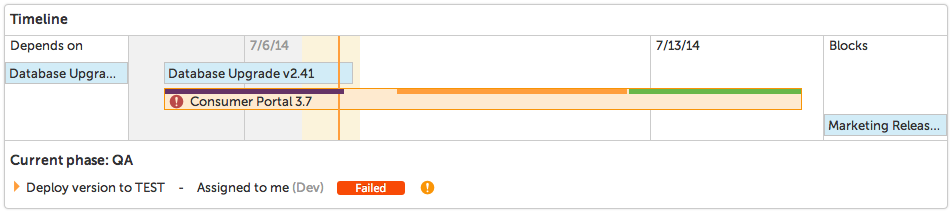
The complete timeline of the current release appears in orange.
The timeline start and end dates appear as follows:
- If an item has not started, its scheduled start date and due date appear.
- If an item is complete, the actual start and end dates appear.
- If an item is in progress, the start date that appears is the actual start date. If the item is on schedule and the scheduled start date is after the current date, then the end date is the scheduled start date. Otherwise, the end date is the current date.
Note: The release phases (thin lines at the top of the main release) are cropped to fit inside the release.
A release may depend on other releases; you can specify this on a Gate. If the release has any dependencies on other releases, then those releases appear above it, under Depends On. The releases that depend on this release appear below the release in the timeline (if visible) and are summarized in the Blocks header.
The current phase and currently active tasks appear below the timeline.
Task overview
The next section is the task overview.
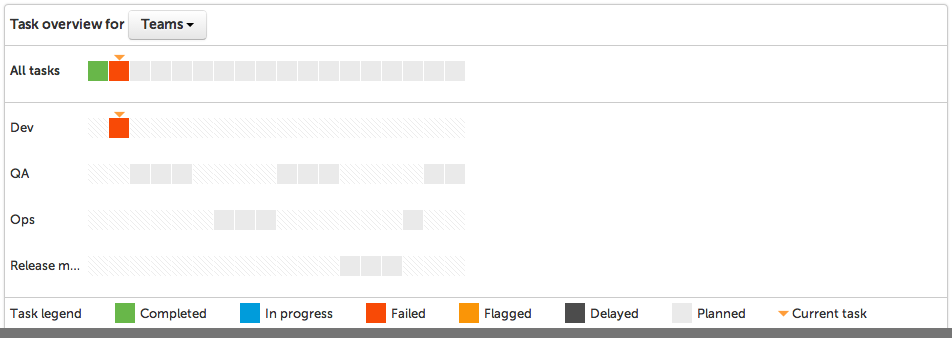
This widget shows the tasks that are coming up, that are currently active, and that need to be done. The tasks are split per team or per user so you can easily see how teams and people are allocated throughout the release.
Alerts
The Alerts section shows release warnings.
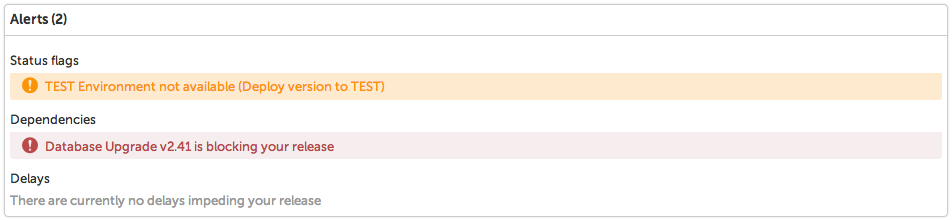
Status Flags are manually set on the release or on a task to indicate that the release needs attention or is at risk.
The Dependencies section shows alerts for dependent releases that are not finished.
Finally, Delays shows all tasks (active and planned) that have a due date in the past.
Release Flow editor
The Release Flow editor shows the phases and tasks in the release and allows you to add, move, edit, and delete them.
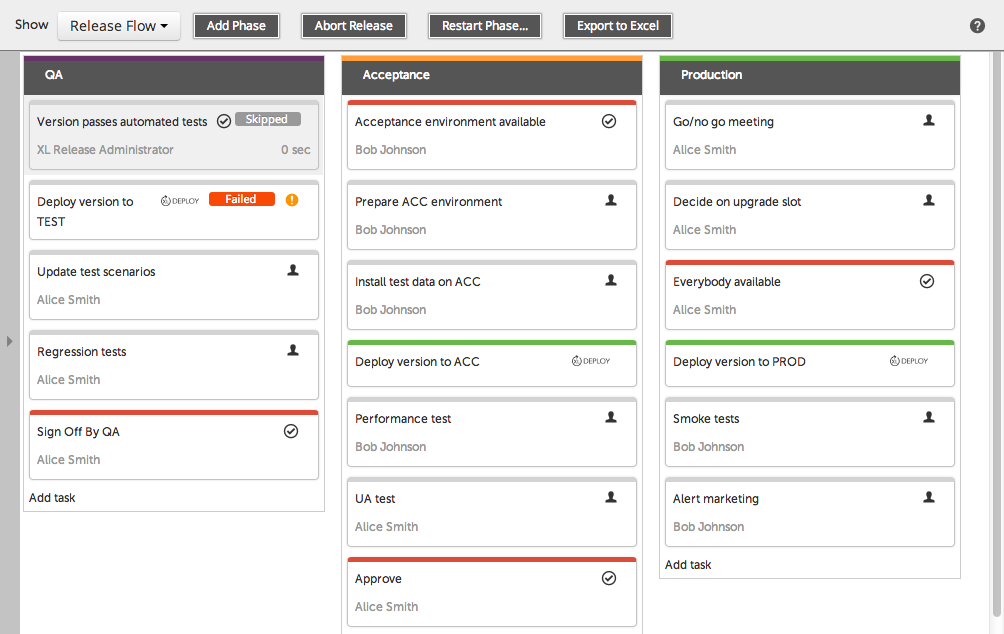
You use the editor for running releases and templates, though there are some minor differences between the two. In a running release, an orange arrow indicates the current task. Completed tasks appear in grey and you cannot move or edit them.
Top bar
Next to the navigation button, there are action buttons that depend on the release type.
Template

Planned release

Active release

The actions that are available are:
- Add Phase: Add a new phase to the release editor, after the last phase. You can drag the phase and drop it in the correct position.
- New Release: Create a new release from the template. This is a copy from the template. See Creating and starting a release for more information.
- Start: Start a release that is in the 'planned' state.
- Abort: Stop a currently active release and discard it.
- Restart Phase...: Abort the current phase (in an active release) and restarts execution from any phase in the past. See Restarting a phase for more information.
- Export to Excel: Download the current release in Microsoft Excel format (.xlsx).
- Export: Download the current template in ZIP format. You can import a template in the Template Overview, so you can share templates across XL Release servers. See Importing a template for more information.
Editor
The release flow editor shows the workflow of your release. This section describes how you use the editor to design a workflow by adding, moving, and deleting phases and tasks.
Managing phases
To add a phase, click Add Phase in the top bar. A new phase with title 'New Phase' appears.
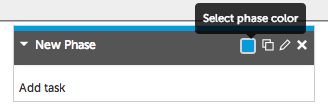
Click the title to change it. You can drag the new phase to the desired position and drop it. To collapse or expand a planned phase, click the arrow.
Hover over the phase header to:
 Select the color of the phase's top bar.
 Creates a copy of the current phase. This is useful during modeling when you have similar or identical phases. When you duplicate a phase that is active and has running and completed tasks, the tasks in the new phase are all in the 'planned' state.
 View a description of the phase and the start date, due dates, and duration. XL Release uses the dates and duration when displaying the phase in the planner and calendar; if they are not consistent with the release dates (as defined in the Release properties page), a warning appears.
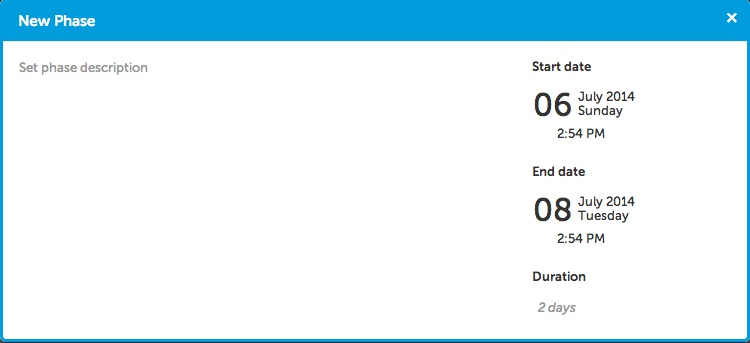
 Delete the phase from the release flow. Note that you cannot remove completed or active phases of a running release because this would corrupt the history reports and audit log of your release.
Managing tasks
Phases by themselves do not do very much; they are logical groupings of all activities in a release. The activities are modeled as tasks. To add a task to a phase, click Add task at the bottom of the phase.
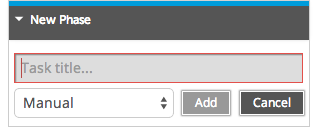
You can then specify the new task's title and type. See Task types for an overview of the task types that are available. Click Add to create the task and add it to the phase. The new task input field remains open so you can quickly add another task.
The task is added at the end of the release. Drag it to the desired position in the phase and drop it. You can also drop the task into another phase.
A Parallel group is a container for other tasks. All tasks inside the parallel group are started simultaneously and the parallel group task will finish when all of its children are complete. To add tasks to a parallel group, click Add task at the bottom of the group. To move a task into a parallel group, drag and drop it. To collapse or expand a parallel group, click its arrow.

A task appears as a box in the phase.
The elements of a task are:
- Orange triangle: Indicates that the task is currently active in the release. This only appears in an active release (not in templates or planned releases). In a parallel group, there can be more than one active task.
- The title appears in the upper left corner.
- The task assignee appears in the lower left corner. If the task is not assigned to a user, the team appears here. If the task is not assigned to a team, this area is blank. If the task is automated, the type of script appears here; for example, Webhook: JSON webhook.
- Status and action icons:
- Icon indicating the type of task
- The current state of the task (if the release is active)
- Alert icon (if action is needed)
- Buttons for duplicating and removing a task
- In an active release, you can only remove planned tasks (tasks that are not in progress)
- You can only duplicate tasks that are active or planned
- The due date appears in the lower right corner (if it is set).
Click anywhere on the task (besides the duplicate and remove buttons) to open the task details. See Task types for more information.
Planner
Select Planner from the Show menu to see an interactive Gantt chart. In the planner, you can view and edit the timing of phases and tasks on the level that you desire.

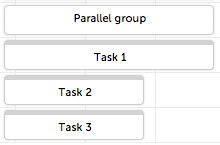
The Gantt chart is a combined timeline of the release, its phases, and the tasks within. You can optionally set a desired start time, due date, and duration on phases and tasks. If a task does not have due dates or a duration, it appears on that chart as having a default duration (one hour for manual tasks and one minute for automated tasks).

In a phase, tasks are executed in sequential order. Therefore, in the example above, Task 2 will not start until Task 1 is finished. The grey line connecting the right end of Task 1 to the left side of Task 2 indicates this.
You can move and resize the tasks in the diagram for detailed time planning.
To set the duration of a task, drag its right edge. To set the scheduled start date of a task, drag its left edge.
Note: If you set a scheduled start date on a task, the task will not start before that date, even if the previous task is finished.
To move a task, drag it; this will update the scheduled start date and due date without changing the duration.
Alternatively, set the scheduled start date or due date by clicking the dates in the Start date and End date columns, or set the duration by clicking the date in the Duration column.

Moving a task and changing the due date will also affect the start dates of subsequent tasks in the same phase.
To remove a start or due date, click the cross next to the date.
Parallel groups
You can perform more sophisticated planning in a Parallel group. By default, all tasks in a parallel are started when the group is started and are executed in parallel. The planner tool allows you to do plan on a detailed level and explicitly express dependencies between tasks.
This is an example of a ParallelGroup with three tasks. Task 1 already has a due date.
Connect Task 1 to Task 2 by dragging an arrow from the right edge of Task 1 to the left edge of Task 2.
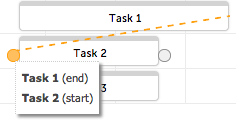
As a result, Task 2 will start at the due date of Task 1.
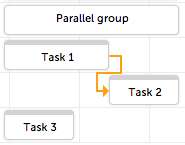
Task 3 is not connected and because it is inside a parallel group, it will start at the same time as Task 1 (when the parallel group starts).
Release properties
Select Properties from the Show menu to go to the release properties page, which provides the metadata of the release.
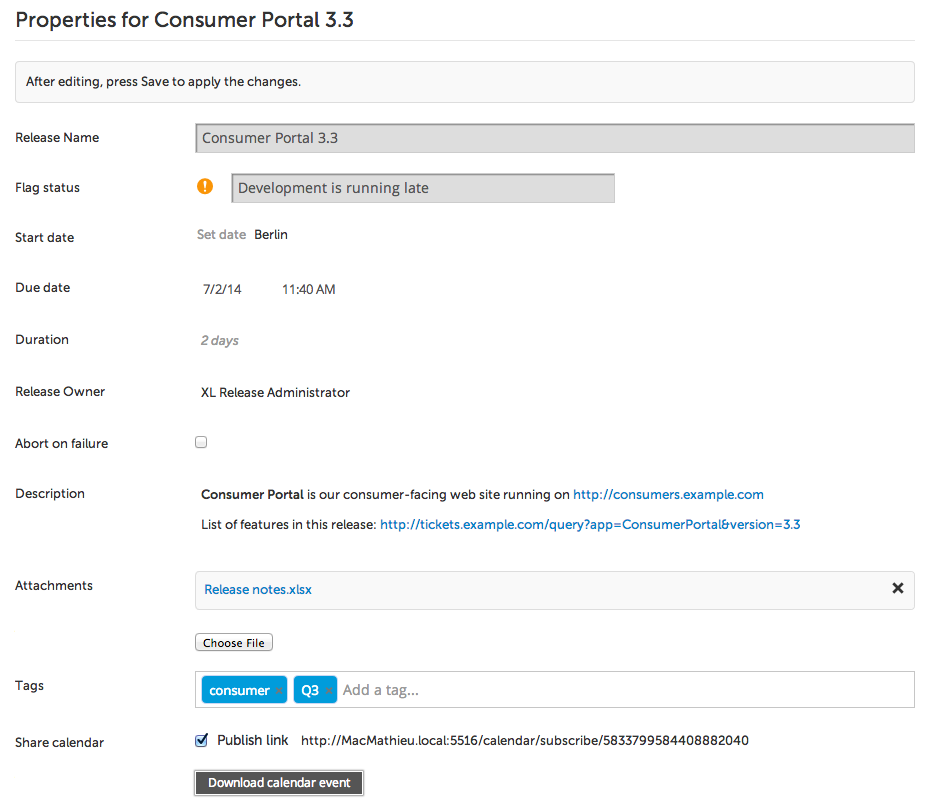
The following information is available:
Release Name: Change the name of the release (also allowed on a running release).
Flag status: Optionally set a warning message on the release. You can set the alert to amber ("attention needed") or red ("release at risk"). A releases with such a status is highlighted in overviews so it is easy to see.
Start date and Due date: Set the planned start and end dates of the release. These dates are used to display the release on the calendar. Note that these are not the dates that the release actually started or ended.
Release Owner: The person who is responsible for the release and who will receive notifications if tasks fail or are flagged as being in danger. Release owners are automatically added to the Release Admin team when the release is created. This team has all security permissions on a release. Release owners can also use the My Releases filter option in the Release overview.
Abort on failure: If ticked, the release will be aborted when a task fails.
Description: Provides detailed information about the release. To edit the text, click it. The text editor supports Markdown syntax, so you can put styled text and hyperlinks here.
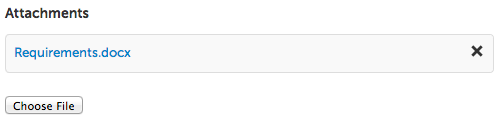
Attachments: Lists file attachments on the release. To add an attachment, click Choose File. To delete an attachment, click the black cross on the right.
Tags: Set tags on the release to make it easier to find in the release overview.
Share calendar: View the release in a calendar application such as Microsoft Outlook or Apple iCal. The options are:
- Publish link: Publish a link that you can add to a calendar application. When the release dates change, the event is automatically updated in your calendar. Note that everyone who can reach the XL Release server can access this link, which may be a security concern.
- Download calendar event: Download an ICS file that you can open with a calendar application.
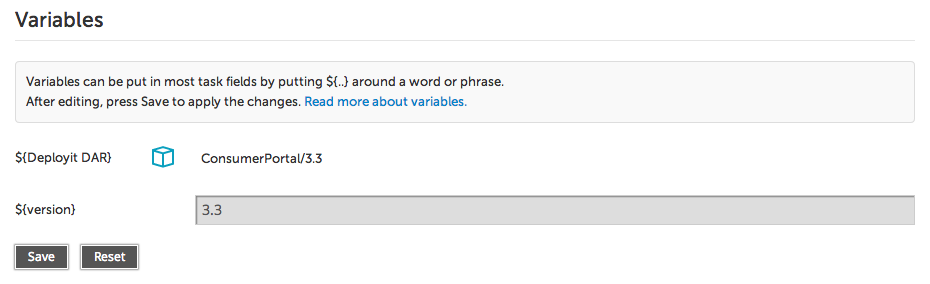
Variables: Lists the Variables that are defined in the release. Variables are placeholders that are filled in when the release starts. You can enter variables in most task fields by typing
${..}around a word or phrase. You specify the values of variables on this page.Note: You must provide values for all variables, or any task that contains a variable without a value will fail.
Smart auto-completing is available for deployment packages and environments of a XL Deploy task. Start typing and XL Release will retrieve the list of deployment packages or environments that are available in XL Deploy.
Click Save to save your changes to the release properties. Changes are not saved automatically.
To discard changes that you've made without saving, click Reset.
Teams
Select Teams from the Show menu to go to the teams page, which shows the teams that are defined for the particular release.
Teams group people with the same role together. You can assign a task to a team to indicate that someone from the team must pick up the task when it becomes active. Release security permissions are also expressed on the team level; see Release permissions for more information.
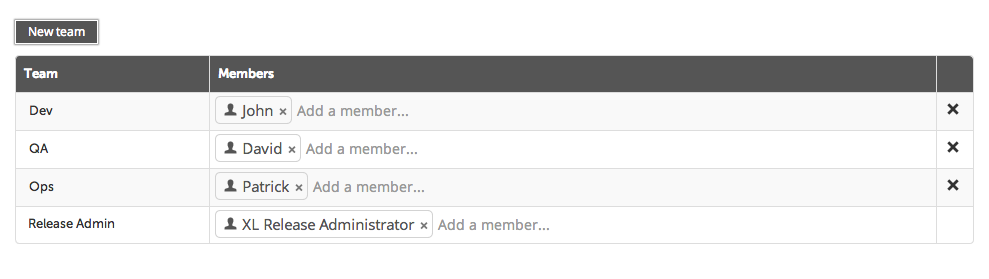
Click New team to add a new team to the release. Type each team member's name and press ENTER to add him or her to the team.
To remove a team, click the cross to the right of it.
There are two predefined teams (which you cannot remove):
- Template Owner: Contains everyone who has owning rights on the template.
- Release Admin: Contains everyone who is responsible for a running release that is created from this template. These are the people who receive extra notifications when, for example, a task fails and the release is halted.
Release permissions
Select Permissions from the Show menu to go to the permissions page, where you specify who can do what on a release. This page is only available to users who have the 'edit security' permission, either on the release or as a global permission.
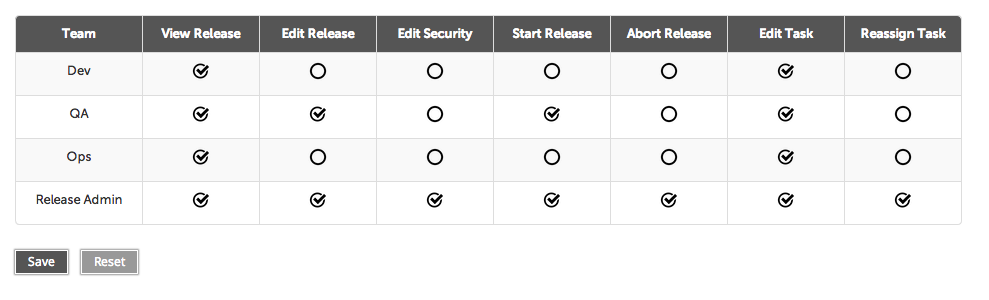
The following permissions apply to a release:
- View Release: Users have view access to this release. It will appear in the Release Overview. In the release details, users have read-only access to the release flow, properties, and activity log.
- Edit Release: Users can alter the structure of a release by adding and moving tasks and phases. Release properties and teams are editable.
- Edit Security: Users can edit teams and permissions in a release.
- Start release: Users can start a planned release.
- Abort release: Users can abort an active or planned release.
- Edit task: Users can edit individual tasks.
- Reassign task: Users can assign tasks to other people. Team assignment is also enabled.
The Release Admin team is created when the release is created. It contains the release owner and has all permissions by default.
Click Save to save your changes to the release permissions. Changes are not saved automatically.
To discard the changes that you've made without saving, click Reset.
Activity logs
Select Activity Logs from the Show menu to go to the activity logs, which show everything that has happened to a release. This is an audit trail of who did what and when.
This is an example of an activity log:
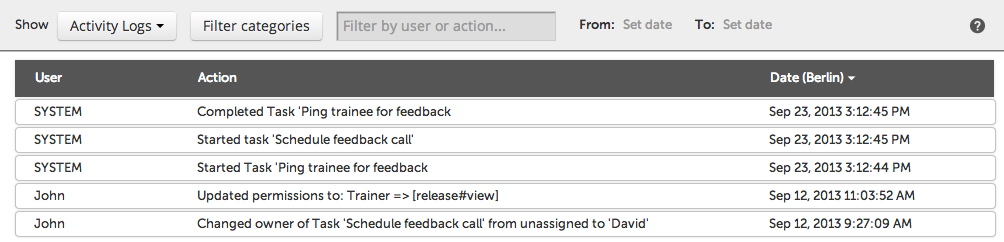
Click Filter categories to select the types of actions that appear:
- Important: The most important events of all other categories (such as 'Release started' and 'Task failed'). By default, only this category is selected.
- Release life cycle: Events for the start and end of a release, phases, and tasks.
- Release edits: Changes that were made to a release or a template.
- Task edits: Changes that were made to a single task.
- Task assignment: A task was assigned to a user.
- Comments: A comment was added to a task.
- Security: Changes that were made to the release security settings.
Start typing in the text field to target a specific user or action. Use the From and To fields to select a date range.
To adjust the order of the rows, click the Date column header.
Task types
There are several types of tasks in XL Release:
Human tasks: A person performs an action and indicates when it is done; for example, manual tasks and gates.
Automated tasks: The XL Release execution engine performs an automated script; for example, the XL Deploy task, the script task, webhooks, and the notification task.
Container tasks: Tasks that contain subtasks; for example, the parallel group
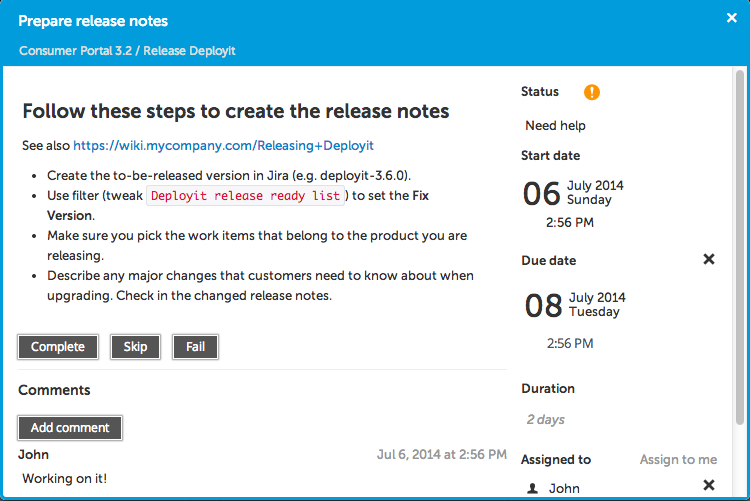
Manual task
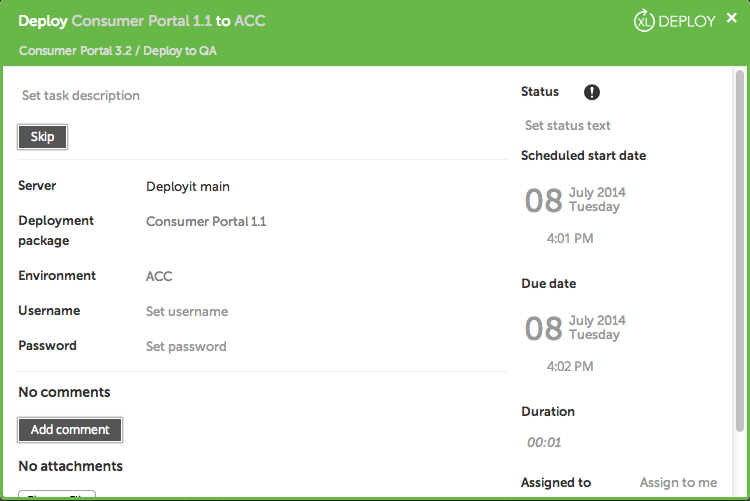
A manual task indicates that a step in the release process must be completed by a person. It is the most basic of the available task types. This documentation uses it as a basis to describe the functionality that is common across most tasks.
This is an example of the task details dialog window. To reach this window, click a task in the task overview or in the Release Flow editor.
To edit a field, click it and make the desired changes, then press ENTER or click outside the field to finish editing. In large fields, you can press ENTER to start a new line and click the checkmark icon to save.
To cancel your changes, press ESC. To cancel your changes in a large text field, click the round cancel icon.
Your edits to the task details are saved immediately.
Title and description
The task title appears in the top colored bar. To change the title, click it.
The release that the task belongs to appears below the task title "Consumer Portal 3.2" in the screenshot), followed by the task's phase. Click the release to go to the Release Flow editor.
The task description is the main element on the dialog. Use the description to describe the purpose of the task and instructions on how to complete it. Again, to edit the description, click it.
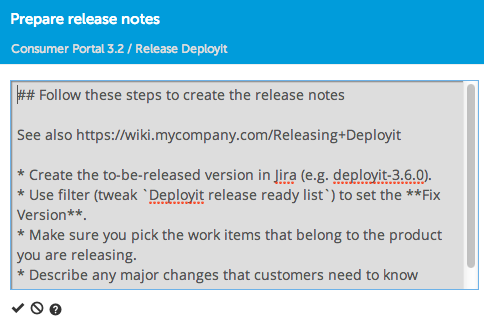
XL Release supports the Markdown syntax for styled text (headers, bold & italic, hyperlinks, bullet lists, and so on). This is a visually friendly way to code styling into text. See the Markdown syntax guide for more information.
Tip: Use hyperlinks to refer to documents published elsewhere, such as on a wiki or SharePoint server.
Task status and transitions
Use the following buttons to indicate that something has happened on the task (only available when the task is assigned to you):
Complete: The task is done. You can optionally add a comment about the completion of the task. After completion, XL Release advances to the next task in the phase and sends the appropriate notifications.
Skip: No work was needed or could be done, and you have moved on to another task. You can use this option for tasks that are not relevant to the release. You are required to enter a comment explaining why you skipped the task. XL Release marks the task as complete and moves on to the next task.
Fail: An unforeseen event is impeding the completion of the task or you do not know how to complete the task. This stops the release flow, and XL Release notifies the release owner.
Task attachments
The Attachments section is located below the comments.
Task properties
Status
To signal that the timely completion of a task is at risk or that you need some help, without failing the task, use the Status flags in the upper right corner of the task properties. The status flag appears in all overviews to alert the release manager and other users.
Scheduled start date
Use the scheduled start date to schedule a task to be performed at an exact time. For example, a deployment with XL Deploy that must start at midnight or an email must be sent to all stakeholders at 9:00 AM on Monday.
Note that the task will not start on the scheduled start date if it is not yet active in the flow. All previous tasks must be complete before a scheduled task is started and the scheduled start date is reached. If the previous tasks are completed after the scheduled start date, the task will start the moment it becomes active.
Click the scheduled start date to select a date and time. When executing the release flow, XL Release will wait until this time (if set) to execute the task. While waiting, the task is marked as "Pending".
Dates in XL Release are displayed using the clients operating system's timezone. Dates and times are formatted according to the browser's language settings.
Due date
Set a due date on a task to mark the time that the task must be completed.
Duration
Instead of explicitly setting the due date, you can use the duration property to indicate how long a task should last.
Note: If no dates or duration are set, the "inferred" dates and duration appear in grey.
Assigned to
This section indicates the user who is the owner of the task and who is responsible for completing it. It also indicates the team that the task is assigned to. Teams are a way to group users who are involved in the release and who have the same role. For example, you could have a DEV team, QA team and an OPS team. During planning, it can be useful to assign a task to a team because you do not know in advance who will participate in a certain release. If a task is assigned to a team but not to a user, all team members receive an email when the task becomes active.
To remove an assignment to a user or a team, click the cross icon.
Gate task
A gate is a type of task that contains conditions that must be fulfilled before the release can continue. There are two types of conditions: simple checkboxes and dependencies on other releases.
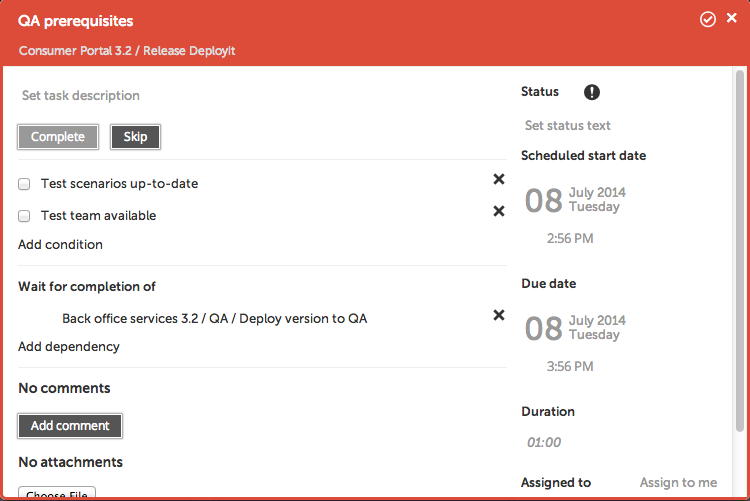
Checkbox conditions
The gate details window shows the checkbox conditions. If you have the edit task permission, you can add a checkbox by clicking Add condition. To remove a condition, click the cross icon.
Checkboxes must be completed by users who are involved in the release. When a gate task is active, it can only be completed with all of its conditions are met; that is, when all checkboxes have been ticked. The gate task will not automatically complete when the conditions are met; the task assignee must mark it as complete.
Dependencies
The gate details window also shows dependencies on other releases. A gate task can wait on other releases, on the level of release, phase, or task. In the screenshot above, there is a dependency on the "Deploy version to QA" task in the QA phase of the "Back office services 3.2" release.
Click Add dependency to create a new dependency or click an existing dependency to edit it.

Use the dependency editor to select the conditions for the dependency:
- The release the gate will wait on (only current releases appear)
- The release phase the gate will wait on (optional)
- The release task the gate will wait on (optional)
When the gate contains dependencies and no conditions, it completes automatically when all dependent releases, phases, or tasks are complete.
When a dependent task or release fails, the gate does not fail. It waits until the release is restarted and the task is completed or skipped. A gate fails if a release it depends on is aborted.
Notification task
The notification task allows you to write emails that are sent automatically when a task becomes active. This is an automated task, so it will complete by itself (or fail if the email could not be sent) and XL Release will advance to the subsequent task.
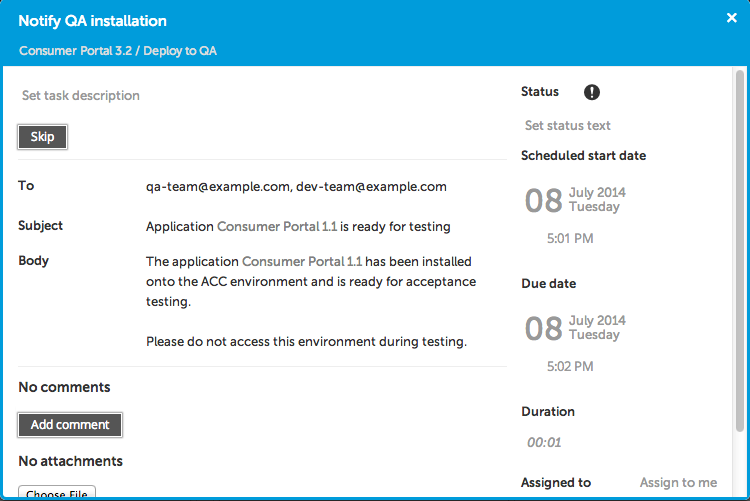
The options for the notification task are:
- To: A list of email addresses where the message will be sent.
- Subject: The subject of the message.
- Body: The message body, in plain text.
Click a field to edit it. You can use variables.
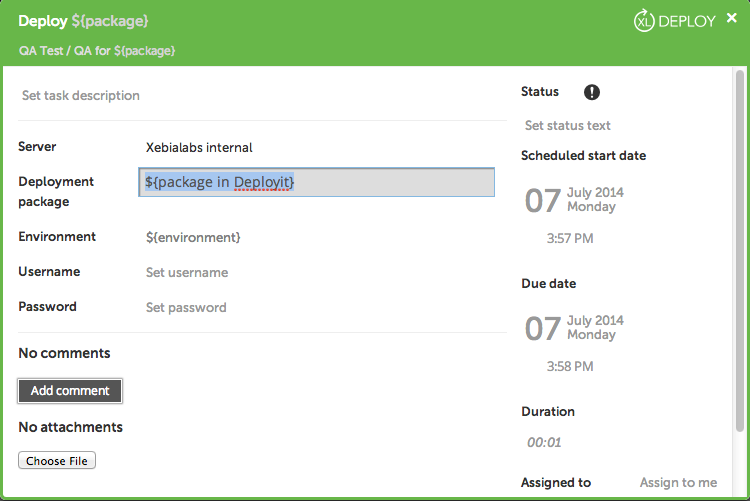
XL Deploy task
The XL Deploy task provides integration with XL Deploy, XebiaLabs' Application Release Automation solution.
It is an automated task that tells XL Deploy to deploy a certain application to an environment. Both application and environment must be configured in XL Deploy. The task gives live updates of the deployment process and completes automatically when the deployment finishes.
The options for the XL Deploy task are:
- Server: XL Deploy Server that XL Release connects to. You can configure XL Deploy servers in the Settings section under XL Deploy Servers.
- Deployment package: Version of the application to be deployed. Auto-complete is supported in this field. Start typing and XL Release will retrieve the list of applications that are present in the XL Deploy server.
- Environment: Environment to deploy to. Auto-complete is also supported in this field.
- Username: Username to use when connecting to the XL Deploy server.
- Password: Password to use when connecting to the XL Deploy server.
You can also use variables in the Deployment package and Environment fields. This allows you to reuse application version and environment across tasks in XL Release. For example, when using variables you can mention the name of the application and the environment you deploy to in a notification task.
Script task
A script task contains a Python script that is executed on the XL Release server. This is an automated task that completes automatically when the script finishes successfully.

Type or paste a Python script in the Script field of the script task details. XL Release supports Jython 2.5. Jython is the Java implementation of Python. This means that you have access to standard Python as well as the Java libraries included in Java 7.
You can access and modify release variables in your scripts using the dictionary named releaseVariables. This sample script shows how to access and modify a variable:
print(releaseVariables['xldeployPackage'])
releaseVariables['xldeployPackage'] = 'XL Release'
When the task becomes active, the script is executed in a sandboxed environment on the XL Release server. This means that the script has very restricted permissions. By default, access to the file system and network are not allowed.
To relieve these restrictions, add a script.policy file to the SERVER_INSTALLATION/conf directory. This is a standard Java Security Policy file, where you put the permissions that a script may have.
This sample script shows how to download a file from a web site and save it locally:
import httplib
url = 'www.xebialabs.com'
file = '/tmp/xebialabs.html'
xl = httplib.HTTPConnection(url)
xl.request('GET', '/')
response = xl.getresponse()
myFile = open(file, 'w')
myFile.write(response.read())
myFile.close()
print "Save %s to %s" % (url, file)
This requires the conf/script.policy file to be edited. This example allows access to the network using Python httplib and read/write access to the /tmp directory on the XL Release server:
grant {
    // Network access
    permission  java.lang.RuntimePermission "accessClassInPackage.sun.nio.ch";
    permission  java.net.SocketPermission "*", "connect, resolve";

    // File access
    permission java.io.FilePermission "/tmp/*", "read, write";
    permission java.util.PropertyPermission "line.separator", "read";
};
The XL Release server must be restarted after the conf/script.policy file is changed.
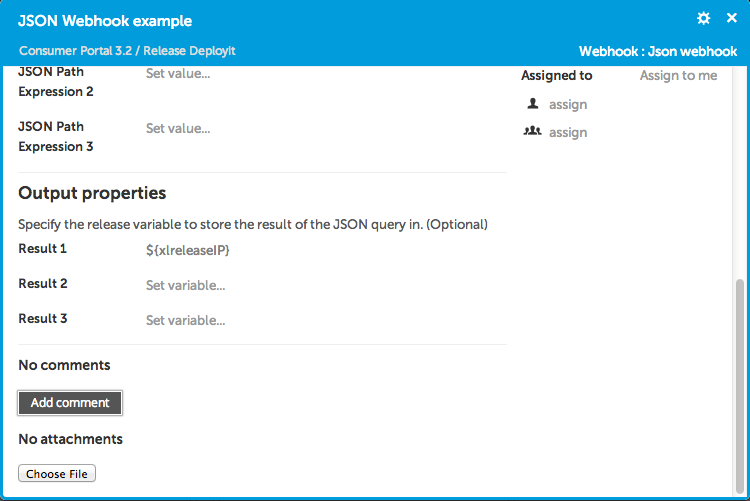
Webhook task
Automatic tasks often need to interact with an external system through a REST interface. You could use a script task to send an HTTP query and parse the response; but to make this easier, XL Release provides the webhook task.
To configure a webhook, you specify the URL to call and the details of the request (HTTP method, request body, authentication). The task will perform the query, parse the response, and optionally extract results and them it in release variables.
Webhooks are available in XML and JSON, depending on the format of the HTTP response. Each has its own way of extracting a result from the response:
This example is based on HttpBin, a free service to test REST clients. It uses the /ip endpoint, which returns the IP of the caller in a JSON response with the following structure:
{
  "origin": "xxx.xxx.xxx.xxx"
}
This is the configuration of the task in XL release:
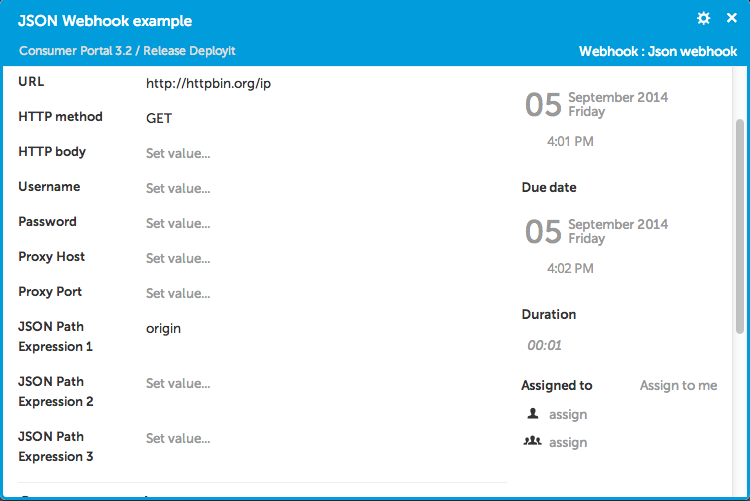
After the task is complete, the origin field is extracted from the response and stored in the ${xlreleaseIP} release variable, where it can be used by other tasks.
Jenkins task
The Jenkins task lets you configure Jenkins jobs that are triggered when a task becomes active.
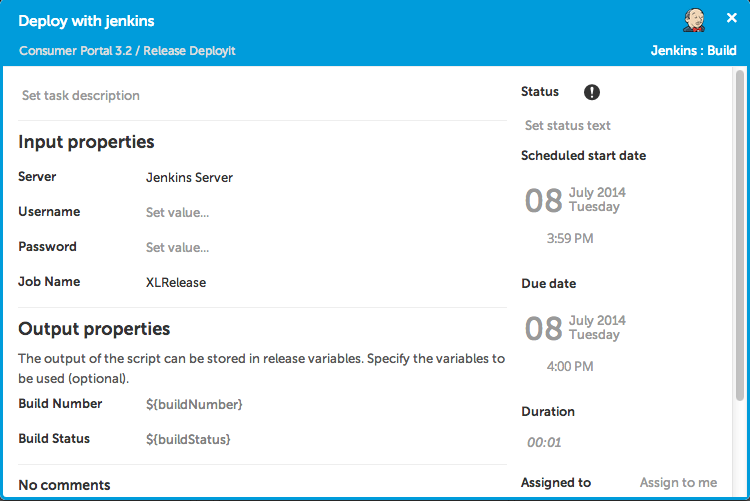
The options for the Jenkins task are:
- Server: The Jenkins Server that XL Release connects to. You can configure Jenkins servers in the Settings section under Configuration.
- Username: Username to use when connecting to the Jenkins server.
- Password: Password to use when connecting to the Jenkins server.
- Job Name: The name of the job that will be triggered. It must be configured on the Jenkins server.
The task will complete when the job completes successfully on the Jenkins server; otherwise, the task will fail. The build number and build status are stored in the ${buildNumber} and ${buildStatus} release variable.
Parallel group
Use the parallel group to model tasks that must be executed in parallel. The default flow in a phase is serial: all tasks are executed in order, one after the other.
The parallel group is a container for tasks that should be executed simultaneously. There are no specific properties to be set on the parallel group, other than the common properties such as description, due date, and so on.
In the release editor, click Add task to add a parallel group. You can then drag existing tasks into the parallel group or click Add task in the group to create a new task.
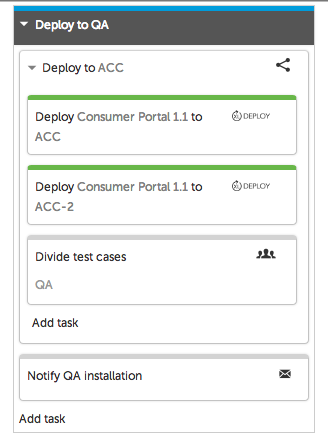
In this example, the XL Deploy tasks and the "Divide test cases" task will start simultaneously and the parallel group "Deploy to ACC" will not complete until all tasks are complete. Then will XL Release start the next task ("Notify QA installation").
Templates
Templates are like blueprints for releases. You use them to model the ideal process of a release flow.
Templates lack certain properties of actual releases, such as start and end dates. Also, you typically use placeholders like variables and teams for information about a release that you do not know in advance.
A new release is based on a template. The release is a copy of the template and has the values for the variables filled in, the start and end dates assigned, and the teams populated.
If you change a template, the running releases that were created from it are not updated with the changes. Also, if you change the content or structure of a release, the changes are not automatically propagated to the template that was used to create it.
Template overview
The template overview shows all templates that you have permission to see.
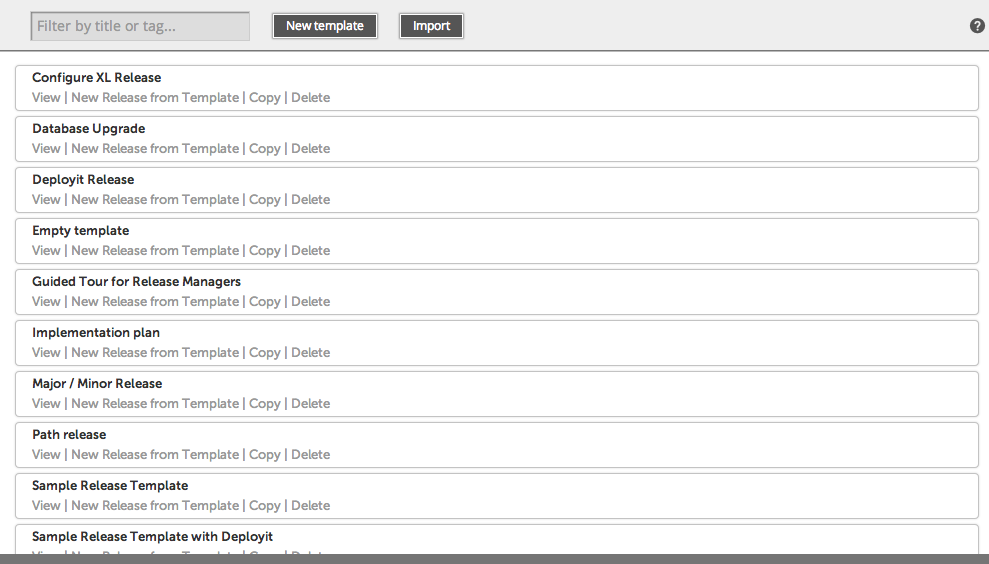
The following options are available (depending on your permissions):
- View: Open the template in the Release Flow editor. See template details for more information.
- New Release from template: Create a new release based on this template.
- Copy: Create a new template that is a copy of this one. When copying a template that contains release triggers, all the triggers on the copied template will be disabled.
- Delete: Delete this template.
Creating a template
To create a new, empty template, click New template.

Template name is the name that identifies the template in the overview.
Scheduled start date and time, Due date and time, and Duration set the planned start date, end date and duration of a template. These dates will be used to display the template in the planner. Only the scheduled start date is mandatory, if not set, the due date and the duration will be inferred.
Tick the Abort on failure checkbox if you want the release created from this template to be aborted when a task fails.
You can enter a Description to provide more information about the template. Click the text to edit it. The text editor supports Markdown syntax, so you can put styled text and hyperlinks here.
Tags can be set on the template. The tags are copied to the releases that are created from this template, to make it easier to search for them in the release overview.
Template details
Editing a template is very similar to editing an actual release. Refer to Release details for a full explanation.
However, there are some differences.
Teams in templates
When you create a template, a team called Template owners is automatically created and populated with the user who created the template. This team has the permissions that are required to edit a template and create a release.
The Release Admin team is not available for templates. It is created when a release is created from the template.
Template permissions
Templates have two sets of permissions. The first table shows permissions that apply to the template itself.

- Create release: Users can create a release from this template.
- View template: Users can see the template in the template overview.
- Edit template: Users can change the template by adding tasks and phases and changing them.
- Edit security: Users can edit teams and permissions on the template.
The second table contains permissions that are copied when creating a release. This allows you to define teams and permissions for the release beforehand. See Release Permissions for an overview of these permissions.
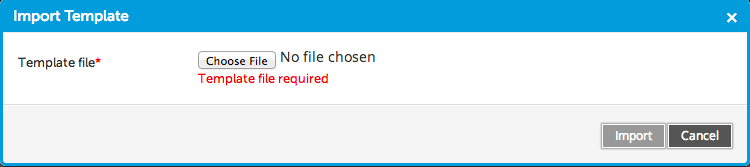
Importing a template
You can import templates from a ZIP file. Templates are exported with the Export button in the Release Flow editor for templates.
Click Import, then select a ZIP file that was previously exported from XL Release, then click Import. (if you have exported templates from a previous version of XL Release - before version 4.0.0 - you can also select a JSON file)
After the file is processed, the list of imported templates appears. If a template contains references to objects that do not exist on this server (for example, XL Deploy servers or gate dependencies), XL Release removes the references and shows a warning message.
When importing a template that contains release triggers, all the triggers on the imported template will be disabled.
Variables
For data that may change or that is not known in advance, XL Release provides a placeholder mechanism in the form of variables. You can use variables to manage information that:
- Is not known when designing a template, such as the name of the application
- Is used in several places in the release, such as the name of the application, which you might want to use in task descriptions and email notifications
- May change during the release, such as the version number of the release that is being pushed to production
Variables are snippets of text in a text field surrounded by ${ }. For example, you can define a variable called name by typing ${name} in a text field.
You can combine normal text with one or more variables, although in the case of XL Deploy, it is recommended that you use a dedicated variable for the entire field, because this will allow auto-completion later on.
Variables are supported in:
- Titles of phases and tasks
- Descriptions of tasks, phases and releases
- Task owners
- XL Deploy fields
- Notification task fields
- Gate conditions
- Scripts
You are required to provide values for all variables when starting a release. Values are filled in the task when the task starts. You can change the values of variables during an active release, although doing so will only affect the tasks that are in a 'planned' state and have yet to be executed.
Special variables can be used to access release properties:
- ${release.title}
- ${release.status}
- ${release.owner}
- ${release.description}
- ${release.flagStatus}
- ${release.flagComment}
- ${release.tags}
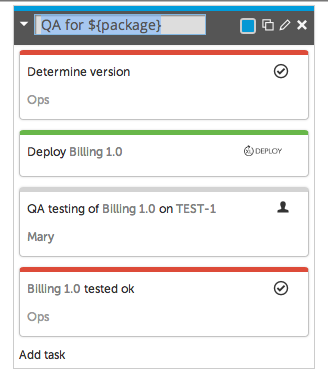
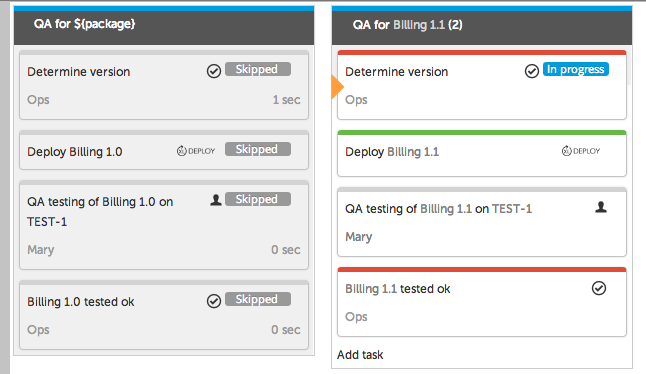
Variable usage example
This example shows a template that deploys an application to a test environment and assigns testing to QA. When testing succeeds, XL Release sends an email notification. If testing fails, we try again with the next version of the application.
This is the template:
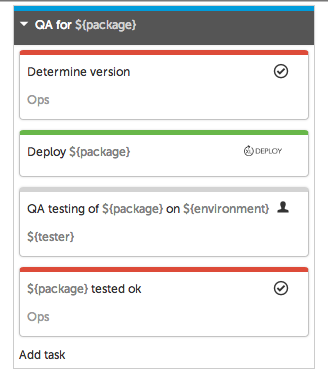
The variable ${package} is used in the phase title and in the titles of various tasks. This variable is also used to instruct XL Deploy to deploy this package:
Click New Release to create a release from the template. XL Release scans the template for variables and asks the user to provide values for all of them.
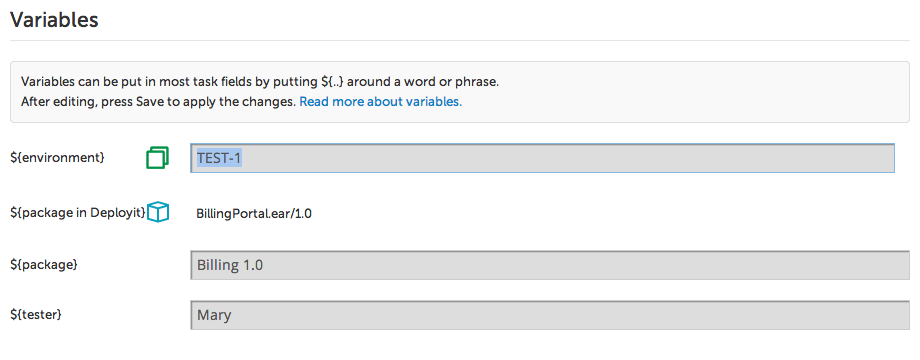
XL Deploy variables are marked with special icons, and auto-completion is available for those variables. XL Release queries the XL Deploy server for the packages and environments that are available and display them in a drop-down menu.
After the release is created, the release flow appears with the values of the variables filled in.
Note that you can still change variables by editing the fields on the Release properties page.
Now suppose that QA testing for BillingApp 1.0 failed and we need to repeat the procedure for the next version delivered by the Development team.
Click Restart Phase to restart the QA phase. Before the release flow resumes, you can change the variables:
When the release resumes, the phase is duplicated with the new variable values in place (the old phase still has the old values).
Release life cycle
A release can go through various stages. First a blueprint of a release is defined as a template. From the template, a planned release is created. The release is a copy of the template, but it has not started yet. When it is started, the release becomes active and the phases and the tasks are executed. When all is done, the release is completed. See the life cycle diagram for a detailed overview of the states that a release can have.
Templates
A template is a blueprint for similar releases. A template can describe a procedure that is used to deliver different applications, or it can describe a procedure that is used to release a particular application and that will be reused for different versions of it.
In a template, you do not know all details in advance, such as the application name and version, the deployment environment, and so on. Therefore, templates typically use placeholders like variables and teams. For example, in a template you can define teams but leave them empty, to be filled in after a release that is based on the template starts.
Creating and starting a release
When you create a release from a template, it is first in a 'planned' state. This is an important state, because before the release starts and people are notified by email that tasks are assigned to them, the release owner must do some configuration:
- Variables: When starting a release, the Create Release page will ask the release owner to assign values to all variables.
- Teams: In a planned release, the release owner should populate the teams or revise the members of each team.
- Start dates and due dates: The release owner can optionally set scheduled start dates and due dates on crucial tasks or on all tasks.
- Dependencies: The release owner should revise dependencies on other releases. Dependencies can only be set on active releases, so they should not be specified in the template.
Triggers
Tiggers offer you an automated way to create and run a release. A Trigger it's a kind of XL Release plugin executed periodically and able to create and run a release from a template. Go to the XL Release documentation home to see available trigger plugins.
The triggers page is accessible by clicking on Triggers from the Show menu of your template, and you will be on the triggers configuration page. This page is divided in two parts. The first one named Settings is used to configure some trigger settings. cf. below :

The configurable triggers options are :
- Allow concurrent triggered releases : If this option is unchecked, the releases kicked off by the triggers's template will be run sequentially and not concurrently. For example, if this option is unchecked, and a trigger's template dectects many releases to kick off in a short time, XLRelease will run only one triggered release at a time.
The second part of the triggers page, will be used to list, create, and update the triggers list :

To add a trigger, select the type of trigger you want to add.
You will arrive on the creation form, where you will be able to configure the trigger, cf. below :
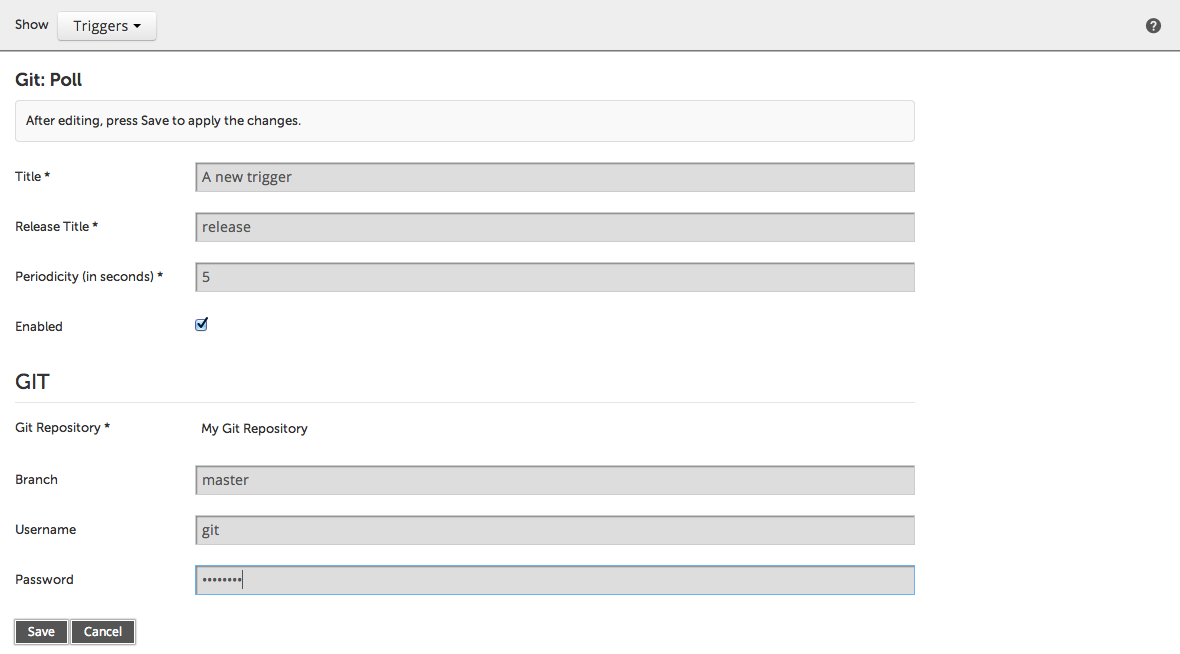
The first commons and mandatories fields are :
- Title: The name you will use to identify the trigger in the previous the list.
- Release title: The name given to releases you will create with this trigger. This field can contains variables.
- Poll type: Type of polling interval as repeatable interval in seconds (i.e. each 10 seconds) or cron expression
- Poll interval: The number of seconds between each execution of the trigger or cron expression
- Enabled: Define if the trigger is currently active or not. A disabled trigger do nothing.
Then, you will find the configuration fields to configure the plugin. At the end of the form you will find the Template Variables section, where you can define the values to be used for template variables when the trigger creates a new release. By default, all template variables with the same name as a trigger variable are automatically bound. For example, a template variable named "commitId" will have the value "${commitId}", which will be replaced by the corresponding value of the trigger variable. You can also specify static values or others variables.
To finish the creation of a trigger, click on Save and you will be redirected to the list of triggers where you will see your own.
Note : All releases created by a trigger are tagged with the id of the this trigger, you can find all releases related to a trigger by clicking on the link related releases, visible on each line of this list.
A trigger will not trigger a release during its first run, it will wait the next iteration.
Running release
In a running release, XL Release starts planned tasks in the correct order and executes them if they are automated, or sends a notification to the users who are responsible for their completion if they are not automated.
Generally, one or more tasks will be active at any given time. Users who have tasks assigned to them will find these tasks in their task overview. Users are expected to mark tasks as complete in XL Release when done.
If an active task is failed, the release is paused. The release owner must then decide whether to assign the task to another user or to skip it.
Also, the release may be stalled after a phase is restarted. In this situation, tasks are copied and may have erroneous start and due dates, or may be assigned to the wrong users. The release owner should configure the tasks correctly before carrying on.
Restarting a phase
In an active release, you can abort the current phase and restart the execution from any phase in the past. This can be required if some parts of the release procedure must be repeated. For example, QA rejects a version of the application for release and the test phase must be repeated with an updated version.
When you restart the release from a previous phase, the current phase is interrupted and all remaining tasks are skipped. The release is paused and XL Release makes a copy of all previous phases that need to be repeated. The release owner can change variable values and task details before the release flow is reinitiated.
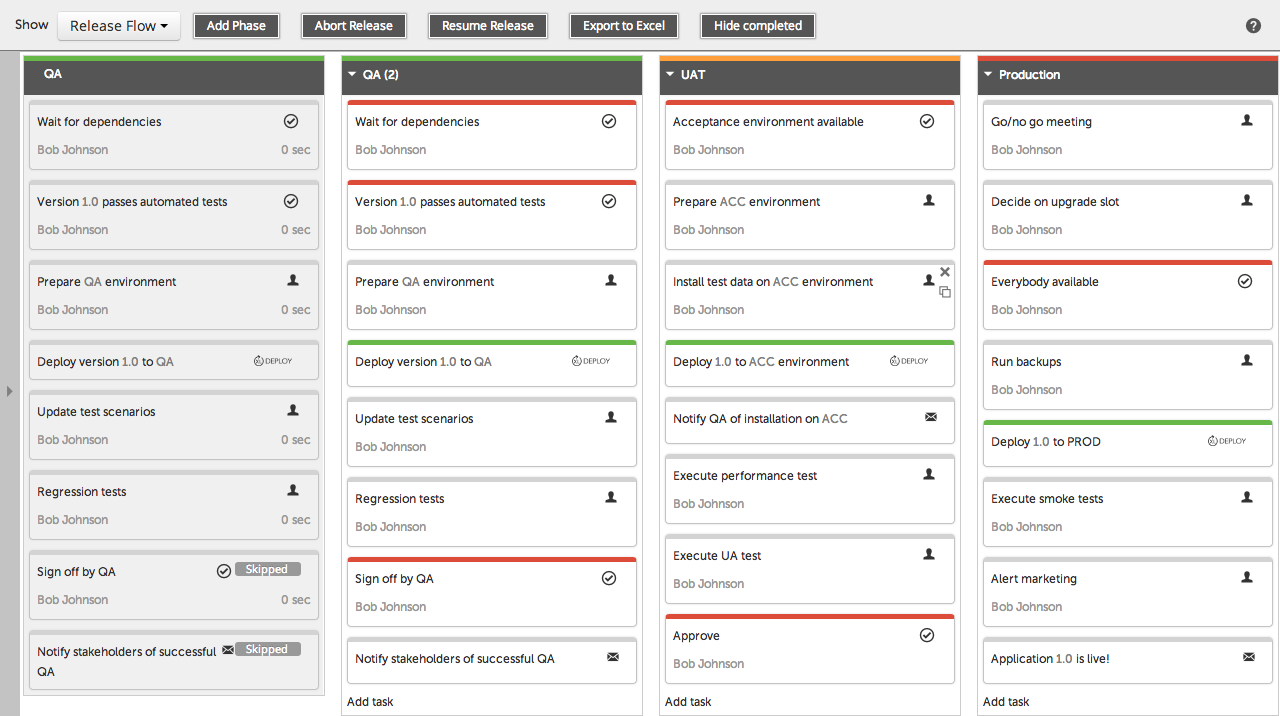
This is an example of how restarting a phase works in practice. Suppose you have a release with three phases: QA, UAT and Production.
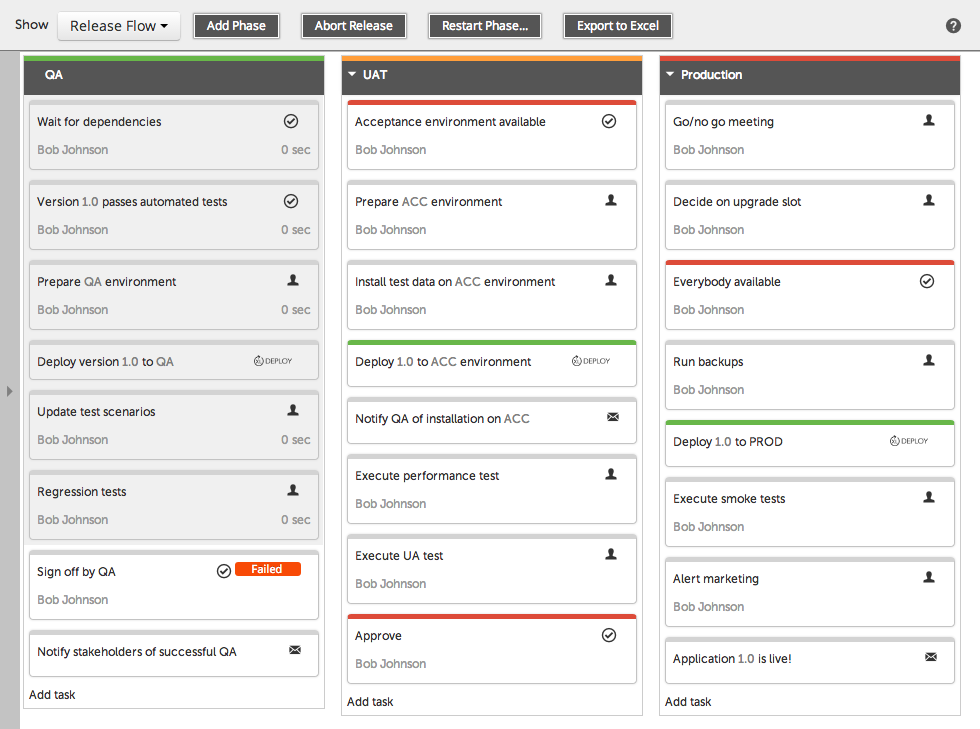
The QA phase was started with version 1.0 of the product, but bugs were found and QA cannot sign off. So the Sign off by QA task has failed. The Dev team is notified and produces a fix: version 1.0.1. You can now start the QA phase again for version 1.0.1.
Do so by clicking Restart Phase... in the top bar. XL Release then asks from which phase the release should be restarted.
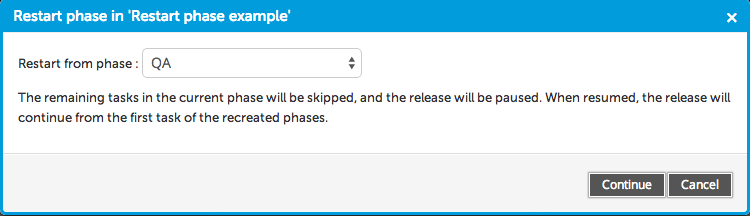
Press Continue to confirm the restart. Alternatively, click Cancel to discard the restart.
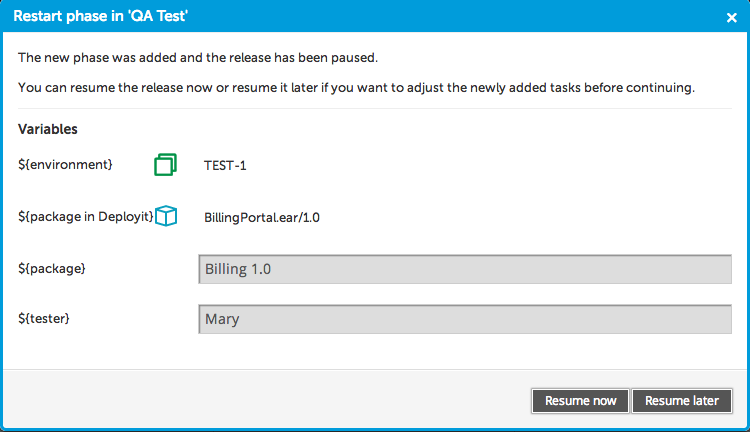
After you continue, the release is paused and the new phases are created. Before the release flow is resumed, you can make some changes. First, you confirm whether to resume now or later.
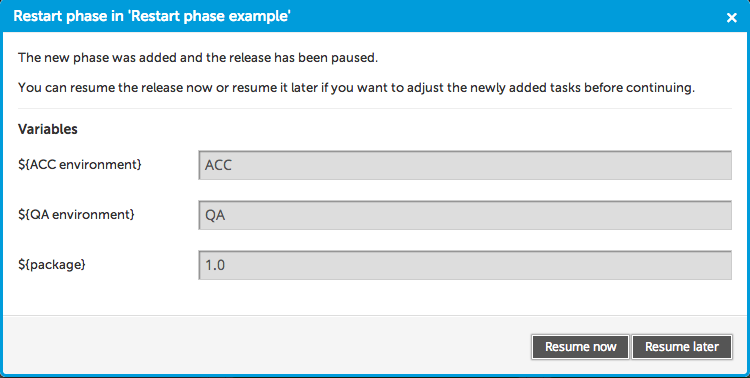
You can change the package version variable from 1.0 to 1.0.1 and click Resume now to proceed right away.
If you click Resume later, the release remains in the 'paused' state. You can change task assignees, due dates, and so on. You can even decide to delete tasks that are no longer relevant.
XL Release creates a phase called QA (2). You can still modify its contents. For example, suppose that the task Update test scenarios is no longer relevant; you can remove it.
To resume a paused release, click Resume Release in the top bar.
Release life cycle states
This is a detailed breakdown of the states that a release can go through.
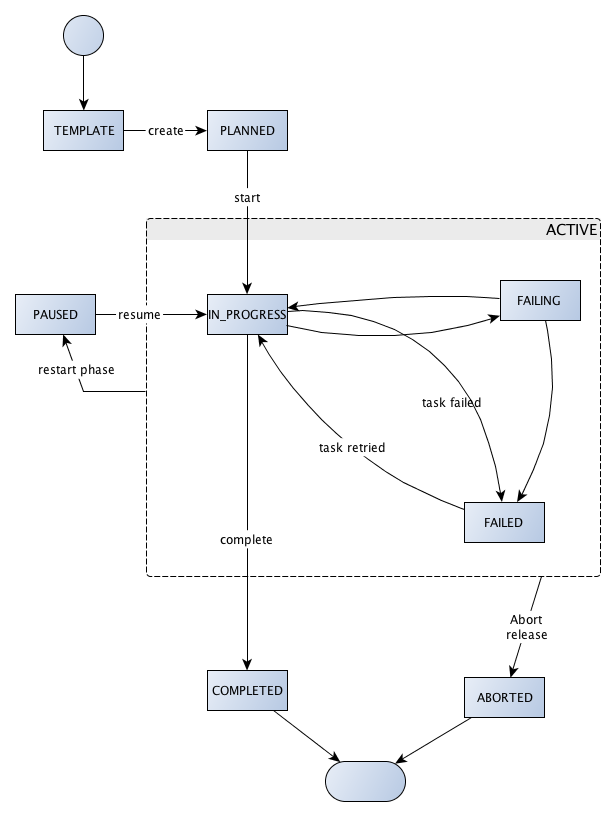
All releases are derived from a template (it can be an empty template), so the first state of a release is template.
When a release is created from a template, a copy is made from the template and the release is planned.
When the release starts, it enters the in progress state. Phases and tasks are started and notifications are sent to task owners to pick up their tasks.
The state of an active release is reflected in the state of the current task. In the case of multiple tasks running in a parallel group, the state of the topmost parallel group is used.
- In progress: The current task is in progress.
- Failed: The current task has failed. The release is halted until the task is retried.
- Failing: Some tasks in a parallel group have failed, but other tasks are still in progress.
You can restart a phase when the release is any active state ('in progress', 'failed', or 'failing'). After a phase is restarted, the release is in 'paused' state. This is a state in which no tasks are active. It is similar to the 'planned' state, and allows the release owner to change due dates and other task variables before the release is resumed.
There are two end states: completed and aborted. When the last task in a release finishes, the release enters the 'completed' state. A release can be manually aborted at any point, at which point it will be in the 'aborted' state.
Task life cycle states
In an active release, tasks transition through different states. The following diagram shows the lifecycle of a task.
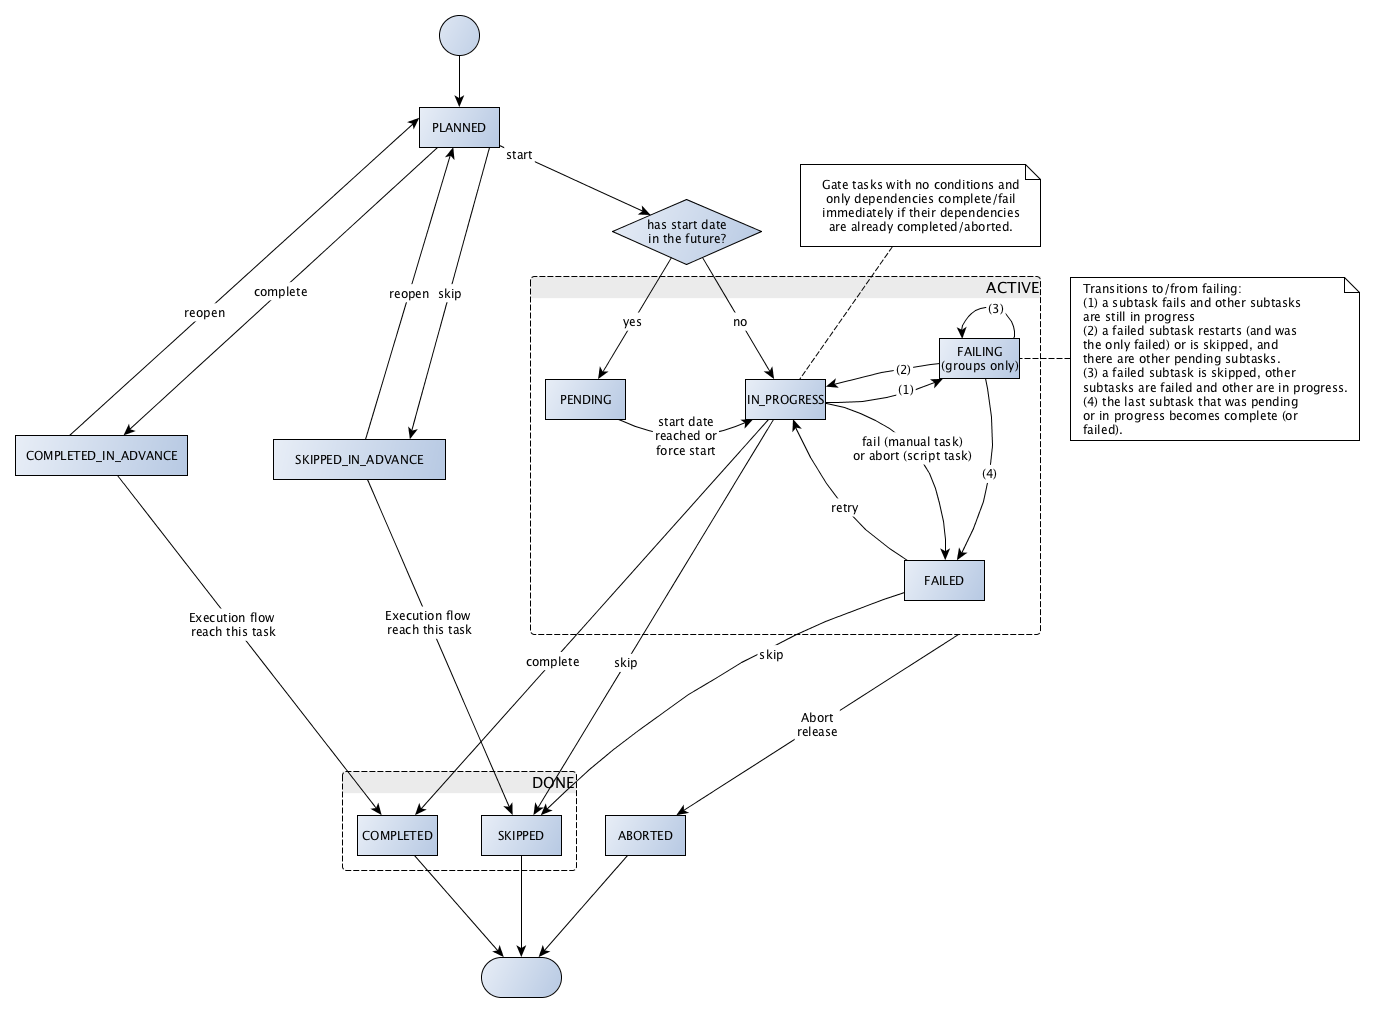
Normal flow
Tasks start in planned state. This means that they are not active yet. All properties can still be edited.
When the release flow reaches a task and it becomes active, there is a choice. If a scheduled start date is set and this date has not passed yet, the task is pending. Otherwise, the next state is in progress. At this point, notifications are sent to the task owner, and the user can trigger the next transition by clicking Complete, Skip, or Fail in the UI.
Normally, when a user completes a task or an automated task is performed without errors, the task enters the completed state. This is an end state that means that the task has completed successfully. The release flow continues with the next task in the flow.
A user may also skip a task that was in progress or failed. In that case, the task goes into the skipped state. The 'skipped' state is functionally equivalent to completed. The only difference is that it implies that no work was done on the task.
Tasks may also be completed or skipped in advance; that is, before the execution flow has reached the task. In that case, the task appears as completed (or skipped) in the release flow editor. Before the release flow has reached this task, it is still possible to reopen the task, moving it back in the 'planned' state. When the release flow reaches a task that was completed or skipped in advance, the state is made definite and the task cannot be reopened.
Fail and abort
If a user fails a task or an automated task encounters an error, the task goes into the failed state. This triggers a notification to the release owner. The task can then be either restarted ('in progress' state) or skipped if no more work will be done ('skipped' state).
Failing state
There is also a failing state. This state only applies to a parallel group task that contains subtasks. It indicates that one of the subtasks is in a failed state, but that other tasks are still running.
Transitions to and from the 'failing' state are:
- In progress -> failing: A subtask fails and other subtasks are still in progress.
- Failing -> in progress: A failed subtask restarts (and was the only failed) or is skipped, and there are other subtasks still pending or in progress.
- Failing -> failing: A failed subtask is skipped, but of the remaining subtasks, some are failed and some are pending or in progress.
- Failing -> failed: There are failed subtasks, and the last subtask that was still pending or in progress completes or fails.
Completion of gate tasks
Gate tasks with no conditions and only dependencies will complete immediately when their dependencies are complete. If all dependencies are complete but at least one of the dependencies is an aborted release, the gate goes into a 'failed' state. If any conditions are set, the owner of the task must complete the gate task manually.
Notifications
XL Release sends emails when certain events happen in a release. The emails are:
Task assignment: An active task has been assigned to somebody else. The new assignee receives a message telling them they are responsible for completion of this task.
Task failed: When a task fails, the release owner is notified so they can take action. A manual task fails when its owner indicates that he or she cannot proceed and clicks Fail. Automated tasks may fail when they cannot be executed correctly. The release owner must then resolve the issue.
Task started: XL Release started a task which is now in progress. XL Release sends a notification to the task owner.
- If the task does not have an assignee but it has been assigned to a team, all team members receive a message.
- If there is no owner or team assigned, the release owner receives a warning message that a task is in progress but no one is responsible for it. In the case of automated tasks, messages are sent to individual owners or team owners so they can track automated procedures they are responsible for. However, a warning message for unassigned tasks is not sent to release owners.
Comment added: When a user adds a comment to a task, a message is sent to the task owner and all team members of the team assigned to the task.
Release flagged: The release owner is notified when a user adds a flag status message to a task or the release to indicate that attention is needed or that the release is at risk.
See SMTP server for information about configuring the email server and sender for these messages.
Pipeline
The Pipeline view shows an overview of all active releases, the phases they are in, and which task is currently active.
A flag appears next to the release title if a status message is set to indicate that the release is at risk.
All phases appear in a linear fashion. Completed phases have a gray tick mark inside them. An active phase shows the currently active task. Gate tasks are red, all other tasks are light blue. If a phase starts or ends with a gate that has not passed yet, it appears in the pipeline view with the gate icon ![]() .
.
Calendar
The Calendar shows an overview of all releases on a month-by-month basis.
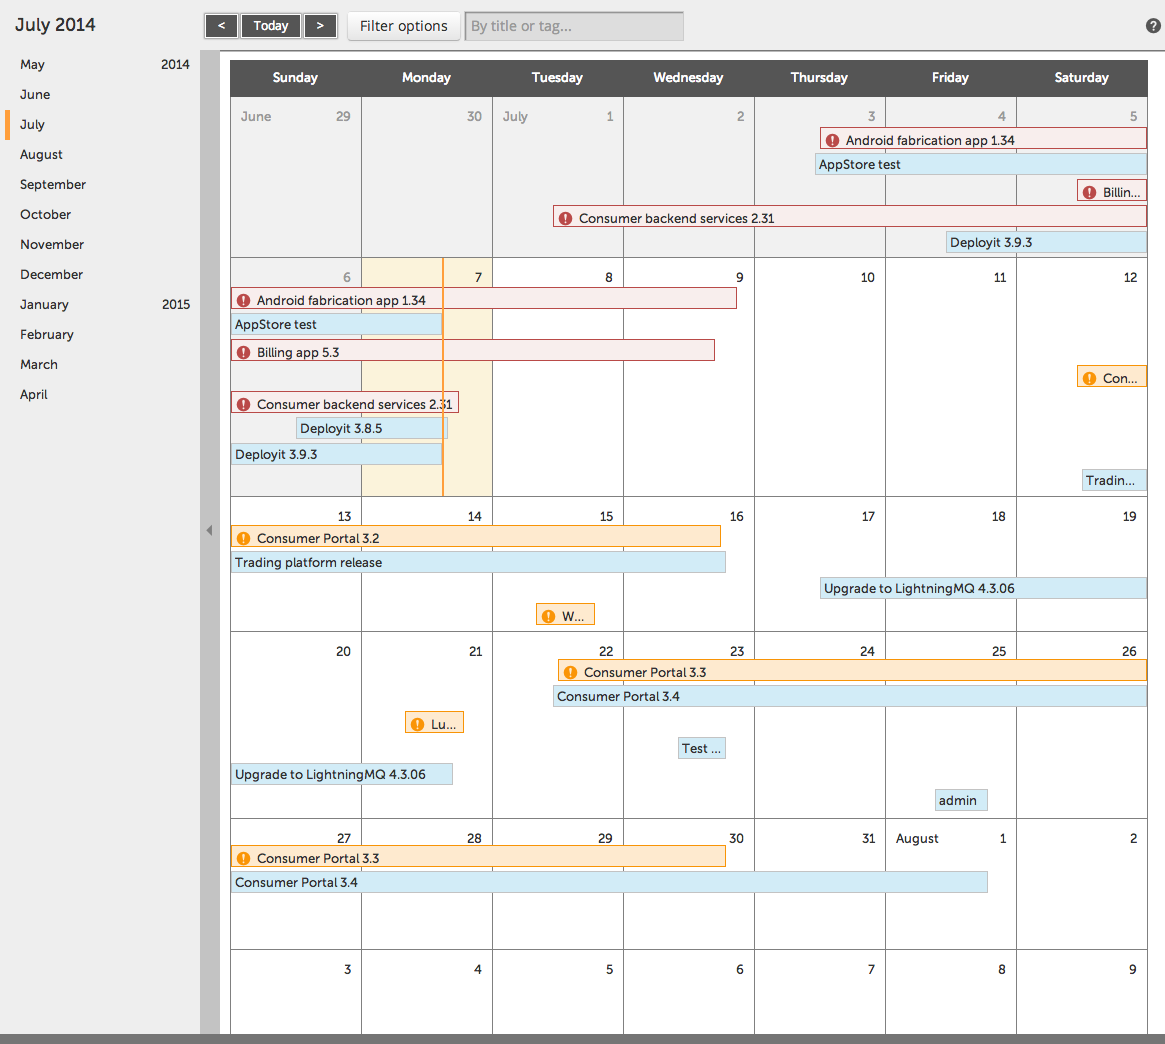
The navigation bar offers a convenient way to browse months. By default, it is hidden, you can open it by clicking the gray vertical bar with triangle on the left side of the calendar.
To see the current month, click Today in the top bar.
The Filter options give you control over which releases are shown on the calendar.
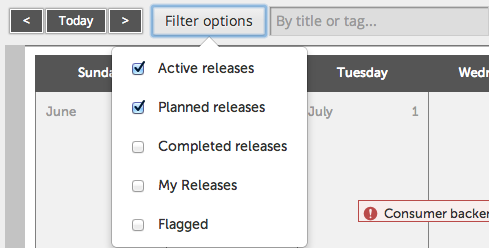
- Active releases: Show releases that are currently in progress.
- Planned releases: Show planned releases that have not started yet.
- Completed releases: Show releases that have completed or that were aborted.
- My releases: Show releases that you own.
- Only flagged: Show releases that are flagged with a status message to indicate that they need attention or are at risk.
You can also filter by release title or tag by using the text box. This will work in addition to the filters already selected.
Releases appear as light blue bars on the calendar. The rules governing the release start and end dates are the same as in the release summary.
Warning icons may appear on the releases to indicate that some attention is needed. A flag appears when a status message is set on the task.
A red icon with exclamation mark appears when there is a dependency conflict, which occurs when a gate task in a release has a dependency on another release, but this release will end later than the start date of the current release. This helps you identify "schedule shift" when one ore more releases require the completion of other releases.
To see more information about a release, click it. A small window with information appears.
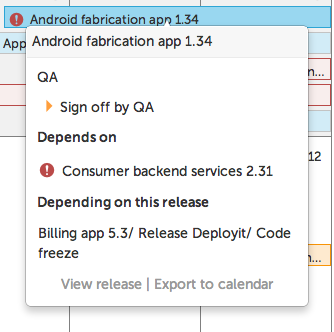
It contains:
- The release title
- The currently active phases and tasks
- A summary of the dependencies on other releases:
- Depends on: Releases that must be complete before a gate task in this release can complete
- Depending on this release: Releases that are waiting on this release
Tip: Hover over a dependent release to see it highlighted in the calendar.
Reports
The reports screen shows graphs and statistics based on the historical release data present in the XL Release repository. It is accessible to users with the view reports permission.
At the top of the page you can select the time period you are interested in: last 30 days, last 3 months, last 6 months, or range. In the range selection, you can also filter on dates using the From and To date selectors. The choice is reflected on all graphs and tables on the page.
Dashboard
The Releases at risk section shows the active releases that have been flagged. Click a release to open its summary.

The Release efficiency section breaks down the task count and total duration between manual and automated tasks. It provides an overview of your overall level of automation during the selected time period.
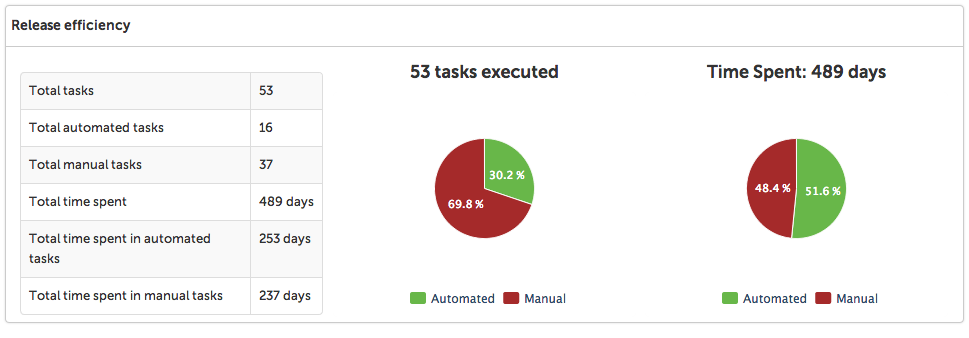
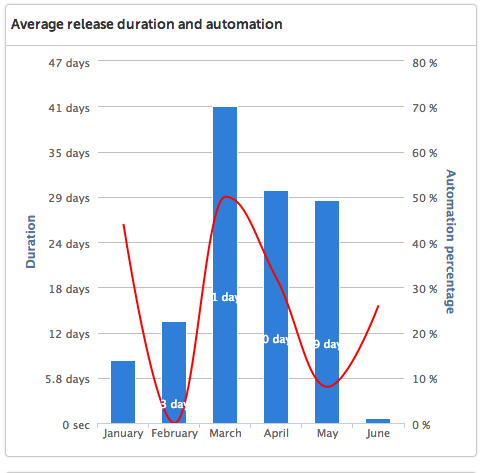
The Average release duration and automation chart also shows the percentage of automation, but aggregated per month. Use it to assess whether automation improves over time.
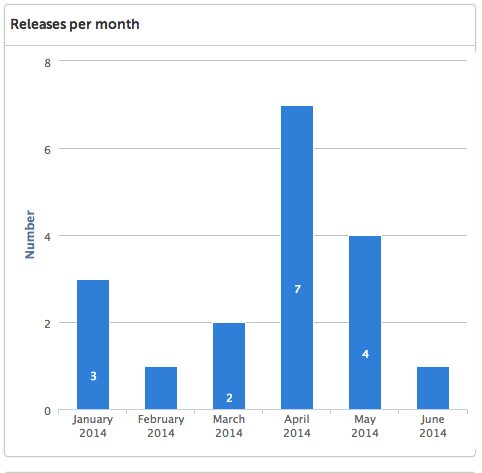
The Releases per month bar chart shows how many releases were finished in a particular month.
Top 10 longest releases shows which release took most time to be completed. For an overview of which parts of the release took most time, there is the Top 10 longest phases table. The release names in these tables are hyperlinks to the releases' flow editor.

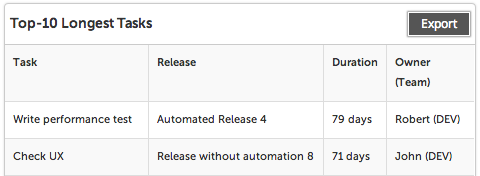
Top 10 longest tasks is an overview of which tasks took most time to be completed and who was responsible for each task.
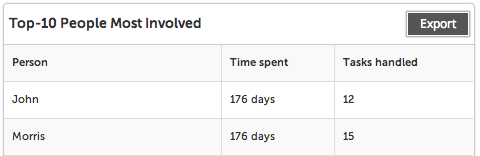
The table Top 10 people most involved shows which users have spent the most time and handled the most tasks in the selected period.
Release automation
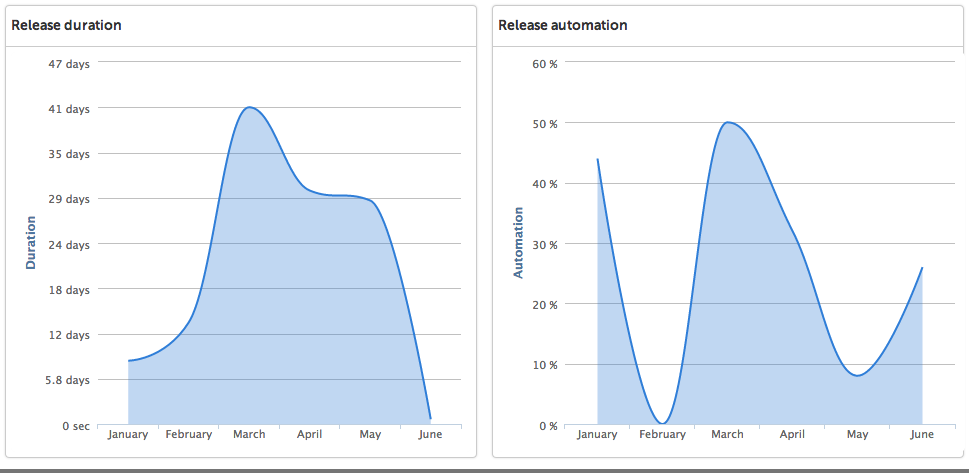
Release duration shows the average release duration by month.
Release automation shows the percentage of automated releases (that is, those that contain at least one automated task) by month.
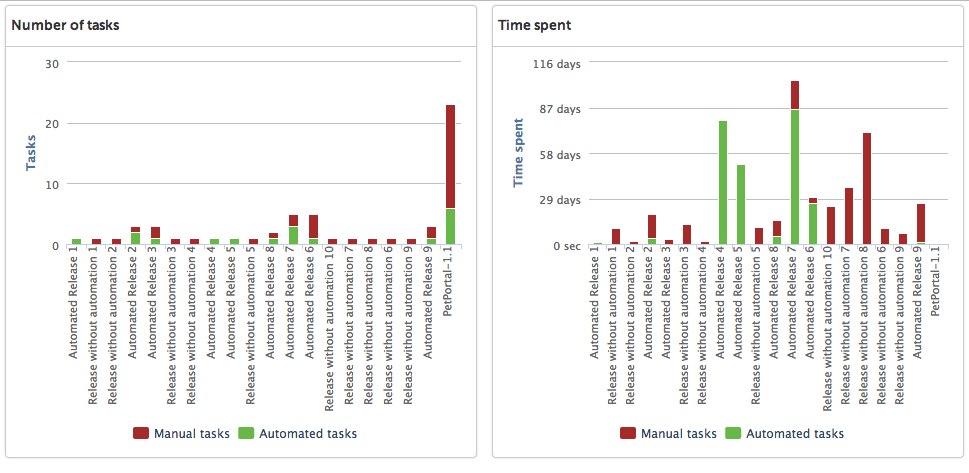
The Number of tasks chart shows the last 20 releases, with number of tasks, split between automated tasks and manual tasks. It shows whether your releases are becoming more or less automated.
The Time spent chart shows the last 20 releases, with task duration split between automated tasks and manual tasks. It shows you where you are spending time in the release.
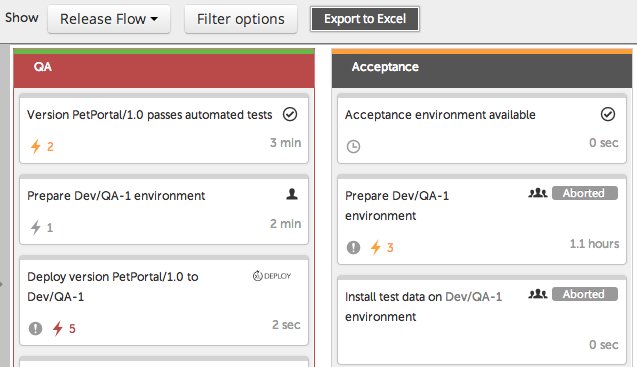
Release value stream
This report focuses on the quality of completed releases.
For each phase, an indicator is built based on these metrics:
- Flag count: Incremented each time a task is flagged
- Failure count: Incremented each time a task fails
- Delayed count: The number of tasks that completed after their due date
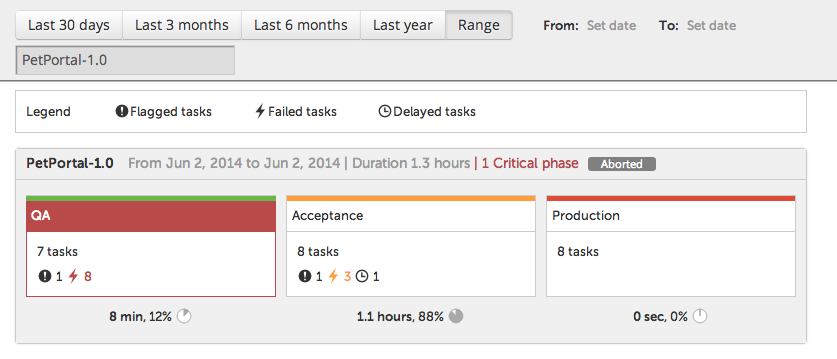
A phase is considered "critical" when the sum of these three counts is strictly greater than 6 (this value can be customized in the Reports Settings screen). The phase is colored in red and the number of critical phases is displayed in the release header. Each phase also displays its total number of tasks and the value of each criticality metric (if non-zero). At the bottom of the release, the time proportion of each phase is shown, both as a duration and as a percentage of the total release time.
Clicking on a release opens its flow editor, which is slightly different for completed releases.
Instead of the assignee, each task shows its individual values for the criticality metrics (if non-zero). The failure count is color-coded: yellow if there were at least two failures, and red if there were at least four (these values can be customized in the Reports Settings screen).
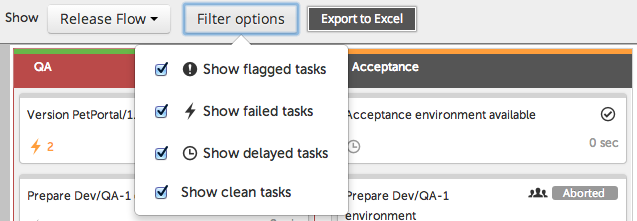
Tasks can be filtered by criticality metric (with the fourth option "clean tasks" referring to tasks that have all metrics to zero):
Settings
The Settings section contains personal preferences and global configuration options for XL Release.
Profile
The Profile page allows you to set your name, your email address, and your password.
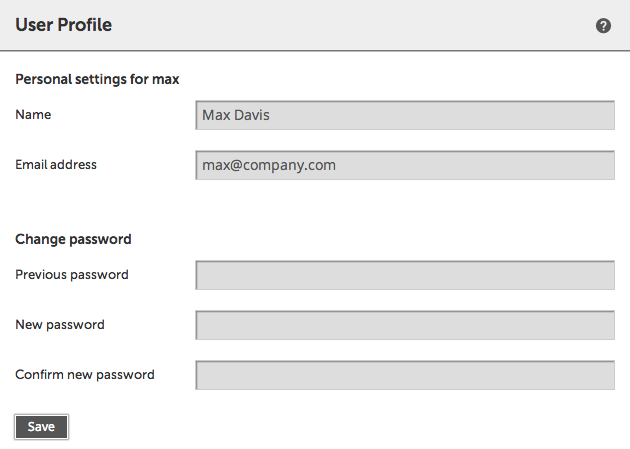
The email address is required to send notifications, such as when a task that is assigned to you starts.
When the XL Release server is configured to use your company's LDAP directory, it will attempt to automatically find your name and your email address. You can change the name and address that the server has found.
External users cannot change their passwords from XL Release.
Users
The Users page allows you to view and edit XL Release Users. This page is only available to users with 'admin' and 'edit security' permissions.
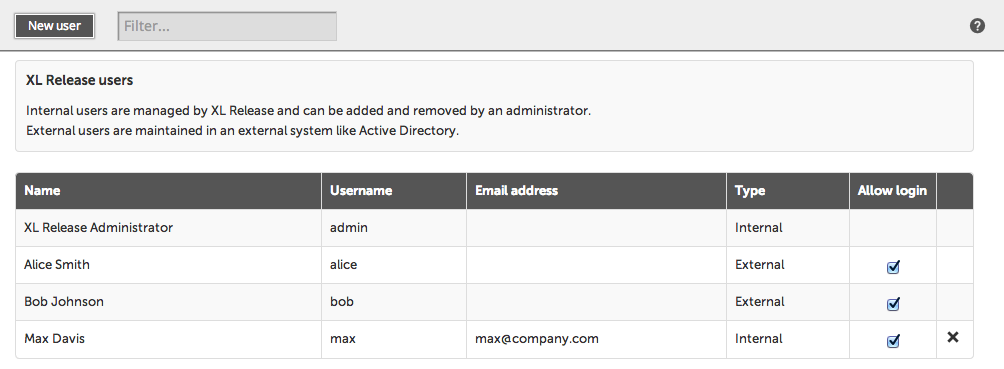
There are two kind of users in XL Release:
- Internal users are managed by XL Release and can be added and removed by an administrator.
- External users are maintained in an external system such as Active Directory. See Configuring LDAP security in the System Administration manual for more information.
To create an internal user, click New user. This dialog appears:
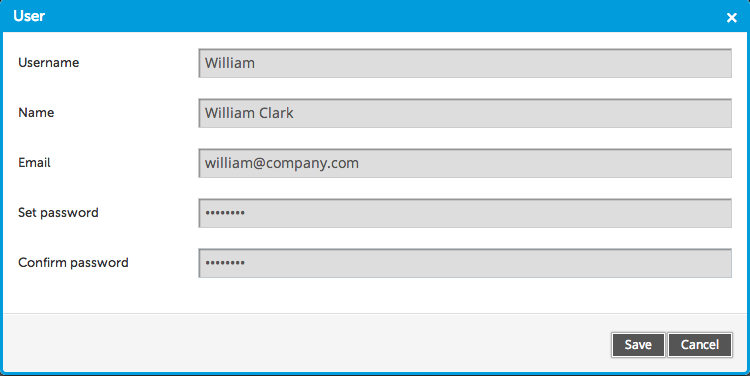
Enter the required details to create the user. Note that Username is the name that is needed to log in, and Name is the full name of the user, which is displayed in overviews and tasks.
On the overview, administrators can change the password or email address of an internal user by clicking on the user. You cannot change the password of an external user from XL Release because it is maintained in LDAP.
You can also grant or revoke the login permission to a specific user by ticking or unticking the checkbox.
Roles
The Roles and Permissions screens allow you to set global permissions; that is, security settings that apply across the entire system. These pages are only available to users with 'admin' and 'edit security' permissions.
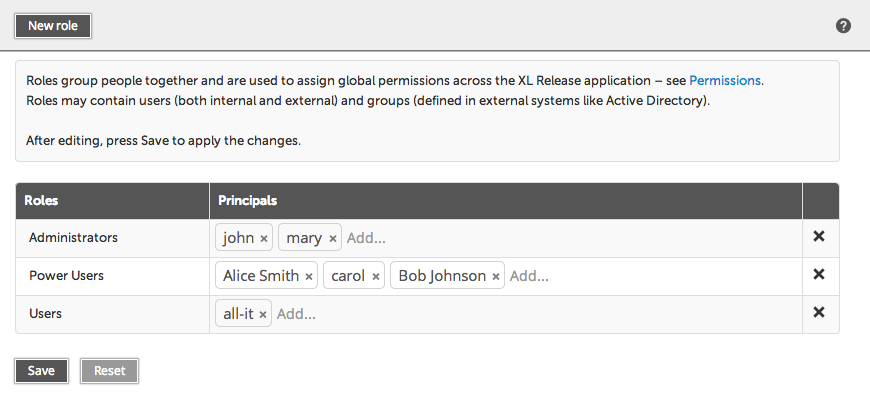
A role is a group of log-in names or LDAP groups. Principal is the technical term for an entity that is either a user or a group. You can assign permissions to roles in the Permissions screen.
To add a new role, click New Role. To delete a role, click the cross to its right. To change the name of a role, click it.
The role is defined by the principals that it contains. This is a comma-separated list of user IDs or groups from the LDAP repository. For example, in the screen shot above, 'john' and 'mary' are Administrators, and all users in the 'all-it' group are Users in XL Release.
The naming of the roles is not restricted. You can give a role any name you want, and there are no predefined role names.
Click Save to apply your changes. Click Reset to discard your changes and reload the current settings from the server.
Global permissions
On the Permissions screen under Settings, you can assign permissions to roles.
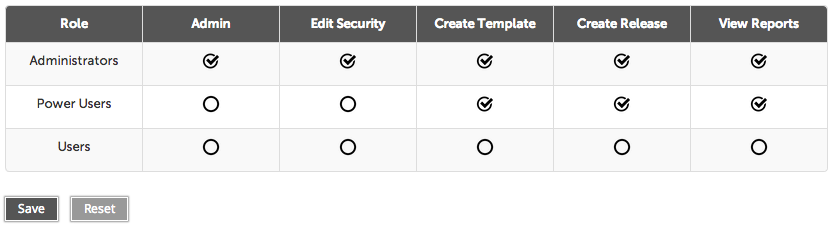
For each role, there is a list of permissions that can be enabled or disabled:
- Admin: Has all permissions in XL Release.
- Login: Required to log in to XL Release.
- Edit security: Gives access to the Roles and Permissions screens and allows global permission to edit security on releases and templates.
- Create Template: Permission to create a new template
- Create Release: Permission to create a release from any template. See also the Create release permission on a single release.
- View Reports: Permission to view reports.
Click Save to apply your changes. Click Reset to discard your changes and reload the current settings from the server.
In addition to global permissions, security can be enforced on the release level. On releases and templates, other permissions apply and are granted to teams that are defined within the release. See Release Permissions and Template Permissions for an overview of these permissions.
Task access
On the Task access, screen under Settings, you can restrict task types access to certain roles.
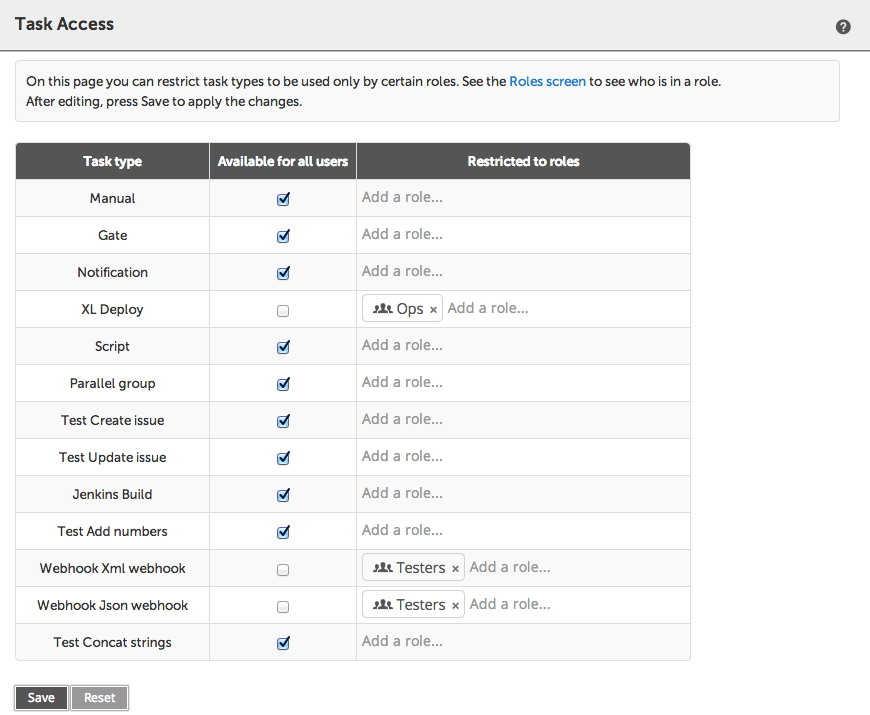
For each Task type, you can set it to be either:
- Available for all users: all users can create or edit tasks based on this type.
- Or Restricted to roles: only the given roles have access to tasks based on this type.
If you uncheck Available for all users and don't list any roles, the task type will be disabled to all except users who have the Admin permission.
Click Save to apply your changes. Click Reset to discard your changes and reload the current settings from the server.
General Settings
Use the General Settings to configure some of XL Release features. This page is only accessible to users with 'admin' permission. Click Save to apply your changes.
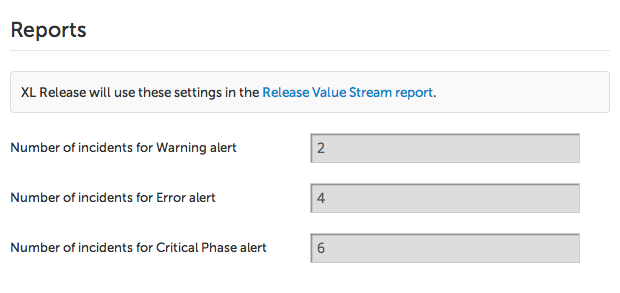
Reports
Use the Reports section to configure thresholds used in the release value stream screen.
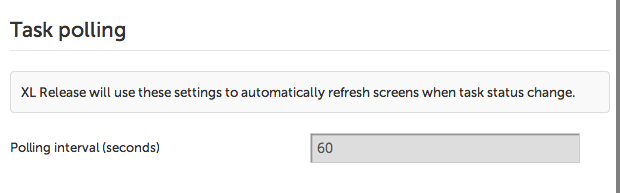
Polling
Use the Polling section to configure the polling interval to automatically refresh screens when task status change.
XL Deploy servers
Use the XL Deploy Servers page to configure connections to XebiaLabs XL Deploy servers. This page is accessible to users with 'admin' permission. It shows a list of currently known servers and allows you to configure them.

The overview shows the XL Deploy server name, as used by the XL Deploy Task, followed by the connection URL and the name of the XL Deploy user that is used to make the remote connection.
To add a server, click New server. This dialog appears:
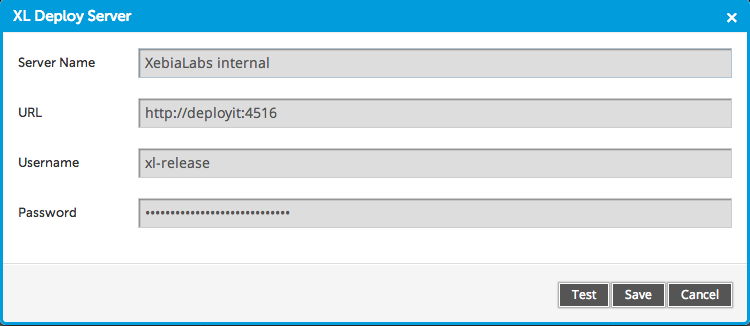
Enter a symbolic name in the Server Name box. In the XL Release application, the XL Deploy Server is referred to by this name.
The connection URL is the internet address at which the XL Deploy Server is reachable. It is the same address you use to access the XL Deploy UI.
The Username is the login ID of the user in XL Deploy that XL Release will use, followed by the Password.
XL Releases uses this user to query XL Deploy for its available applications and environments, to support code completion in the XL Deploy task and variables section.
Click Test to test if XL Release can log in to the XL Deploy server with the configured URL and credentials.
It is recommended that you configure a user in XL Deploy that has read-only rights for this. To do deployments, specify a user and password on the XL Deploy task directly. This provides fine-grained access control from XL Release to XL Deploy. If you do not specify a user on the XL Deploy task, then XL Release will use the user configured on the XL Deploy Server to perform deployments, provided that it has deployment rights on the XL Deploy Server.
SMTP server
XL Release sends notifications to users of the system by email. Use the SMTP server page to configure the email server that is used to send notifications. This page is only accessible to users with 'admin' permission.
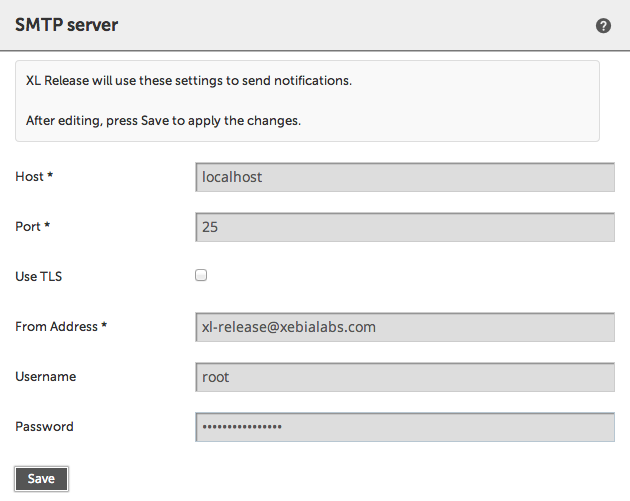
Host is used to specify the internet address of the mail server, followed by the Port it is listening on. Consult your system administrator on the values to use and whether to use TLS to secure the connection.
Most SMTP servers require authentication. Use the Username and Password fields to set the credentials of the user that will connect. The From Address is the sender address that is used in the emails. People will receive emails on behalf of this user. You must enter a valid email address, but you can add a name to by using the following syntax: Full name <name@example.com>. Note that some mail servers will ignore this setting and set the authenticated user as the sender of the emails.
Click Save to apply your changes.