Customization Manual
Introduction
This manual describes how to customize XL Deploy for use in your environment.
Out-of-the-box, XL Deploy provides deployment capabilities for several middleware platforms. However, at times XL Deploy may need to integrate with certain environments or deploy to middleware stacks that it does not currently support. Tailoring deployment plans, adding support for new middleware and integrating with other systems are all possible by customizing the XL Deploy system. This manual describes what customization options are present and how to adapt XL Deploy to fit into your environment.
Customization Overview
XL Deploy is designed with extensibility in mind and provides several different ways to modify its behavior. Depending on the extender's skill set and requirements, one or more of these methods can be used to achieve the desired result.
You can customize XL Deploy functionality in the following ways:
- Add or modify configuration items (CIs) by customizing the XL Deploy type system
- Add or modify CI behavior by customizing a plugin provided by XebiaLabs
- Customize an XL Deploy deployment plan by writing rules
- Add XL Deploy server functionality by providing server plugpoint implementations (requires Java)
- Add custom CIs and deployment functionality by writing a new plugin (requires Java)
Each of these types of customizations are described in the remainder of this document.
Understanding XL Deploy Architecture
Before you customize XL Deploy functionality, you should understand the XL Deploy architecture. XL Deploy features a modular architecture that allows you to change and extend components while maintaining a consistent system.
This diagram provides a high-level overview of the system architecture:
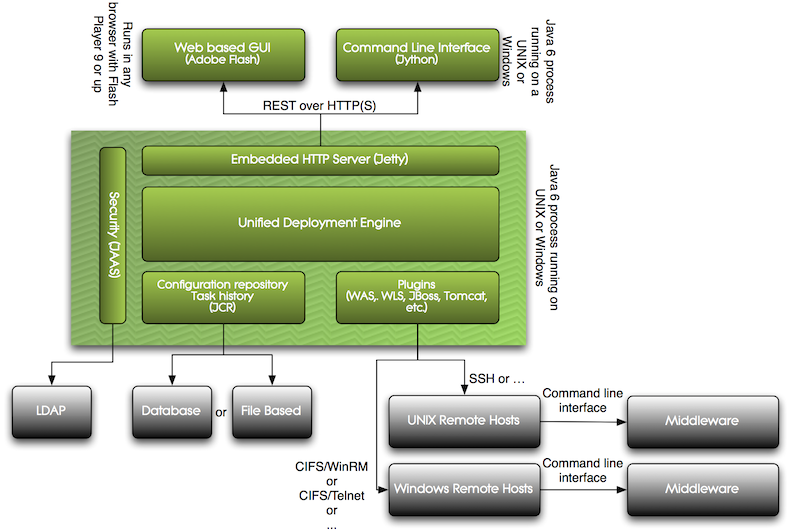
XL Deploy's central component is called the core and contains the following functionality:
- The Unified Deployment Engine which determines what is required to perform a deployment
- Storage and retrieval of deployment packages
- Executing and storing of deployment tasks
- Security
- Reporting
The XL Deploy core is accessed using a REST service. The product ships with two clients of the REST service, a graphical user interface (GUI) built in Flex that runs in browsers using Flash, and a command-line interface (CLI) that interprets Jython.
Support for various middleware platforms is provided in the form of XL Deploy plugins. These plugins add capabilities to XL Deploy and may be delivered by XebiaLabs or custom-built by users of XL Deploy.
XL Deploy and Plugins
A XL Deploy plugin is a component that provides the XL Deploy server with a way to interact with a specific piece of middleware. It allows the XL Deploy core to remain independent of the middleware it connects with. At the same time, it allows plugin writers to extend XL Deploy in a way that seamlessly integrates with the rest of XL Deploy's functionality. Existing XL Deploy plugins can be extended to customize XL Deploy for your environment. It's even possible to write a new XL Deploy plugin from scratch.
To integrate with the XL Deploy core, the plugins adhere to a well-defined interface. This interface specifies the contract between the XL Deploy plugin and the XL Deploy core, making it clear what each can expect of the other. The XL Deploy core is the active party in this collaboration and invokes the plugin whenever needed. For its part, the XL Deploy plugin replies to requests it is sent. When the XL Deploy server starts, it scans the classpath and loads each XL Deploy plugin it finds, readying it for interaction with the XL Deploy core. The XL Deploy core does not change loaded plugins or load any new plugins after it has started.
At runtime, multiple plugins will be active at the same time. It is up to the XL Deploy core to integrate the various plugins and ensure they work together to perform deployments. There is a well-defined process (described below) that invokes all plugins involved in a deployment and turns their contributions into one consistent deployment plan. The execution of the deployment plan is handled by the XL Deploy core.
Plugins can define the following items:
- Deployable - Configuration Items (CIs) that are part of a package and that can be deployed
- Container - CIs that are part of an environment and that can be deployed to
- Deployed - CIs that represent the end result of the deployment of a deployable CI to a container CI
- A recipe describing how to deploy deployable CIs to container CIs
- Validation rules to validate CIs or properties of CIs
Preparing and Performing Deployments in XL Deploy
Performing a deployment in XL Deploy consists of a number of stages that, together, ensure that the deployment package is deployed and configured on the environment. Some of these activities are performed by the XL Deploy core, while others are performed by the plugins.
This is the list of stages:
- Specification: This stage creates a deployment specification that defines which deployables (deployment package members) are to be deployed to which containers (environment members) and how they should be configured.
- Delta Analysis: Analyzes the differences between the deployment specification and the current state of the middleware resulting in a delta specification, a list of changes to the middleware state that transforms the current situation into the situation described by the deployment specification. The deltas represent operations needed on the deployed items in the deployment. There are four defined operations:
- CREATE when deploying an item for the first time
- MODIFY when upgrading an item
- DESTROY when undeploying an item
- NOOP when there is no change
- Orchestration: Splits the delta specification into independent subspecifications that can be planned and executed in isolation. Creates a deployment plan containing nested subplans.
- Planning: Adds steps to each subplan that, when executed, perform the actions needed to execute the actual deployment.
- Execution: Executes the complete deployment plan to perform the deployment.
Deployments and Plugins
The following diagram depicts the way in which a plugin is involved in a deployment:
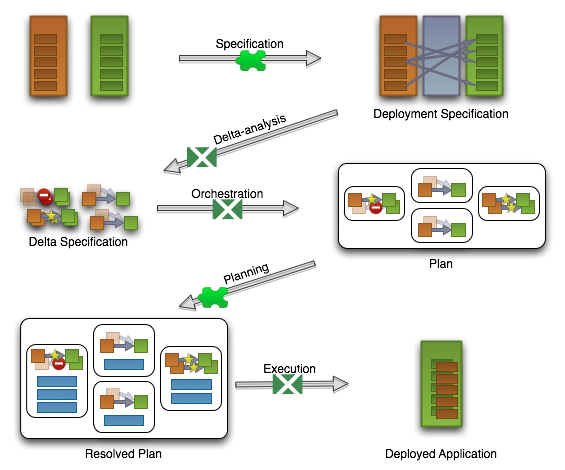
The transitions that are covered by a puzzle-piece are the ones that interact with the plugins, while the XL Deploy logo indicates that the transition is handled by the XL Deploy core.
The following sections describe how plugins are involved in the above mentioned activities. The plugin is involved in the Specification and Planning stages, these will be detailed below.
The Specification Stage
In the Specification stage, the deployment to be executed is specified. This includes selecting the deployment package and members to be deployed, as well as mapping each package member to the environment members that they should be deployed to.
Specifying CIs
The XL Deploy plugin defines which CIs the XL Deploy core can use to create deployments. When a plugin is loaded into the XL Deploy core, XL Deploy scans the plugin for CIs and adds these to its CI registry. Based on the CI information in the plugin, XL Deploy will categorize each CI as either a deployable CI (defining the what of the deployment) or a container CI (defining the where of the deployment).
Specifying Relationships
Where the deployable CI represents the passive resource or artifact, the deployed CI represents the active version of the deployable CI when it has been deployed in a container. By defining deployed CIs, the plugin indicates which combinations of deployable and container are supported.
Configuration
Each deployed CI represents a combination of a deployable CI and a container CI. It is important to note that one deployable CI can be deployed to multiple container CIs. For instance, an EAR file can be deployed to two application servers. In a deployment, this is modeled as multiple deployed CIs.
Sometimes it is desirable to configure a deployable CI differently depending on the container CI or environment it is deployed to. This can be done by configuring the properties of the deployed CI differently.
Configuring the deployed CIs is handled in the XL Deploy core. Users perform this task either via the GUI or via the CLI. An XL Deploy plugin can influence this process by providing default values for its properties.
Result
The result of the Specification stage is a deployment specification, containing deployed CIs that describe which deployable CIs are mapped to which container CIs with the needed configuration.
The Planning Stage
In the Planning stage, the deployment specification and its subplans that were created in the Orchestration stage are processed.
During this stage, the XL Deploy core performs the following procedure:
- Preprocessing
- Contributor processing
- Postprocessing
During each part of this procedure, the XL Deploy plugin is invoked so it can contribute (add) required deployment steps to the subplan.
Preprocessing
Preprocessing allows the plugin to contribute steps to the very beginning of the plan. During preprocessing, all preprocessors defined in the plugin are invoked in turn. Each preprocessor has full access to the delta specification. As such, the preprocessor can contribute steps based on the entire deployment. Examples of such steps are sending an email before starting the deployment or performing pre-flight checks on CIs in that deployment.
Deployed CI processing
Deployed CIs contain both the data and the behavior to make a deployment happen. Each of the deployed CIs that is part of the deployment can contribute steps to ensure that they are deployed or configured correctly.
Steps in a deployment plan must be specified in the correct order for the deployment to succeed. Furthermore, the order of these steps must be coordinated among an unknown number of plugins. To achieve this, XL Deploy weaves all the separate resulting steps from all the plugins together by looking at the order property (a number) they specify.
For example, suppose we have a container CI representing a WAS application server called WasServer. This CI contains the data describing a WAS server (things like host, application directory, etc.) as well as the behavior to manage it. During a deployment to this WasServer, the WasServer CI contributes steps with order 10 to stop the WasServer. Also, it would contribute steps with order 90 to restart it. In the same deployment, a deployable CI called WasEar (representing the WAS EAR file) contributes steps to install itself with order 40. The resulting plan would weave the install of the EAR file (40) in between the stop (10) and start (90) steps.
This mechanism allows steps (behavior) to be packaged together with the CIs that contribute them. Also, CIs defined by separate plugins can work together to produce a well-ordered plan.
XL Deploy uses the following default orders:
- PRE_FLIGHT (0)
- STOP_ARTIFACTS (10)
- STOP_CONTAINERS (20)
- UNDEPLOY_ARTIFACTS (30)
- DESTROY_RESOURCES (40)
- CREATE_RESOURCES (60)
- DEPLOY_ARTIFACTS (70)
- START_CONTAINERS (80)
- START_ARTIFACTS (90)
- POST_FLIGHT (100)
To review the order values of the steps in a plan, set up the deployment, open the Plan Analyzer, and then check the server log. The step order value appears at the beginning of each step in the log.
To change the order of steps in a plan, you can customize XL Deploy's behavior by:
- Creating rules that XL Deploy applies during the planning phase; see the Rules Manual for more information
- Developing a server plugin; see the XL Deploy Java API Manual and the Generic Plugin Manual for more information
Postprocessing
Postprocessing is similar to preprocessing, but allows a plugin to add one or more steps to the very end of a plan. A postprocessor could for instance add a step to send a mail once the deployment has been completed.
Result
The Planning stage results in a deployment plan that contains all steps necessary to perform the deployment. The deployment plan is ready to be executed.
Customizing the XL Deploy Type System
Today's middleware products are complicated and support lots of configuration options. XL Deploy plugins represent this middleware to the XL Deploy system. If a plugin wants to be a direct representation of the options in the middleware, it will quickly grow very large and unwieldy. XL Deploy provides a better way.
Customizing XL Deploy is possible by providing new state (modifying existing CIs or defining new CIs) and by providing new behavior (by modifying existing scripts or adding new scripts). This section describes how to modify XL Deploy state. To learn how to add new behavior to the product, take a look at the manual for the plugin to be modified or the Generic Model Plugin Manual to define a new plugin.
Synthetic Properties
XL Deploy's type system allows an extender to customize any CI by changing its definition. Properties can be added, hidden or changed. These new properties are called synthetic properties since they are not defined in a Java class. The properties and changes are defined in an XML file called synthetic.xml which is added to the XL Deploy classpath. Changes to the types are loaded when the XL Deploy server starts and can be used to perform deployments.
Modifying Existing CIs
Types existing in XL Deploy can be modified to contain additional synthetic properties. These properties become a part of the CI type and can be specified in the deployment package and shown in the XL Deploy GUI.
There are several reasons to modify a CI:
- A CI property is always given the same value in your environment. Using synthetic properties, the property can be given a default value and hidden from the user in the GUI.
- There are additional properties of an existing CI that you want to specify. For example, suppose there is a CI representing a deployed datasource for a specific middleware platform. The middleware platform allows the user to specify a connection pool size and connection timeout and XL Deploy supports the connection pool size out of the box. In this case, modifying the CI to add a synthetic property allows the user to specify the connection timeout.
Note: to use the newly defined property in a deployment, XL Deploy's behavior must be modified. To learn how to add new behavior to the product, take a look at the manual for the plugin to be modified or the Generic Model Plugin Manual to define a new plugin.
The following information can be specified when modifying a CI:
| Property | Required | Meaning |
|---|---|---|
| type | Yes | Specifies the CI type to modify |
Additionally, any property that is modified is listed as a nested property element. For each property, the following information can be specified:
| Property | Required | Meaning |
|---|---|---|
| name | Yes | The name of the property to modify |
| kind | No | The type of the property to modify. Possible values are: enum, boolean, integer, string, ci, set_of_ci, set_of_string, map_string_string, list_of_ci, list_of_string, date (internal use only) |
| description | No | Describes the property |
| category | No | Categorizes the property. Each category is shown in a separate tab in the XL Deploy GUI |
| label | No | Sets the property's label. If set, the label is shown in the XL Deploy GUI instead of the name |
| required | No | Indicates whether the property is required or not. Note that you cannot modify the required attribute of existing CIs. |
| size | No | Only relevant for properties of kind string. Specifies the property size. Possible values are: default, small, medium, large. Large text fields will be shown as a textarea in the XL Deploy GUI |
| default | No | Specifies the default value of the property |
| enum-class | No | Only relevant for properties of kind enum. The enumeration class that contains the possible values for this property |
| referenced-type | No | Only relevant for properties of kind ci, set_of_ci, or list_of_ci. The type of the referenced CI. |
| as-containment | No | Only relevant for properties of kind ci, set_of_ci, or list_of_ci. Indicates whether the property is modeled as containment in the repository. If true, the referenced CI or CIs are stored under the parent CI |
| hidden | No | Indicates whether the property is hidden. Hidden properties do not appear in the XL Deploy GUI. Note that a hidden property must have a default value |
| transient | No | Indicates whether the property is persisted in the repository or not |
| inspectionProperty | No | Indicates that this property is used for inspection (discovery). |
Note: For security reasons, the password property of a CI cannot be modified.
Here are some examples of modifying a CI.
Hiding a CI Property
The following XML snippet hides the connectionTimeoutMillis property for Hosts from the UI and gives it a default value:
<type-modification type="base.Host">
    <property name="connectionTimeoutMillis" kind="integer" default="1200000" hidden="true" />
</type-modification>
Extending a CI
For example, you could add a notes field to a CI to record notes:
<type-modification type="overthere.Host">
    <property name="notes" kind="string"/>
</type-modification>
Defining new CIs
It is also possible to define new CIs using this mechanism. By specifying a new type, its base (either a concrete Java class or another synthetic type) and namespace, a new type will become available in XL Deploy. This means the CI type can be a part of deployment packages and created in the Repository browser. Each of the three categories of CIs (deployables, deployeds and containers) can be defined this way.
The following information can be specified when defining a new type:
| Property | Required | Meaning |
|---|---|---|
| type | Yes | The CI type name |
| extends | Yes | The parent CI type that this CI type inherits from |
| description | No | Describes the new CI |
| virtual | No | Indicates whether the CI is virtual (used to group together common properties) or not. Virtual CIs can not be used in a deployment package |
| deployable-type | No | Only relevant for deployed CIs. The type of deployable CI type that this CI type deploys |
| container-type | No | Only relevant for deployed CIs. The type of CI container that this CI type is deployed to |
| generate-deployable | No | Only relevant for deployed CIs. The type of deployable CI to be generated. This property is specified as a nested element |
For each defined CI, zero or more properties can be specified. See the section above for more information about how to specify a property.
Here is an example for each of the CI categories.
Defining a Deployable CI
Usually, deployable CIs are generated by XL Deploy (see the generate-deployable element above). The following XML snippet defines a tomcat.DataSource CI and lets XL Deploy generate the deployable (tomcat.DataSourceSpec) for it:
<type type="tomcat.DataSource" extends="tomcat.JndiContextElement" deployable-type="jee.DataSourceSpec"
          description="DataSource installed to a Tomcat Virtual Host or the Common Context">
        <generate-deployable type="tomcat.DataSourceSpec" extends="jee.DataSourceSpec"/>
        <property name="driverClassName"
                  description="The fully qualified Java class name of the JDBC driver to be used."/>
        <property name="url"
                  description="The connection URL to be passed to our JDBC driver to establish a connection."/>
</type>
It is also possible to copy default values from the deployed type definition to the generated deployable type. Here is an example:
<type type="tomcat.DataSource" extends="tomcat.JndiContextElement" deployable-type="jee.DataSourceSpec"
          description="DataSource installed to a Tomcat Virtual Host or the Common Context">
        <generate-deployable type="tomcat.DataSourceSpec" extends="jee.DataSourceSpec" copy-default-values="true"/>
        <property name="driverClassName"
                  description="The fully qualified Java class name of the JDBC driver to be used."
                  default="{{DATASOURCE_DRIVER}}/">
        <property name="url"
                  description="The connection URL to be passed to our JDBC driver to establish a connection."
                  default="{{DATASOURCE_URL}}/">
</type>
NOTE: Properties that are either hidden, or of kind ci, list_of_ci or set_of_ci will not be copied to the deployable.
The following snippet shows an example of defining a deployable manually:
<type type="acme.CustomWar" extends="jee.War">
    <property name="startApplication" kind="boolean" required="true"/>
</type>
Defining a Container CI
This XML snippet shows how to define a new container CI:
<type type="tc.Server" extends="generic.Container">
    <property name="home" default="/tmp/tomcat"/>
</type>
Defining a Deployed CI
This XML snippet shows how to define a new deployed CI:
<type type="tc.WarModule" extends="udm.BaseDeployedArtifact" deployable-type="jee.War"
      container-type="tc.Server">
    <generate-deployable type="tc.War" extends="jee.War"/>
    <property name="changeTicketNumber" required="true"/>
    <property name="startWeight" default="1" hidden="true"/>
</type>
The tc.WarModule CI (a deployed) is generated when a tc.War (a deployable) is deployed to a tc.Server (a container). The new CI inherits all properties from the udm.BaseDeployedArtifact CI and adds the required property changeTicketNumber. The startWeight property is hidden from the user with a default value of 1.
Defining an Embedded CI
An embedded CI is a CI that is embedded (part of) another CI (see the Reference Manual for details). The following XML snippet shows how to define an embedded CI that represents a portlet contained in a WAR file. The tc.Portlet embedded CI can be embedded in the tc.WarModule deployed CI, also shown:
<type type="tc.WarModule" extends="udm.BaseDeployedArtifact" deployable-type="jee.War"
      container-type="tc.Server">
    <property name="changeTicketNumber" required="true"/>
    <property name="startWeight" default="1" hidden="true"/>
    <property name="portlets" kind="set_of_ci" referenced-type="tc.Portlet" as-containment="true"/>
</type>

<type type="tc.War" extends="jee.War">
    <property name="changeTicketNumber" required="true"/>
    <property name="startWeight" default="1" hidden="true"/>
    <property name="portlets" kind="set_of_ci" referenced-type="tc.Portlet" as-containment="true"/>
</type>

<type type="tc.Portlet" extends="udm.BaseEmbeddedDeployed" deployable-type="tc.PortletSpec" container-type="tc.WarModule">
    <generate-deployable type="tc.PortletSpec" extends="udm.BaseEmbeddedDeployable" />
</type>
The tc.WarModule has a portlets property that contains a set of tc.Portlet embedded CIs.
In a deployment package, a tc.War CI and its tc.PortletSpec CIs can be specified. When a deployment is configured, a tc.WarModule deployed is generated, complete with all its tc.Portlet portlets deployeds.
See the Packaging Manual for more information on how to include the embedded CIs in the manifest.
Defining Synthetic Methods
In addition to defining CIs, it is also possible to define methods on CIs. Each method can be executed on an instance of a CI via the GUI or CLI. Methods are used to implement control tasks, actions on CIs to control the middleware. An example is starting or stopping of a server. The CI itself is responsible for implementing the specified method, either in Java (see the section "Writing a Plugin" below) or synthetically when extending an existing plugin such as the Generic Model Plugin.
This XML snippet shows how to define a control task:
<type type="tc.DeployedDataSource" extends="generic.ProcessedTemplate" deployable-type="tc.DataSource"
      container-type="tc.Server">
    <generate-deployable type="tc.DataSource" extends="generic.Resource"/>
    ...
    <method name="ping" description="Test whether the datasource is available"/>
</type>
The ping method defined above can be invoked on an instance of the tc.DeployedDataSource CI through the server REST interface, GUI or CLI. The implementation of the ping method is part of the tc.DeployedDataSource CI.
Defining Validation Rules
It is possible to add validation rules to properties and CIs in the synthetic.xml. Out of the box, XL Deploy comes with the regex validation rule, which can be used to define naming conventions using regular expressions.
This XML snippet shows how to add a validation rule:
<type type="tc.WarModule" extends="ud.BaseDeployedArtifact" deployable-type="jee.War"
       container-type="tc.Server">
    <property name="changeTicketNumber" required="true">
        <rule type="regex" pattern="^JIRA-[0-9]+$"
           message="Ticket number should be of the form JIRA-[number]"/>
    </property>
</type>
The validation will throw an error, when the tc.WarModule is being saved in XL Deploy with a value that is not of the form JIRA-[number].
Customizing provided plugins
The XL Deploy type system allows you to customize the XL Deploy plugins that XebiaLabs provides. You can add CI properties or scripts to supplement the functionality that a plugin delivers. For more information about doing so, refer to the documentation of the plugin that you would like to customize.
Also, you can use the Generic Model plugin as a basis to create a new plugin. For more information, refer to the Generic Model Plugin Manual.
Creating a new plugin
You can use Java to customize XL Deploy to implement a server plugpoint that lets you customize XL Deploy server functionality or to implement a custom plugin. For information, refer to the XL Deploy Java API Manual.
Load order of plugins
If you create a custom plugin based on another plugin, and your custom plugin includes a type modification, you must name the custom plugin so that XL Deploy will load it before the original plugin.
For example, if you create a plugin called mycustom-jbossas-plugin-1.4.0.jar that is based on the JBoss Application Server Plugin (jbossas-plugin), you should change its name to 1-mycustom-jbossas-plugin-1.4.0.jar so it will be loaded before jbossas-plugin.
Creating XL Deploy rules
You can use rules to specify behavior during XL Deploy's planning stage. For information, refer to the Rules Manual.
Extending XL Deploy
You can extend XL Deploy by creating new endpoints backed by Jython scripts and new UI screens that use these endpoints.
Each extension must be packaged in a jar archive and saved in the plugins folder of the XL Deploy server. The typical file structure of UI extension is:
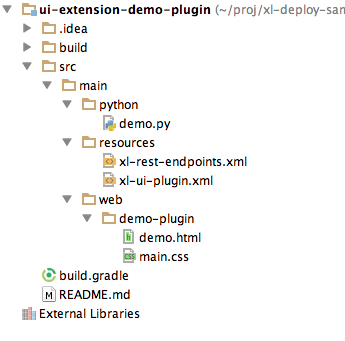
Tip: It is recommended that you create a folder under web with an unique name for each UI extension plugin, to avoid file name collisions.
The following XML files tell XL Deploy where to find and how to interpret the content of an extension:
xl-rest-endpoints.xmlfor adding new REST endpointsxl-ui-plugins.xmlfor adding new top-menu items
Note: These files are both optional.
Adding menu items in XL Deploy
The xl-ui-plugins.xml file contains information about the menu items to be added to the XL Deploy. They can be ordered using the weight attribute.
For example, it could contain:
<plugin xmlns:xsi="http://www.w3.org/2001/XMLSchema-instance"
    xmlns="http://www.xebialabs.com/deployit/ui-plugin"
    xsi:schemaLocation="http://www.xebialabs.com/deployit/ui-plugin xl-ui-plugin.xsd">
    <menu id="test.demo" label="Demo" uri="demo.html" weight="12" />
</plugin>
Menus are enclosed in the <plugin> tag. The xl-ui-plugin.xsd schema verifies the way that menus are defined.
The attributes that are available for <menu> are:
| Attribute | Required | Meaning |
|---|---|---|
| id | Yes | Menu item ID, which must be unique among all menus items in XL Deploy; if there are duplicate IDs, XL Deploy will return a RuntimeException |
| label | Yes | Text to show on the menu button |
| uri | Yes | Link which will be used to fetch the content of the extension |
| weight | Yes | Menu item order; the higher the weight, the further to the right the menu item will be placed |
Tip: Menu items created by extensions always appear after all the 'native' XL Deploy menus.
Calling XL Deploy REST services
You can call two types of XL Deploy REST services from HTML pages:
- XL Deploy REST API
- REST endpoints created by your extension (it is described below how to declare them)
For both types, your extension must authenticate itself with a basic HTTP authentication header appended to each request. You can retrieve the value of this header from the main XL Deploy application:
var authHeader = parent.getAuthToken()
When you are logged in to XL Deploy with the user name and password admin, the authHeader variable will contain the string 'Basic YWRtaW46YWRtaW4'.
Tip: If you have configured XL Deploy to run with a context path, don't forget to take it into account when building a path to the REST services.
Declaring server endpoints
The xl-rest-endpoints.xml file contains declaration of endpoints which your extension adds to XL Deploy:
<?xml version="1.0" encoding="UTF-8"?>
<endpoints xmlns:xsi="http://www.w3.org/2001/XMLSchema-instance"
           xmlns="http://www.xebialabs.com/deployit/endpoints"
           xsi:schemaLocation="http://www.xebialabs.com/deployit/endpoints endpoints.xsd">
    <endpoint path="/test/demo" method="GET" script="demo.py" />
    <!-- ... more endpoints can be declared in the same way ... -->
</endpoints>
Note: After processing this file, XL Deploy creates a new REST endpoint, which is accessible via http://{xl-deploy-hostname}:{port}/{[context-path]}/api/extension/test/demo.
Every endpoint should be represented with <endpoint> element which can contain following attributes:
| Attribute | Required | Meaning |
|---|---|---|
| path | Yes | Relative REST path which be exposed to run the Jython script |
| method | No | HTTP method type (GET, POST, DELETE, PUT); default value is GET |
| script | Yes | Relative path to the Jython script in the classpath |
Jython scripts
Jython scripts should implement the logic of REST endpoints. Typically, every script will perform queries or actions in XL Deploy and produce a response.
Objects available in the context
In a script you have access to the following objects:
- request: JythonRequest
- response: JythonResponse
and XL Deploy services. Please check XL Deploy Jython API Documentation for the complete information.
HTTP response
The server returns a HTTP response of type application/json containing a JSON object with the following fields:
| Field | Description |
|---|---|
| entity | Serialized value that is set in response.entity during script execution. XL Deploy takes care about serialization of standard JSON data types: Number, String,Boolean, Array, Dictionary, and udm.ConfigurationItem. |
| stdout | Text that was sent to standard output during the execution |
| stderr | Text was sent to standard error during the execution |
| Exception | Textual representation of exception that was thrown during script execution |
HTTP status code
You can explicitly set an HTTP status code via response.statusCode. If it is not set explicitly and the script executes smoothly, the client will receive 200. In the case of unhandled exceptions, the client will receive 500.
Sample UI extension
You can find a sample UI extension plugin in XLDEPLOY_SERVER_HOME/samples or on GitHub.
Troubleshooting
If you do not see your UI extension in XL Deploy, verify that the file paths in the plugin JAR do not start with
./. You can check this withjar tf yourfile.jar. The output should look like:xl-rest-endpoints.xml xl-ui-plugin.xml web/It should not look like:
./xl-rest-endpoints.xml
./xl-ui-plugin
.xml
web/
For Jython extensions, if you import a module in a Jython script, the import must be relative to the root of the JAR and every package must have the
__init__.pyfile. That is, for a file structure like this:test/ test/__init__.py test/importing-script.py test/calc/test/calc/__init__.py test/calc/Calc.pyThe import must look like this:
from test.calc.calc import Calc