Rules tutorial
Introduction
This tutorial will guide you through the process of using rules to create an XL Deploy plugin from scratch. The plugin will:
- Wait a specific interval to start the deployment
- Deploy and undeploy an artifact
- Start and stop a server
This tutorial assumes that you:
- Know how to create CI types, as described in Customizing the XL Deploy Type System
- Understand the concepts of XL Deploy planning, as described in Deployments and Plugins
For reference, you can download the code provided in this tutorial from the XebiaLabs GitHub.
For more information about the concepts discussed in this tutorial, see the Rules Manual.
How to run the examples
To run the examples in this tutorial, you need XL Deploy 4.5 or later. No specific configuration or plugin is required.
Required files
To configure XL Deploy to use the examples in this tutorial, you need to add or modify the following files in the ext folder of the XL Deploy server:
synthetic.xml, which will contain the configuration item (CI) types that are definedxl-rules.xml, which will contain the rules that are defined
The additional scripts that you will define should also be placed in the ext folder.
After you finish this tutorial, the ext folder will look like:
ext/
├── planning
│   └── start-stop-server.py
├── scripts
│   ├── deploy-artifact.bat.ftl
│   ├── deploy-artifact.sh.ftl
│   ├── undeploy-artifact.bat.ftl
│   ├── undeploy-artifact.sh.ftl
│   ├── start.bat.ftl
│   ├── start.sh.ftl
│   ├── stop.bat.ftl
│   └── stop.sh.ftl
├── synthetic.xml
└── xl-rules.xml
Restarting the server
After you change synthetic.xml, you must restart the XL Deploy server.
By default, you must also restart the XL Deploy server after you change xl-rules.xml and scripts in the ext folder. However, you can configure XL Deploy to periodically rescan xl-rules.xml and the ext folder and apply any changes that it finds. This is useful when you are developing a plugin. Refer to Rescan the rules file in the Rules Manual for information on how to do this.
Error handling
If you make a mistake in the definition of synthetic.xml or xl-rules.xml, the server will return an error and may fail to start. Mistakes in the definition of scripts or expressions usually appear in the server log when you execute a deployment. For more information about troubleshooting the rules configuration, refer to the troubleshooting tips in the Rules Manual.
Deploy an artifact
Let's start with an application that contains one artifact. We want to deploy the artifact to a server. This part of the plugin will:
- Upload the artifact
- Run a script that installs the artifact in the right place
synthetic.xml
First, in synthetic.xml, add a type definition called example.ArtifactDeployed for the application and add a container type named example.Server:
  <type type="example.Server" extends="udm.BaseContainer" description="Example server">
    <property name="host" kind="ci" referenced-type="overthere.Host" as-containment="true"/>
    <property name="home" description="Home directory for the server"/>
  </type>

  <type type="example.ArtifactDeployed" extends="udm.BaseDeployedArtifact" deployable-type="example.Artifact"
    container-type="example.Server" description="Artifact that can be deployed to an example server">
    <generate-deployable type="example.Artifact" extends="udm.BaseDeployableFileArtifact"/>
  </type>
Notice that:
example.Serverextends fromudm.BaseContainerand has ahostproperty that refers to a CI of typeoverthere.Host.- The deployed
example.ArtifactDeployedextends fromudm.BaseDeployedArtifact, which contains afileproperty that the step uses. - The generated deployable
example.Artifactextends fromudm.BaseDeployableFileArtifact.
xl-rules.xml
Next, define an XML rule for the CI in xl-rules.xml:
<rule name="example.ArtifactDeployed.CREATE_MODIFY" scope="deployed">
    <conditions>
        <type>example.ArtifactDeployed</type>
        <operation>CREATE</operation>
        <operation>MODIFY</operation>
    </conditions>
    <steps>
       <os-script>
         <script>scripts/deploy-artifact</script>
       </os-script>
    </steps>
</rule>
Parts of the rule
Notice that:
- The
nameexample.ArtifactDeployed.CREATE_MODIFYidentifies the rule in the system. It is recommended that you use a descriptive name that includes the name of the plugin and the type and operation the rule responds to. - The
scopeisdeployedbecause this rule needs to contribute a step for every instance ofexample.ArtifactDeployedin the deployment. - The rule matches on deltas with the operations
CREATEandMODIFY. Matching onCREATEmeans that this rule will fire when XL Deploy knows the application must be created (or, in other words, deployed). Also matching onMODIFYmeans that the rule will contribute the same step to the plan upon modification. - The rule will create a step of type
os-script, which can upload a file and run a templated script.scriptdefines the path where the script template is located, relative to the plugin definition.
The following os-script parameters are defined automatically:
- A description that includes the artifact name and the name of the server it will deploy to. You can optionally override the default description.
- The order, which is automatically set to 70 (the default step order for artifacts). You can optionally override the default order.
- The target-host property gets a reference to the host of the container. The step will use this host to run the script.
Script
The FreeMarker variable for the deployed object is automatically added to the freemarker-context. This allows the script to refer to properties of the deployed object such as file location.
The script parameter refers to scripts for Unix (deploy-artifact.sh.ftl) and Windows (deploy-artifact.bat.ftl). The step will select the correct script for the operating system that XL Deploy runs on. The scripts are actually script templates processed by FreeMarker. The template can access the variables passed in by the freemarker-context parameter of the step.
The Unix script deploy-artifact.sh.ftl contains:
echo "Deploying file on Unix"
mkdir -p ${deployed.container.home + "/context"}
cp ${deployed.file.path} ${deployed.container.home + "/context"}
echo "Done"
The script accesses the variable deployed and uses it to find the location of the server installation and copy the file to the context folder. The script also prints progress information in the step log.
For more information about:
- The OS script step, see os-script in the Step Reference
- Parameters that are defined automatically, see the Rules Manual
- The default step order, see the Customization Manual
- FreeMarker, see the FreeMarker Manual
Add a wait step
Additionally, we can enrich the plan with an additional step that waits a specific number of seconds before the actual deployment starts.
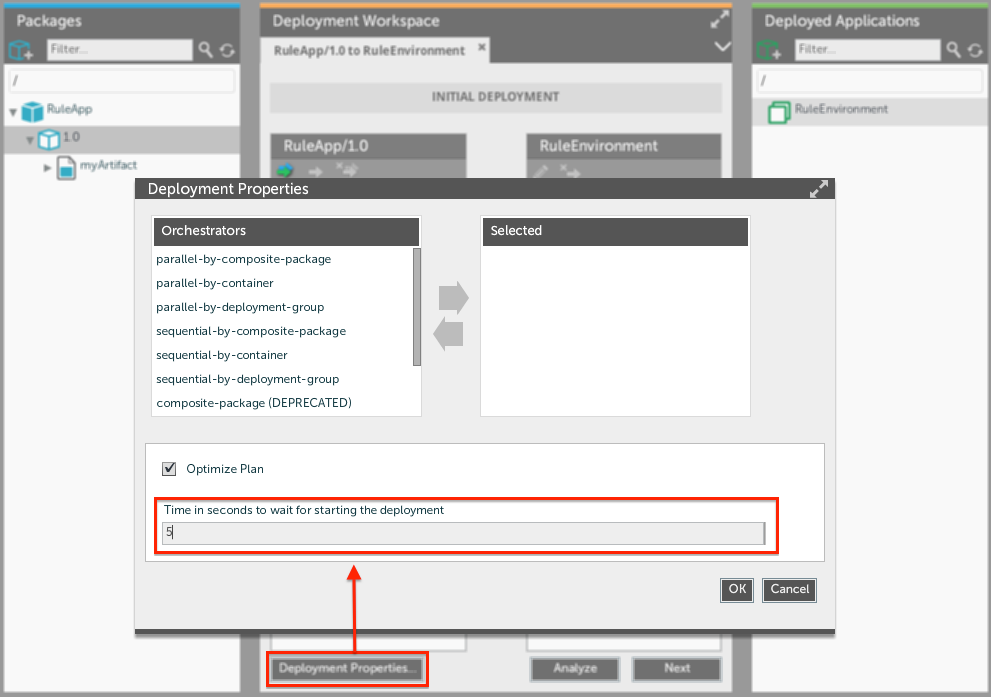
- While preparing the deployment, the user can set the number of seconds to wait in the deployment properties
- If the user does not set a number, XL Deploy will not add a wait step to the plan
synthetic.xml
First, we need to store the wait time in the deployment properties by adding the following property to udm.DeployedApplication in synthetic.xml:
<type-modification type="udm.DeployedApplication">
     <property name="waitTime" kind="integer" label="Time in seconds to wait for starting the deployment" required="false"/>
</type-modification>
xl-rules.xml
Next, we need to define a rule in xl-rules.xml to contribute the wait step to the plan:
<rule name="example.DeployedApplication.wait" scope="pre-plan">
    <conditions>
        <expression>specification.deployedOrPreviousApplication.waitTime is not None</expression>
    </conditions>
    <steps>
        <wait>
            <order>10</order>
            <description expression="true">"Waiting %i seconds before starting the deployment" % specification.deployedOrPreviousApplication.waitTime</description>
            <seconds expression="true">specification.deployedOrPreviousApplication.waitTime</seconds>
        </wait>
    </steps>
</rule>
Parts of the rule
Notice that:
- The
scopeispre-plan, which means that:- The rule will only fire once per deployment
- The step that the rule contributes is added to the pre-plan, which is a sub-plan that XL Deploy prepends to the deployment plan
- We only want to contribute a step to the plan when the user supplies a value for the wait time; therefore, there is a condition that checks if the
waitTimeproperty isnot None. The expression must be defined in Jython. - If the condition holds, XL Deploy will create the step that is defined in the
stepssection and add it to the plan. The step takes arguments that you specify in the rule definition:- The
orderis set to 10 to ensure that the rule will appear early in the plan. (In this case, this will be the only step in the pre-plan, so theordervalue does not matter; however, it is a required value for the wait step, so we need to provide it.) The type oforderis integer, so if it has a value that is not an integer, planning will fail.descriptionis a dynamically constructed string that tells the user what the step will do. Providing a description is optional; if you do not provide one, XL Deploy will use a default description.expression="true"means that the definition will be evaluated by Jython and the resulting value will be passed to the step. This is required because the definition contains a dynamically constructed string.
- The
waitTimevalue is retrieved from theDeployedApplicationand passed to the step. You can access theDeployedApplicationthrough thespecificationanddeployedOrPreviousApplication. This automatically selects the correct deployed, which means that this step will work for aCREATEorDESTROYoperation.
- The
For more information about:
- The wait step, see wait in the Step Reference
- How to use Jython expressions, see the Rules Manual
Test the deployment rules
Now you can test the rules that you created. To do so, you must:
- Install XL Deploy and the scripts as explained in How to run the examples.
- Under Applications in the XL Deploy Repository, create an application that contains a deployable of type
example.Artifact(upload a dummy file when creating the deployable CI). - Under Infrastructure, create a host of type
overthere.LocalHostand a container of typeexample.Server. Set the home directory ofexample.Serverto a temporary location. - Under Environments, create an environment that contains the
example.Servercontainer. Go to the Deployment Workspace and start a new deployment of the application to the environment. When preparing the deployment, click Deployment Properties and enter a wait time (if you do not provide a value, the wait step will not appear in the plan).
Click Next. XL Deploy should create the following deployment plan:
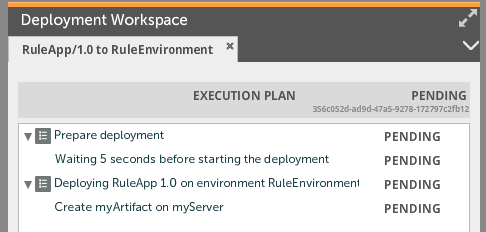
Execute the plan. The steps should succeed.
- Verify that there is a
contextfolder in the directory that you set as the home directory ofexample.Server, and verify that the artifact was copied to it.
The folder structure should be similar to:
$ tree /tmp/srv/
/tmp/srv/
└── context
    └── PetClinic-1.0.ear
Undeploy an artifact
When you create rules to deploy things, you should also define rules to undeploy them. In the case of this plugin, undeployment means removing the artifact that was deployed. The rule will use the state of the deployment to determine which files must be deleted.
xl-rules.xml
The rule definition in xl-rules.xml is:
<rule name="example.ArtifactDeployed.DESTROY" scope="deployed">
    <conditions>
        <type>example.ArtifactDeployed</type>
        <operation>DESTROY</operation>
    </conditions>
    <steps>
        <os-script>
            <script>scripts/undeploy-artifact</script>
        </os-script>
    </steps>
</rule>
Notice that:
- The
operationisDESTROY. - XL Deploy automatically sets the
orderanddescription. - The step is an
os-scriptstep. The script behind the step is responsible for deleting the file on the server.
Script
The FreeMarker variable for the previousDeployed object is automatically added to the freemarker-context. This allows the script to refer to the properties of the previous deployed object such as file name.
The Unix script undeploy-artifact.sh.ftl contains:
echo "Undeploying file on Unix"
rm ${previousDeployed.container.home + "/context/" + ${previousDeployed.file.name}
echo "Done"
Test the undeploy rule
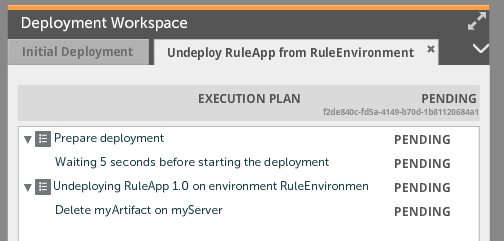
Now, you can test the rule. After successfully deploying the artifact, roll back the deployment or undeploy the application. If you have defined undeployment rules for all deployeds or used the sample code provided by XebiaLabs, the deployment plan should look like this:
Restart the server
Restarting the server is an advanced technique because it requires a script rule, which is written in Jython.
We already created rule that copies an artifact to the server. To correctly install the artifact, we need to stop the server at the beginning of the deployment plan and start it again in the end. This requires two more steps:
- One script that stops the server by calling the stop script
- One script that starts the server by calling the start script
Note that a full implementation would require four scripts in total:
- One script that stops the server for Unix
- One script that starts the server for Unix
- One script that stops the server for Windows
- One script that starts the server for Windows
xl-rules.xml
The script rule is defined in xl-rules.xml as follows:
<rule name="example.Server.startStop" scope="plan">
    <planning-script-path>planning/start-stop-server.py</planning-script-path>
</rule>
Parts of the rule
Notice that:
- The
scopeisplanbecause the script needs to inspect all deployeds of the specific sub-plan to make its decision. Also, the rule only needs to contribute one start step and stop step per sub-plan, and rules with the plan scope are only triggered once per sub-plan. - The rule has no conditions because the script will determine if the rule will contribute steps.
- The rule refers to an external script file in a location that is relative to the plugin definition.
Script
The script start-stop-server.py contains:
from java.util import HashSet

def containers():
    result = HashSet()
    for _delta in deltas.deltas:
        deployed = _delta.deployedOrPrevious
        current_container = deployed.container
        if _delta.operation != "NOOP" and current_container.type == "example.Server":
            result.add(current_container)
    return result


for container in containers():
    context.addStep(steps.os_script(
        description="Stopping server %s" % container.name,
        order=20,
        script="scripts/stop",
        freemarker_context={'container': container},
        target_host=container.host)
    )
    context.addStep(steps.os_script(
        description="Starting server %s" % container.name,
        order=80,
        script="scripts/start",
        freemarker_context={'container': container},
        target_host=container.host))
The rules demo plugin also contains a dummy script called start.sh.ftl that contains:
echo "Starting server on Unix"
In a real implementation, this script would need to contain the commands required to start the server.
Parts of the script
- The script starts with:
- An import statement of an utility class
- The method definition of
containers() - A loop that iterates all containers and creates steps; this is the starting point of the code that will be executed
- The
containers()method determines which containers need to be restarted and collects them in a set. The set data structure prevents duplicate start and stop steps.- The method iterates over the
deltasand selects the deployed withdeployedOrPrevious, regardless of whether it isDESTROY,CREATE, and so on. - It retrieves the container of the deployed and stores it in
current_container. - The container is added to the set of containers that need to be restarted if:
- The
operationis notNOOP(because we only perform actions when the operation isCREATE,MODIFY, orDESTROY). - The
typeof the container isexample.Server. This rule will be triggered for every plan and every deployment, so we need to ensure that the delta is related to a relevant container.
- The
- The method iterates over the
- The script iterates over all containers that need to be restarted.
- The
freemarker_contextmap contains a reference to the container. - In the start and stop steps, the
stepsfactory is used to construct the steps by name. Note that:- The
os_scriptstep is used to execute the script. - The Jython naming convention (with underscores) is used to refer to the step.
- The orders for the stop (20) and start (80) steps will ensure that they will be run before and after the deployment of the application.
- We use the
addStepmethod to add the constructed step directly to thecontext.
- The
- The
- If XL Deploy does not find deltas for the sub-plan, the start and stop steps will not be created.
Test the server restart rules
To test the server restart rules, set up a deployment as described in Test the deployment rules. The deployment plan should look like:
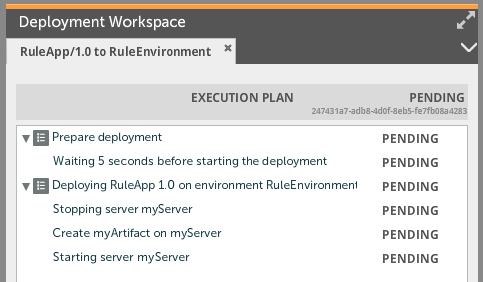
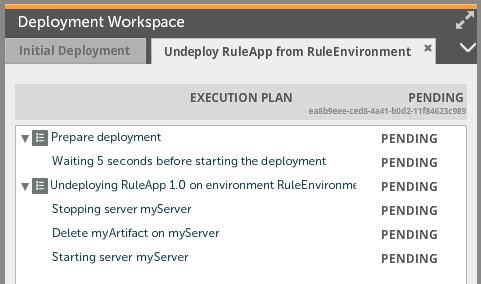
Notice that steps to start and stop server are added even when application is undeployed:
Roll back a deployment
The plugin that you create when following this tutorial does not require any extra work to support rollbacks. This is because XL Deploy automatically generates checkpoints for the last step of each deployed. Therefore, when a user decides to roll back a deployment that has only been partially executed, the rollback plan will contain the steps for the opposite deltas of the deployeds for which all steps have been executed.
If you have more advanced rollback requirements, refer to Using checkpoints.
What's next
You made it through the entire tutorial, congratulations! You should now have a good understanding of rules-based planning, and you should be able to find the information you need to continue creating deployment rules.
The most important sources for information about rules and deployment planning are:
The code discussed in this tutorial is available in the rules demo plugin, which you can download from GitHub. Also, the demo plugin contains additional examples.
If you would like to change the behavior of an existing plugin, you can disable predefined rules and redefine the behavior with new rules. For more information about this, refer to the Rules Manual.