Security Manual
Preface
This manual describes the XL Deploy security system.
Security in XL Deploy
XL Deploy supports a fine-grained access control scheme to ensure the security of your middleware and deployments. XL Deploy's security mechanism is based on the concepts of principals, roles and permissions.
Principals
A (security) principal is an entity that can be authenticated in XL Deploy. Out of the box, XL Deploy supports only users as principals -- users are authenticated by means of a username and password. When using an LDAP repository, users and groups in LDAP are also treated as principals. See below for more information about LDAP.
Roles
Roles are groups of principals that have certain permissions in XL Deploy. Roles are identified by a name that often indicates the role the principals have within the organization (e.g. 'deployers'). Permissions in the XL Deploy security system can only be assigned to roles.
Permissions
Permissions are rights in XL Deploy. Permissions control what actions a user can execute in XL Deploy, but also which parts of the repository the user can see and change.
Permissions come in two flavors, global and local. Global permissions apply in all of the XL Deploy product and repository. Once a global permission is granted to a role, XL Deploy allows principals with this role to execute the associated action on all CIs in the repository.
Local permissions are granted only on core.Directory CIs and root nodes and apply to the subset of the repository contained in the directory. Within this directory, the user can execute the actions that are allowed by the permission. Outside of the directory, this permission does not apply.
The following table shows the permissions that XL Deploy supports:
| Global Permissions | |
|---|---|
| admin | This permission grants all rights within XL Deploy. |
| discovery | The right to perform discovery of middleware. |
| login | The right to log into the XL Deploy application. This permission does not automatically allow the user access to nodes in the repository. |
| security#edit | The right to administer security permissions. |
| task#assign | The right to reassign any task to someone else. |
| task#takeover | The right to assign any task to yourself. |
| task#preview_step | The right to inspect scripts that will be executed with steps in the deployment plan. |
| report#view | The right to see all the reports. When granted, the UI will show the Reports tab. To be able to view the full details of an archived task, a user needs read permissions on both the environment and application. |
| Local Permissions | |
| controltask#execute | The right to execute control tasks on configuration items. |
| deploy#initial | The right to perform an initial deployment of a package to an environment. Applies only for the Environment CIs within the containing directory. |
| deploy#undeploy | The right to undeploy an application. Applies only for the Environment CIs within the containing directory. |
| deploy#upgrade | The right to perform an upgrade of a deployment on an environment. Note that this does not allow deploying items from the package to new targets. Applies only for the Environment CIs within the containing directory. |
| import#initial | The right to import a package for which the application does not yet exist in the repository and for which a new application will be created. |
| import#remove | The right to remove an application or package. Applies only for Application and DeploymentPackage CIs within the containing directory. |
| import#upgrade | The right to import a package for which the application already exists in the repository. Applies only for Application CIs within the containing directory. |
| read | The right to see CIs in the repository. |
| repo#edit | The right to edit (create and modify) CIs in the repository. The user must also have read access to CIs to be able to edit them. Applies only for the CIs within the containing directory. |
| task#assign | The right to transfer a task to another user. |
| task#skip_step | The right to skip steps in the generated steplist before starting a deployment. Applies only for deployments executed on Environment CIs in the containing directory. |
Granting and Revoking
Access rights in XL Deploy can be granted to a role or revoked from a role. When rights are granted, all principals that have this role are allowed to perform some action or access repository entities. Granted rights can be revoked again to prevent the action in the future.
Inherited Permissions
In general, permissions on a directory CI are inherited from it's parent unless the directory CI specifies it's own permissions.
For example, if you have read permission on the Environments root node, you will have read permissions on all it's contained directories and environments. If the Environments/production directory has it's own permissions set, your access to the Environments/production/PROD-1 environment depends on the permissions set on the Environments/production directory CI itself.
Configuring Repository Security
Security in the XL Deploy repository can be configured using the command line (creating users, granting and revoking global and local permissions) or graphical interface (granting and revoking global and local permissions).
Creating Users
XL Deploy can only create users in it's own repository, even if it is configured to use an LDAP repository for authentication and authorization. To do this, use a statement such as the following:
deployer = security.createUser("john", "secret")
Creating Roles and Assigning Principals to Roles
Roles are managed with the following command:
security.assignRole("developers", ["john"])
This assigns principal john to the developers role. If the role does not exist yet, it is created.
Granting Permissions
To grant a particular permission to a role, use a statement such as the following:
security.grant("import#initial", "developers", ['Applications'])
To grant a particular permission to a role within a directory, use a statement such as the following:
security.grant("deploy#initial", "developers", ['Environments/DevelopmentDirectory'])
See the Graphical User Interface Manual for more information on configuring security via the GUI.
Revoking Permissions
To revoke a particular permission from a role, use a statement such as the following:
security.revoke("read", "developers")
or, to revoke a permission from a particular directory:
security.revoke("read", "developers", ['Environments/DevelopmentDirectory'])
Security Configuration Example
Let's illustrate the security setup with an example.
The Acme corporation runs a highly profitable website selling widgets. Their website has a two-tier architecture and is split into a frontend and backend part. Their development department works on both components. The operations department is responsible for installing and maintaining the company's hardware and administering Acme's DEV, TEST, ACC and PROD environments. There are dedicated people for deploying the frontend and backend components and only a select group of senior deployers is allowed to deploy to the production environment but all deployers can look at the deployments on production.
To improve deployment throughput, Acme wants to give developers permission to import and deploy application upgrades to the development and test environments without needing the assistance of the operations group.
In XL Deploy, each of the sets of permissions is translated into a role. The following roles are needed:
- administrators: they need permission to create, update and delete infrastructure as well as permission to create, update and delete environments.
- frontend deployers: they need permission to import new applications, deploy frontend applications to development, test and acceptance environments and view deployments on the production environment.
- backend deployers: they need permission to import new applications, deploy backend applications to development, test and acceptance environments and view deployments on the production environment.
- senior deployers: they need permission to import new applications, deploy and upgrade on all environments.
- developers: they need permission to import new versions of existing applications and to upgrade existing deployments on the development and test environments.
In this setup, the roles need the following permissions:
- all roles: login permission to be able to log into XL Deploy.
- administrators: repo#edit permission on the Infrastructure and Environment root nodes.
- frontend deployers: access to the frontend application directory, deploy#initial and deploy#upgrade on environments DEV and TEST, read rights on environment PROD.
- backend deployers: access to the backend application directory, deploy#initial and deploy#upgrade on environments DEV and TEST, read rights on environment PROD.
- senior deployers: import#initial permission for the applications, deploy#initial and deploy#upgrade permission on all environments.
- developers: import#upgrade permission for the applications, deploy#upgrade on the DEV and TEST environments.
Setting up Security in the CLI
After a fresh installation of XL Deploy no permissions are granted to any user. The only users that have any permissions granted to them, are the administrator users and they will, by default, have all permissions granted to them. Currently, XL Deploy ships with one predefined administrator user called admin, with default password admin.
So the first task an admin user should do, is change the default password to something hard to guess and keep this password private. See the section Changing the admin user's password below. The next tasks should consist of adding users to XL Deploy's repository - if no other credentials store is in use, or possibly in addition to another credentials store that will be used - and granting permissions to users that will work with XL Deploy, starting with the (global) permission to login.
Changing the admin user's password
Changing the admin user's password consists of the following steps:
Change the
adminuser's password using the CLI:adminUser = security.readUser('admin') adminUser.password = 'newpassword_1' security.modifyUser(adminUser)Change the
adminuser's password in the deployit.conf configuration file *:admin.password=newpassword_1Restart the XL Deploy server.
* Note: the password in the deployit.conf file is encrypted when the server starts for the first time.
Adding users to the repository
Creating and deleting users can be done using the following commands:
    deployit> security.createUser('John', 'Doe')
    deployit> security.createUser('Alice', 'secret')
    deployit> security.deleteUser('John')
Users created this way will however only end up in XL Deploy's own repository. In order to create users in, for example, an LDAP credentials store, use your favorite LDAP administration tool.
The concept of groups is also supported by XL Deploy when using LDAP as the credentials store. All groups defined in LDAP can be assigned to roles in XL Deploy and users belonging to these groups will be assigned the role permissions when they use the system.
Managing Users
Sometimes it proves necessary to change a user's password, to delete a user or to login as a different user in order to perform a specific task with a different set of permissions. An example of this latter case might be the user admin that normally would work using another username with less permissions to perform regular deployment tasks, but needs to switch to admin in order to, for example, create a new user.
And sometimes it proves useful - in case of troubleshooting for instance - to just be able to see what permissions exactly have been granted to what user on which CI's.
Changing a user's password
If for some reason a user's password gets compromised or the user has forgotten it, it is possible to set a new password for the user. Note that it will not be possible to retrieve the user's password since XL Deploy does not store it as plain text. When requesting and viewing a user CI, passwords will always be shown as eight asterisks (*).
In order to change the password for user Alice, issue the following command:
    deployit> user = security.readUser('Alice')
    deployit> user.password = 'newpassword_1'
    deployit> security.modifyUser(user)
Please note the difference between the name of the user in the first command, John, and the object representing this user that was returned after executing the first command; this user object need also be used in the next two commands following the first one.
Login as a different user
It is possible to login as a different user once the CLI has started up. In order to log in as another user, you must first logout the user that is currently logged in. This will show the deployit> prompt from which it is then possible to login again as a different user.
In following example an administrator is logged in as user alice and needs to login as admin to delete user John.
    deployit> security.logout()
    deployit> security.login('admin', 'admin')

    # Delete the user Alice
    deployit> security.deleteUser('Alice')

    #switch back to the account with less privileges
    deployit> security.logout()
Retrieving permissions
The security object offers methods to find the permissions for a certain role and the permissions for the currently logged in user.
- To show one's own permissions, issue
print security.getPermissions(). - To show the permissions for a particular role, issue
print security.getPermissions('rolename')
Both methods return a AssignedPermissions object, that shows the relevant permissions when printed. The AssignedPermissions object makes it possible to retrieve and inspect user permissions, to find out if a given role has any permissions at all or has a specific permission and on what CIs. This will, for example, allow an administrator to automate granting and/or revoking of permissions by use of a script, depending on the retrieved permissions and their state or CIs.
Take note that only a user with security#edit permission is allowed to retrieve permissions for a role and to grant or revoke permissions. Normally it is only possible to retrieve and list one's own permissions. Trying to grant permissions using the second form of the command without this permission will lead to an exception.
A somewhat more extensive example of using this object, to be executed as an administrator user, is listed in following snippet:
    deployit> security.logout()
    deployit> security.login('admin', 'admin')
    deployit> security.createUser('alice', 'al1ce')
    deployit> security.assignRole('deployer', ['alice'])

    deployit> if security.isGranted('deployer','login'):
        security.grant('login', 'deployer')

    deployit> print security.getPermissions('deployer')
    deployit> security.removeRole('deployer')
    deployit> security.deleteUser('alice')
Example setting up initial security
This example shows how to implement the security policy described above. To recap, here are the roles and permissions they should have:
- administrators: repo#edit permission on the Infrastructure and Environment trees.
- frontend deployers: access to the frontend application directory, deploy#initial and deploy#upgrade on environments DEV and TEST, read rights on environment PROD.
- backend deployers: access to the backend application directory, deploy#initial and deploy#upgrade on environments DEV and TEST, read rights on environment PROD.
- senior deployers: import#initial permission for the applications, deploy#initial and deploy#upgrade permission on all environments.
- developers: import#upgrade permission for the applications, deploy#upgrade on the DEV and TEST environments.
The first task for a user with administrator privileges will be to create the users and roles in XL Deploy and allowing them to be able to login. Executing the following code will do this (the passwords in the examples are chosen for clarity. When creating users it's advisable to choose strong and difficult to guess passwords):
    # Sample security setup.

    deployit> security.createUser('alice', 'al1ce')
    deployit> security.assignRole('administrators', ['alice'])
    deployit> security.createUser('bob', 'b0b')
    deployit> security.assignRole('senior-deployers', ['bob'])
    deployit> security.createUser('carol', 'car0l')
    deployit> security.assignRole('frontend-deployers', ['carol'])
    deployit> security.createUser('dave', 'd@ve')
    deployit> security.assignRole('backend-deployers', ['dave'])
    deployit> security.createUser('mallory', 'mall0ry')
    deployit> security.assignRole('developers', ['mallory'])

    deployit> security.grant('login', 'administrators')
    deployit> security.grant('login', 'senior-deployers')
    deployit> security.grant('login', 'frontend-deployers')
    deployit> security.grant('login', 'backend-deployers')
    deployit> security.grant('login', 'developers')

    # Create some environments
    deployit> infraGroup = repository.create(factory.configurationItem('Infrastructure/Dev','core.Directory',{}))
    deployit> host = factory.configurationItem(infraGroup.id + '/myHost', 'overthere.SshHost', {
                'os':'UNIX',
                'address':'localhost',
                'username':'deployit',
                'password':'deployit'})
    deployit> repository.create(host)
    deployit> repository.create(factory.configurationItem('Environments/Dev', 'core.Directory'))
    deployit> repository.create(factory.configurationItem('Environments/Test', 'core.Directory'))
    deployit> repository.create(factory.configurationItem('Environments/Acc', 'core.Directory'))
    deployit> repository.create(factory.configurationItem('Environments/Prod', 'core.Directory'))
    deployit> repository.create(factory.configurationItem('Environments/Dev/env', 'udm.Environment',
          { 'members': ['Infrastructure/Dev/myHost'] }))
    deployit> repository.create(factory.configurationItem('Environments/Test/env', 'udm.Environment'))
    deployit> repository.create(factory.configurationItem('Environments/Acc/env', 'udm.Environment'))
    deployit> repository.create(factory.configurationItem('Environments/Prod/env', 'udm.Environment'))
    # Import a application
    deployit> repository.create(factory.configurationItem('Applications/team1','core.Directory',{}))
    deployit> repository.create(factory.configurationItem('Applications/team1/PetClinic-ear','udm.Application',{}))
    deployit> deployit.importPackage('PetClinic-ear/1.0')
Since the login permission is a global permission, there's no need to specify a list of CI's it will be in effect upon.
Next is to grant the individual roles their needed aggregated permissions in order for them to perform their tasks. The following snippet of code is a continuation of the above snippet; together with the snippets to come, it will constitute the complete script for this example.
The first role we will grant permissions to, is the administrators role. At minimum it needs read and repo#edit permission on the Infrastructure and Environments root nodes in order to perform any creation, deletion and updating of CI's under these root nodes.
    deployit> security.grant('read', 'administrators',['Infrastructure', 'Environments'])
    deployit> security.grant('repo#edit', 'administrators', ['Infrastructure', 'Environments', 'Applications'])
Notice the use of a list of target CI's in the first command. The permissions will only be set on these two specified CI's - which happen to be the root nodes for Infrastructure and Environments in this case. If for instance a user exists who has limited administrator privileges, it would be possible to just grant the role of this user rights to specific environments by using the command:
deployit> security.grant('repo#edit', 'administrators', ['Environments/Prod'])
Going back to the example, the senior-deployer needs the permissions to import and deploy applications to the DEV, TEST, ACC and PROD environments:
    deployit> security.grant("import#initial", 'senior-deployers', ['Applications'])
    deployit> security.grant("import#upgrade", 'senior-deployers', ['Applications'])
    deployit> security.grant("deploy#initial", 'senior-deployers', ['Environments'])
    deployit> security.grant("deploy#upgrade", 'senior-deployers', ['Environments'])
Setting up permissions for the deployers will be a bit more complicated because of the restrictions imposed. Let's first create a separation of applications in frontend and backend. We do this by creating two directories:
    deployit> repository.create(factory.configurationItem('Applications/frontend', 'core.Directory'))
    deployit> repository.create(factory.configurationItem('Applications/backend', 'core.Directory'))
Next, allow the frontend deployer to access the frontend applications and the same for the backend deployer. Both roles can deploy to the DEV, TEST and ACC environments.
    deployit> security.grant("import#initial", 'frontend-deployers', ['Applications'])
    deployit> security.grant("import#upgrade", 'frontend-deployers', ['Applications/frontend'])
    deployit> security.grant("deploy#initial", 'frontend-deployers', ['Environments/Dev', 'Environments/Test',
       'Environments/Acc'])
    deployit> security.grant("deploy#upgrade", 'frontend-deployers', ['Environments/Dev', 'Environments/Test',
       'Environments/Acc'])

    deployit> security.grant("import#initial", 'backend-deployers', ['Applications'])
    deployit> security.grant("import#upgrade", 'backend-deployers', ['Applications/backend'])
    deployit> security.grant("deploy#initial", 'backend-deployers', ['Environments/Dev', 'Environments/Test',
       'Environments/Acc'])
    deployit> security.grant("deploy#upgrade", 'backend-deployers', ['Environments/Dev', 'Environments/Test',
       'Environments/Acc'])
As can be seen from the commands in the snippet above, the deployers do not have permission to perform a deployment to the Environments/Prod environment. In order for them to see deployments in the production environment, read permission should be granted.
    deployit> security.grant('read', 'frontend-deployers', ['Environments/Prod'])
    deployit> security.grant('read', 'backend-deployers', ['Environments/Prod'])
Finally permissions need to be granted to the developer role. This role is permitted to import new versions of applications into XL Deploy and to perform the deployment upgrade to the Dev and Test environments that goes hand in hand with this new version.
    deployit> security.grant("import#upgrade", 'developers', ['Applications/frontend', 'Applications/backend'])
    deployit> security.grant("deploy#upgrade", 'developers', ['Environments/Dev', 'Environments/Test'])
In this scenario the the developer role has the ability to import new versions of both frontend and backend applications. If there were no specific directories below the Applications root node that override the root permissions, the following command would give permissions for all applications in XL Deploy:
deployit> security.grant('import#upgrade', 'developers', ['Applications'])
After the commands in the above snippets have been executed, the intial security setup of XL Deploy will match the intended security setup as described in the beginning of this section.
Setting up Permissions in the GUI
XL Deploy security can also be configured in the GUI. This section describes how this is done.
Setting up Global Permissions
The Admin screen is used to maintain roles and global permissions in XL Deploy. Only users that are permitted to maintain security will have access to the Admin screen.
Global permissions
The global permissions tab is used to assign global permissions to roles. The following screenshot shows an example of the global permissions tab:
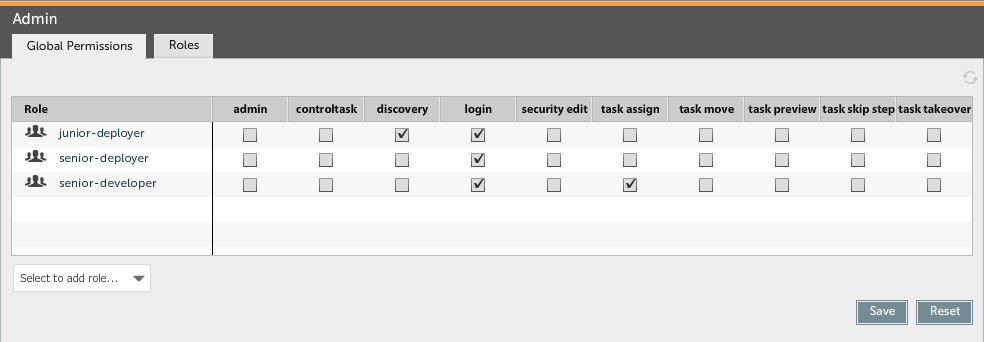
The table displays, for each role, which global permissions are assigned to it. If a permission is assigned to the role, a check mark is shown. If the permission is not assigned, a dot is shown.
To add a role and assign permissions to it, select it from the dropdown list in the bottom-left corner of the table. Click on a dot or check mark to assign or unassign the permission to the role.
Note that changes made to the global permissions table are not stored until you press the Save button.
The screen contains the following buttons:
- Save button: This button is used to save the changes you have made to the table.
- Reset button: This button cancels all changes to the table and reloads the table and roles from the server.
- Refresh button: This button cancels all changes to the table and reloads the table and roles from the server.
Roles
The roles tab is used to create and maintain roles in XL Deploy. The following screenshot shows an example of the roles tab:
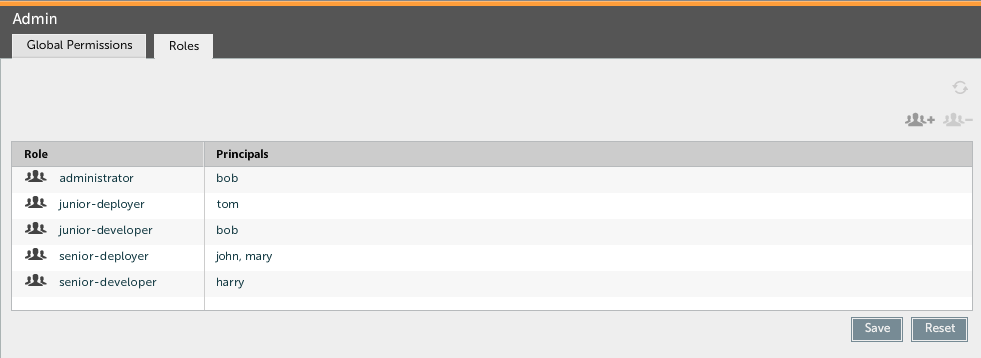
The table displays, for each role, which principals are a member of the role.
To create a role, click the plus sign on the top-right corner of the table. A new role is added to the table. Enter a role name and press the Tab key to move to the principals field. Enter all principals that are a member of the role, separated by commas.
To remove a role, select it in the table and press the minus sign on the top-right corner of the table.
To rename a role, double-click on the role name, type the new role name and press the Save button.
To edit a role, double-click the principal list, edit the list and press the Save button.
Note that changes made to the role table are not stored until you press the Save button.
The screen contains the following buttons:
- Save button: This button is used to save the changes you have made to the table.
- Reset button: This button cancels all changes to the table and reloads the table and roles from the server.
- Refresh button: This button cancels all changes to the table and reloads the table and roles from the server.
Setting up local permissions
Local permissions (permissions per CI) can be configured in the Repository screen. To edit the permissions on a root node or directory, right-click on the node and select the Permissions item from the context menu.
The table displays, for each role, which permissions are assigned to it on the selected CI. If a permission is assigned to the role, a check mark is shown. If the permission is not assigned, a dot is shown.
To add a role and assign permissions to it, select it from the dropdown list in the bottom-left corner of the table. Click on a dot or check mark to assign or unassign the permission to the role.
Note that changes made to the permissions table are not stored until you press the Save button.
The screen contains the following buttons:
- Save button: This button is used to save the changes you have made to the table.
- Reset button: This button cancels all changes to the table and reloads the table and roles from the server.
- Refresh button: This button cancels all changes to the table and reloads the table and roles from the server.