Release Dashboard Manual
Introduction
This manual describes how to use XL Deploy's Release Dashboard functionality.
Note that configuration of the Release Dashboard requires knowledge of the customization mechanisms that XL Deploy supports. More information about this topic can be found in the Customization Manual.
Overview
Most organizations have a process around releasing software to their environments. Typically, application versions are promoted to a number of environments before being released to production. In each environment, the application version is integrated or tested before being allowed to progress to the next stage. XL Deploy offers the Release Dashboard as a way to get insight into this process.
Preparing the Release Dashboard
Before using XL Deploy's Release Dashboard, you need to define the deployment pipeline, deployment checklists and checklist items.
Defining the deployment pipeline
The deployment pipeline is the sequence of environments that an application is deployed to during it's lifecycle. Each application can be configured with it's own deployment pipeline. An application version starts in the first environment and is promoted to each of the following environments in turn. It is also possible for a particular version to be deployed to multiple environments at once.
A common example of such a pipeline is: Development, Testing, Acceptance and Production. If this deployment pipeline was associated with the PetClinic application, then version 1.0 of PetClinic would be deployed to the Development environment first, then the Testing environment, etc.
You need to define the deployment pipeline for every application that you want to see in the Release Dashboard.
Defining deployment checklists and checklist items
To ensure the quality of the deployment pipeline, each environment in the pipeline can be associated with a checklist that a deployment package must satisfy before being deployed to the environment. It is also possible to include an environment in a deployment pipeline that does not have a checklist.
XL Deploy supports checkboxes and text fields as checklist items. A checkbox condition is met if it is checked. A text field condition is met if it is not empty.
Some examples of checklist items are:
- Have release notes been included in the deployment package?
- Has the application version been performance tested?
- Is there a change ticket number associated with the deployment?
- Has the business owner signed off on the deployment?
You need to define the deployment checklist for every environment that you want to use in a deployment pipeline.
Release Dashboard example
Let's say that we want to use the Release Dashboard in a company that uses the following deployment pipeline for their PetClinic application:
- a Development environment where applications are tested by the development team.
- a Test environment where the test group does QA.
- an Acceptance or pre-production environment where acceptance testing is done.
- a Production environment where the application is live.
Suppose we want to use the following deployment checklists:
- Development: none, an application can always be deployed here.
- Test: there must be release notes packaged with the application so the test group knows what is new in the release.
- Acceptance: the test group must have done a performance test before the application lands here.
- Production: a change ticket number must be attached to all production deployments.
In the sections below, we will configure XL Deploy for this scenario.
Configuring the Release Dashboard
Once you have decided on the deployment pipeline and checklists, it is time to configure XL Deploy. In this section, we will use the example described above. Note that this section assumes that you know how to extend the XL Deploy server as described in the Customization Manual.
Start by stopping the XL Deploy server if it is already running.
Configuring deployment checklists
The checks on deployment checklists are specified on each environment that is a member of the deployment pipeline. XL Deploy's XML configuration capabilities are used to extend the type system with the new checklist items (see the Customization Manual for more information about XL Deploy's XML type system). This actually needs to happen in two places: on the environment and on the deployment package.
The environment specifies which checklist items must apply before a deployment package can be deployed there. Therefore, the environment is extended with a checkbox for each possible condition. If the item's checkbox is checked, this means that the condition must be satisfied before a deployment, no check means the condition does not apply. Note that all checklist items are specified together on the environment type. In XL Deploy, you will select which condition applies to which environment.
Whether the condition is satisfied or not depends on the deployment package that is being deployed. Once a certain condition is met, the fact that this is the case is recorded on the deployment package itself so that the information travels along with the application code through the deployment pipeline.
First, we change the environment. This XML snippet extends the udm.Environment with our checklist items:
<type-modification type="udm.Environment">
  <property name="requiresReleaseNotes" description="Release notes are required"
            kind="boolean" required="false" category="Deployment Checklist" />
  <property name="requiresPerformanceTested" description="Performance testing is required"
            kind="boolean" required="false" category="Deployment Checklist" />
  <property name="requiresChangeTicketNumber" description="Change ticket number authorizing deployment is required"
            kind="boolean" required="false" category="Deployment Checklist" />
</type-modification>
Note that the type of each property is boolean (meaning it is a checkbox that is checked (condition applies) or unchecked (condition does not apply)). All properties are also optional. It's recommended to group these properties into one or more categories. (Note: in XL Deploy 3.7.0 and 3.7.1, the properties must be put in the Deployment Checklist category)
In addition to extending the environment we also customize the udm.Version. (udm.Version encompasses both udm.DeploymentPackage and udm.CompositePackage)
<type-modification type="udm.Version">
  <property name="satisfiesReleaseNotes" description="Indicates the package contains release notes"
            kind="boolean" required="false" category="Deployment Checklist"/>
  <property name="rolesReleaseNotes" kind="set_of_string" hidden="true" default="senior-deployer" />
  <property name="satisfiesPerformanceTested" description="Indicates the package has been performance tested"
            kind="boolean" required="false" category="Deployment Checklist"/>
  <property name="satisfiesChangeTicketNumber" description="Indicates the change ticket number authorizing deployment to production"
            kind="string" required="false" category="Deployment Checklist">
    <rule type="regex" pattern="^[a-zA-Z]+-[0-9]+$" message="Ticket number should be of the form JIRA-[number]" />
  </property>
</type-modification>
The 'requires' properties on an udm.Environment always have to be of type boolean because this property means "Is this check enabled for this Environment?". After adding a 'requires' property on the udm.Environment in the synthetic.xml, you can use the UI to turn the checks on or off for an environment.
In contrast, 'satisfies' properties on udm.Version can be of type boolean, integer or string. Usually it will be a boolean, but for example in the case of a ticket number it will be a string, so you can enter the ID of the ticket. XL Deploy will just check if some value was entered. If that's the case, the requirement is satisfied.
It is also possible to assign security roles to checks. Adding a role to a particular check restricts the users who can satisfy this checklist item to the users that are a member of this role. The default value defines the actual roles and must be of type set_of_string. Multiple roles are specified as a comma-separated list. The 'roles' property should be placed on udm.Version. Roles are optional and when omitted everyone is allowed to modify this check. The admin user is always allowed to modify checks.
Important: Property names on the udm.Environment must use the requires prefix and properties on the udm.Version must use the satisfies prefix. If you assign specific roles to checks on udm.Version, the property must have the roles prefix. In addition, roles properties should be hidden (i.e. set hidden="true").
Complete synthetic.xml example
This is an example of a complete synthetic.xml configuration for a Release Dashboard:
<synthetic xmlns:xsi="http://www.w3.org/2001/XMLSchema-instance"
           xmlns="http://www.xebialabs.com/deployit/synthetic"
           xsi:schemaLocation="http://www.xebialabs.com/deployit/synthetic synthetic.xsd">

        <type-modification type="udm.Environment">
          <property name="requiresReleaseNotes" description="Release notes are required"
                    kind="boolean" required="false" category="Deployment Checklist" />
          <property name="requiresPerformanceTested" description="Performance testing is required"
                    kind="boolean" required="false" category="Deployment Checklist" />
          <property name="requiresChangeTicketNumber" description="Change ticket number authorizing deployment is required"
                    kind="boolean" required="false" category="Deployment Checklist" />
        </type-modification>

       <type-modification type="udm.Version">
         <property name="satisfiesReleaseNotes" description="Indicates the package contains release notes"
                   kind="boolean" required="false" category="Deployment Checklist"/>
          <property name="rolesReleaseNotes" kind="set_of_string" hidden="true" default="senior-deployer" />
         <property name="satisfiesPerformanceTested" description="Indicates the package has been performance tested"
                   kind="boolean" required="false" category="Deployment Checklist"/>
          <property name="satisfiesChangeTicketNumber" description="Indicates the change ticket number authorizing deployment to production"
                    kind="string" required="false" category="Deployment Checklist">
            <rule type="regex" pattern="^[a-zA-Z]+-[0-9]+$" message="Ticket number should be of the form JIRA-[number]" />
          </property>
       </type-modification>

</synthetic>
With your configuration in place, start the XL Deploy server.
Configuring the deployment pipeline
Configuring the deployment pipeline for an application is done on the application CI itself. Here, you refer to a release.DeploymentPipeline CI (stored under the Configuration root node) that specifies an ordered list of environments the application progresses through. The application must have a deployment pipeline associated with it before it can be used in the Release Dashboard.
Log into the XL Deploy GUI as an administrator and open the Repository Browser. Locate the application for which you want to set the deployment pipeline and open it in the editor. The application has a property called deployment pipeline and allows the user to select a number of environments from the repository. Choose the environments you want in the deployment pipeline. Note that you can put the environments in the desired order by dragging the environments to the correct place in the list. Save the application CI when you are done.
Configuring the environment checklists
Configuring the environment checklists is done on the environment CI itself. Here, you specify which of the available checks must be satisfied for an application version to be deployed to the environment.
Open the Repository Browser and locate the environment for which you want to set the deployment checklist and open it in the editor. The environment has a tab called Deployment Checklist that contains the checkboxes for each condition that you have set in the synthetic.xml. Check each condition that you want to verify for a deployment to the environment. Save the environment CI when you are done.
Using the Release Dashboard
Now that your deployment pipeline has been configured in XL Deploy, you are ready to use the Release Dashboard.
Opening the Release Dashboard
Log into the XL Deploy GUI and select the Release Dashboard tab. This will bring up the empty Release Dashboard screen.
On the left side of the screen, an Application Browser is shown. Here, you will see all applications that you can access in XL Deploy. The application node can be expanded to bring up all versions of the application that are available. You can also traverse through all directories to locate the application you need.
Displaying an application's deployment pipeline
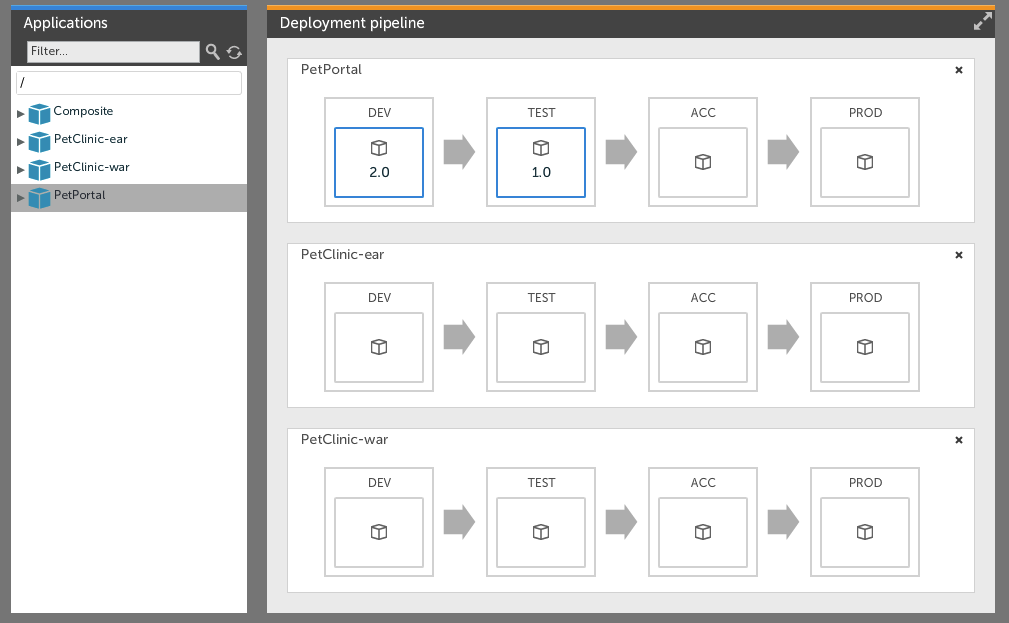
Click on an application in the Application Browser to view it's deployment pipeline. The following screenshot shows an example of a deployment pipeline for the PetPortal sample application:

In the above example, the environments DEV, TEST, ACC and PROD are configured to be the deployment pipeline for the PetPortal application. This screen shows you which versions of the PetPortal application are currently deployed to each environment in the pipeline.
Click on another application to display multiple deployment pipelines side-by-side. Click on the cross in the top-left corner to close the deployment pipeline.
Displaying an application version's deployment pipeline
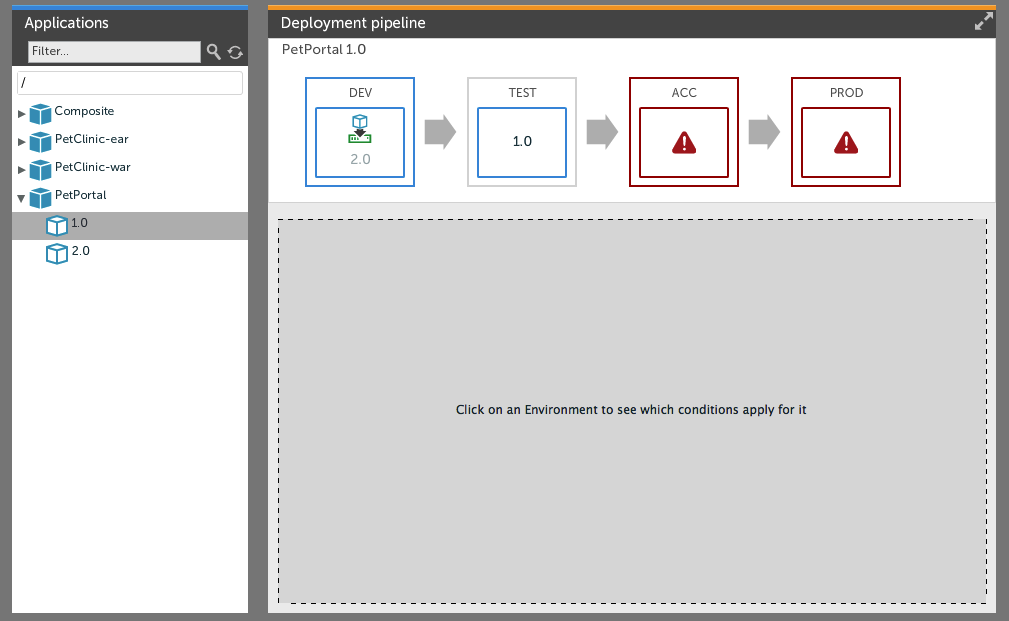
To display the deployment pipeline for a specific application version, click on the application version in the Application Browser or, alternatively, click on the application version number in the application deployment pipeline. The Release Dashboard shows a deployment pipeline for the selected version:

Here, you see all environments in the deployment pipeline and which version is deployed where. The focus here is on the selected application version, PetPortal version 1.0. Each environment for which the deployment checklist has been completed are outlined in green. A deploy button is shown in the environment. Environments for which the checklist has not yet been completed are outlined in red.
Filling out deployment checklists
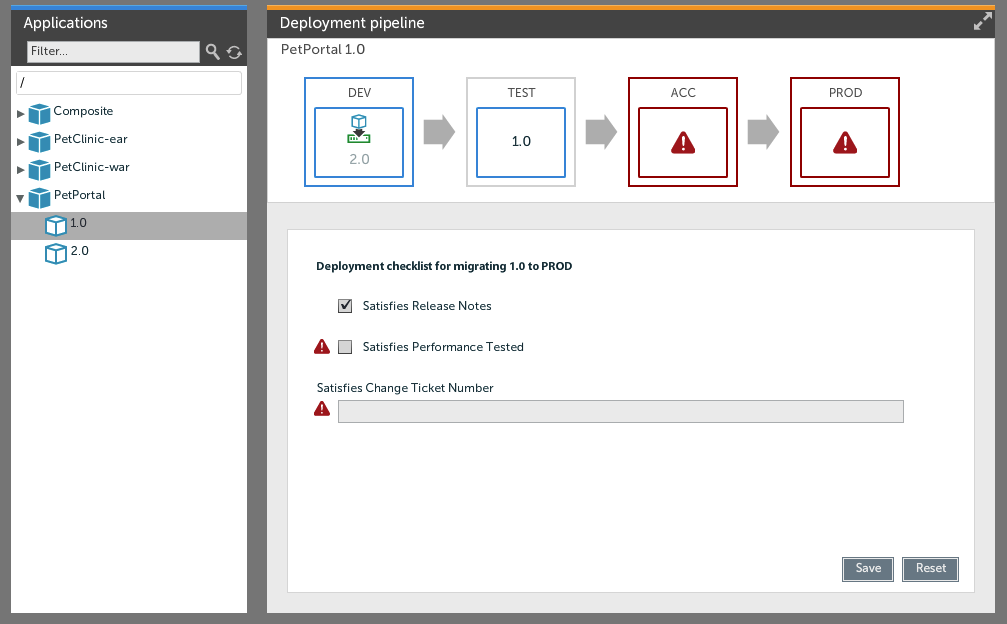
Before promoting an application version to a new environment, the deployment checklist for this package and environment must be met. Click on the environment name to show the deployment checklist for the application version and environment:

Conditions that are not met are marked with a stop sign. Check a checkbox or fill out a string field and click the Save button to satisfy the condition. If all items are satisfied, the environment will turn green, indicating that the application version can be promoted to the target environment.
Starting a deployment
When the checklist for a particular version and environment has been filled out, a Deploy button appears on the environment. Clicking this button will start a new deployment on the Deployment tab. The deployment can be configured and executed in the regular way.
Verifying the deployment checklist
Deployment checklists are verified at two points during a deployment:
- when a deployment is configured
- when a deployment is executed
When configuring a deployment, XL Deploy validates that all checks for the environment have been met for the deployment package you selected. This validation happens when XL Deploy calculates the steps necessary for the deployment. If this is not the case, an error message is shown. Open the Release Dashboard to view the checklist and fill out the necessary items.
Any deployment of a package to an environment with a checklist contains an additional step at the start of the deployment. Not only does this step validate that the necessary checklist items have been satisfied, but it also writes confirmation of this fact to the deployment log. This allows an administrator to verify these later if necessary.
Release Dashboard and Security
The XL Deploy security system determines who can do what in XL Deploy and this also applies to the Release Dashboard. The following items describe how security affects the functioning of the Release Dashboard:
- The values for deployment checklist items are stored on the deployment package CI. This means that whoever has
repo#editpermission on the deployment package is allowed to set or unset these items. In addition, it's possible to restrict the set of users that can set a checklist item to a certain role. - When viewing the deployment pipeline, you will only see the environments that the logged in user has access to. That is, if user 'developer' has access to the Development and Testing environments, he will only see these environments, even if the complete deployment pipeline includes additional environments.
- Regular deployment permissions apply when a deployment is initiated from the Release Dashboard.
