Graphical User Interface Manual
Preface
This manual describes the XL Deploy GUI. The GUI is used to import packages, perform deployments, view and edit the repository and run reports.
The XL Deploy Server must be running before accessing the GUI. See the XL Deploy System Administrator Manual for more information.
See XL Deploy Reference Manual for background information on XL Deploy and deployment concepts.
Requirements
To use the GUI, your system must meet the following requirements:
- Web browser: The following web browsers are supported:
- IE 8.0 or up
- Firefox
- Chrome
- Safari
- Flash Player: A flash player is required, versions 9.0 and up are supported.
Starting and Stopping
Before accessing the GUI, make sure the XL Deploy Server is started. Then start a browser and enter the URL of the XL Deploy Server (for example, http://xl-deploy:4516).
Logging in and Logging out
When you open the GUI, the browser will show a popup window to prompt you for a username and password. Enter your XL Deploy username and password to log in.
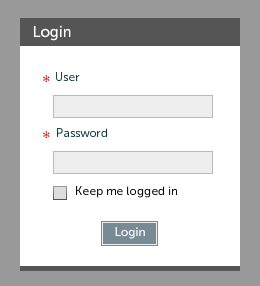
By ticking the "Keep me logged in" checkbox, you will not have to enter your password again to enter the GUI until you explicitly log out. Note that this feature even works across browsers on the same machine. If you have selected "Keep me logged in" in Internet Explorer, you will not be asked for you password when accessing the page with Firefox. Note that this feature could be disabled. To disable this feature, see the System Administration Manual.
To log out of the GUI, select "Logout" from the Help menu in the upper right-hand corner of the screen.
Help
To access help information while using the GUI, click on the help menu icon in the top-right of the window. This is a button combined with a selection menu with the following options.
- Help - Opens the help page for the current tab: Deployment, Repository, Reports or Amdin.
- Online Documentation - Opens
docs.xebialabs.com. - Online Support - Opens the XebiaLabs support web site
- Visit XebiaLabs website - Opens
www.xebialabs.com - Task Monitor - Opens the XL Deploy Task Monitor (see below).
- Lock screen - Lock the XL Deploy screen to prevent abuse of your login session when leaving your system unattended. The lock screen can be closed by providing your password.
- Logout - Logs out the current user and clears the "Keep me logged in" option (see above).
- About - Shows the XL Deploy server version and configuration.
Main Sections
The available functionality in the GUI is divided into three sections:
- Deployment - Viewing, creating, configuring and executing deployments.
- Repository - Viewing, creating and editing configuration items (CIs) in the repository.
- Reports - Creating and viewing reports.
- Admin - Administrative tasks: setting security permissions.
Note: depending on the installed plugins, your XL Deploy installation may contain two additional sections that are documented in separate manuals:
- Release Dashboard -- see the Release Dashboard manual
- XL Scale -- see the XL Scale manual
GUI Components
Editor Window
Editor windows use tabs to allow the user to perform multiple tasks in parallel. The tabs will be opened in response to user actions in other parts of the GUI. Tabs can also be closed.
Here's an example of an Editor window with a single tab:
When working on a specific task, the editor window can be maximized so that the most screen real estate can be used. Click on the top right corner of the editor window to maximize it or restore it to its original size.
CI Editor Component
The following image shows an example of the CI Editor component:
The CI editor component shows the properties of a CI and allows the user to edit them (if permitted by the security system). These include simple properties like strings and integer values, but also more complex properties like name-value pairs and references to other CIs. Some CI properties are not editable in the repository browser once they have been set, such as the file of an artifact CI or the ID of the CI. Using the context menu, uneditable field values can be copied and used elsewhere.
Tree Component
The following image shows an example of the Tree component:
The tree component is a component that is used often in the GUI. It shows a hierarchical view of the XL Deploy data. Nodes can be expanded or collapsed.
To facilitate installations with large amounts of data, the tree component lazily loads its data. That is, when the scrollbar is pulled down to the bottom, the GUI queries the server for more data. This prevents the GUI from loading all data at once.
Filtering the data in the tree is also possible using the filter field in the top of the tree component. Note that filtering always happens on the top-level nodes in the tree. If you want to filter on a lower level, first narrow the scope of the tree by selecting the node in the tree and selecting Show as Root from the context menu. The tree component includes a breadcrumb that shows all levels of the hierarchy and allows quick access to previous levels.
Importing Packages
The XL Deploy Repository is the database that contains all packages, environments and other CIs. The repository keeps track of this data and all its revisions.
The first step to performing a deployment with XL Deploy is to import your package into the repository. These are the steps you need to follow:
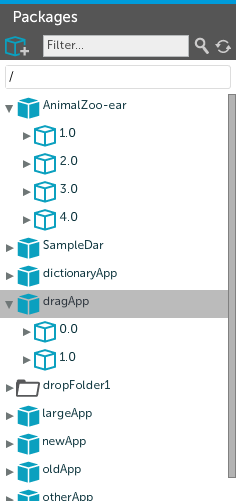
Start the Import Wizard. To start the Import Wizard, click the Import button on the Package Browser.

Import the Package. Run through the steps of the import wizard. Import deployment package from server scans for packages in the configured dropbox, which by default is the importablePackages directory from the XL Deploy installation directory. Import deployment package from URL allows the user to specify a URL to download the package from. Note that you cannot re-import packages.
Close the Import Wizard. Click on the Close button to complete the import procedure.
For more information about the XL Deploy packaging format, see the XL Deploy Packaging Manual.
Exporting packages
To export a deployment package (DAR file) from the Repository:
- Go to the Repository.
- Expand Applications, then expand the desired application.
- Right-click the desired package and select Export.
Deployments
Initial deployment
Once the package has been imported, you can deploy it to any of the environments in XL Deploy. To deploy your package to an environment for the first time, follow these steps:
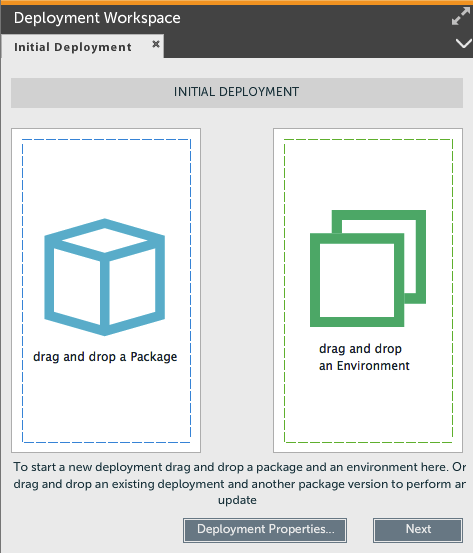
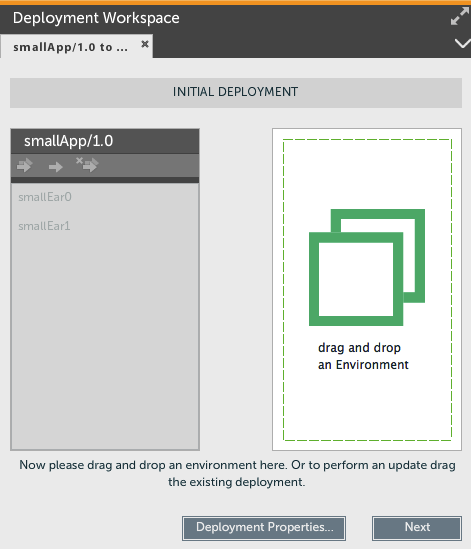
Start a new deployment. To start a new deployment, click the New Deployment button on the Application Browser:

Select the deployment package. Find the package you want to deploy in the Package Browser and drag it into the new deployment tab. The package will be loaded into the Package Box and its contents will be shown. This is an example of the Deployment Tab after selecting a deployment package:
Alternatively, you can select a deployment package in the Package Browser and choose the Deploy option from the context menu.
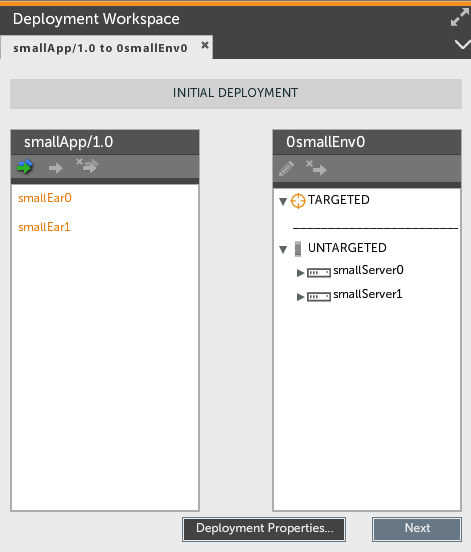
Select the environment. Find the environment you want to deploy to in the Application Browser and drag it into the new deployment tab. The environment will be loaded into the Environment Box and its contents will be shown. This is an example of the Deployment Tab after selecting an environment:
Alternatively, you can select an environment in the Application Browser and select the Deploy to option from the context menu.
Map the deployment package to the environment. Now that XL Deploy knows which deployment package you want to deploy on which environment, you can configure the way the package members are installed on the targets. To do this, you create deployed items for each of the package members you want to deploy.
There are several ways to do this:
Let XL Deploy create default deployed items. XL Deploy can generate default deployed items for each valid combination of a package member and target. The generated deployed items can then be configured manually. There are two ways to do this: either generate default deployed items for all package members or select one or more package members and generate deployed items only for them. You can also remove all deployed items for a package member. The buttons to perform these functions are in the top of the Package Box in the Deployment Configuration Page.
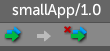
From left to right, the buttons are:
- Automatically map all deployed items - Use this button to ask XL Deploy to automatically generate deployed items for all package members.
- Automatically map selected deployed item - Use this button to ask XL Deploy to automatically generate a deployed item for the selected package member.
- Remove selected deployed item - Use this button to delete all deployed items for the selected package member.
Manually create deployed items. If you want to manually generate a deployed item, drag the package member from the left box to the target on the right. The mouse cursor will indicate whether it is possible to drop the package member and to generate a deployed item. If there are more possible deployed items that can be created, XL Deploy will display a popup so you can select which one to use. After the deployed item is created, the Deployed Item Configuration Balloon will open, allowing you to configure the deployed item. The balloon can also be opened by using the Edit Deployed Item button in the top of the Environment Box. You can also remove deployed items here.

From left to right, the buttons are:
- Edit Deployed Item - Use this button to edit the selected deployed (or double-click the deployed in the list).
- Remove Deployed Item - Use this button to delete the selected deployed.
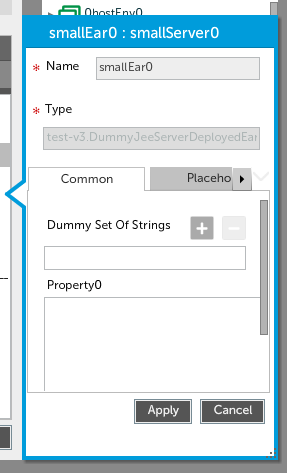
Configure the deployed items. The deployed items may need to be configured before the deployment can be started. To do this, open the Deployed Item Configuration Balloon by double-clicking on a deployed item or use the Edit Deployed Item button in the toolbar. A balloon will open, showing the properties of the deployed item:
The CI properties may be divided into separate tabs. It's possible to enlarge the balloon component by clicking on maximize button of the editor window.
When saving changes in the deployed item, XL Deploy will validate the data you entered and provide error messages if there are any problems. Some validation errors may be related to properties shown on different tabs.
Generate the execution plan. When all of the deployed items are properly configured, proceed with the deployment by clicking on the Next button. XL Deploy will validate all deployed items and, if they are correct, generate an execution plan. If the deployed items are not configured correctly or completely, XL Deploy will show an error message and allow you to rectify the situation.
Configure the execution plan. The plan contains all steps that XL Deploy will execute to perform your deployment. If the plan contains parts that have to be executed in parallel, it is represented as a tree with parallel/serial blocks as branches and steps as leaves. You have the opportunity to review it before starting the deployment. Depending on the user's permissions, the user may be able to edit the plan. If you want to return to the previous screen, use Previous button, the task will be cancelled in this case. If there is a step that you want to skip, select the step from the execution plan and press the right mouse button. This will show a context menu with an action 'Skip steps'. You can select and skip multiple steps at the same time. Notice that the action will show the total number of steps that will be skipped. Skipped steps can be unskipped by using the same context menu and choosing the 'Unskip steps' action. If your selection includes steps that cannot be skipped, only the steps that can be skipped will be skipped. If you want to pause the deployment before a certain step, select the step from the list and press the Pause button. A pause step will be introduced just above the selected step. The deployment can be cancelled by pressing the Cancel button. The deployment task and its associated deployed items will be removed. To navigate back to the Deployment Configuration Page, press the Previous button.
Execute the deployment. Press the Execute button to start the deployment. XL Deploy will schedule the deployment for immediate execution. For delayed execution, see Scheduling deployments below. Depending on the load on the XL Deploy server and its configuration, the deployment may start executing immediately or it may be scheduled for execution as soon as the server has sufficient capacity to do so. In the latter case, the deployment window will show a QUEUED state, indicating the deployment is queued. Press the Cancel button to cancel the deployment before it starts executing.
The log of a step will be shown in the Log Window below the execution plan. Select a step by clicking on it to see its log.
When the deployment is being executed, the following scenario's may occur:
A step in the deployment fails. If a step fails to execute successfully, XL Deploy stops executing the deployment and marks the step as Failed. This allows you to view the step's log output to determine what to do next. The following image shows a failed deployment:
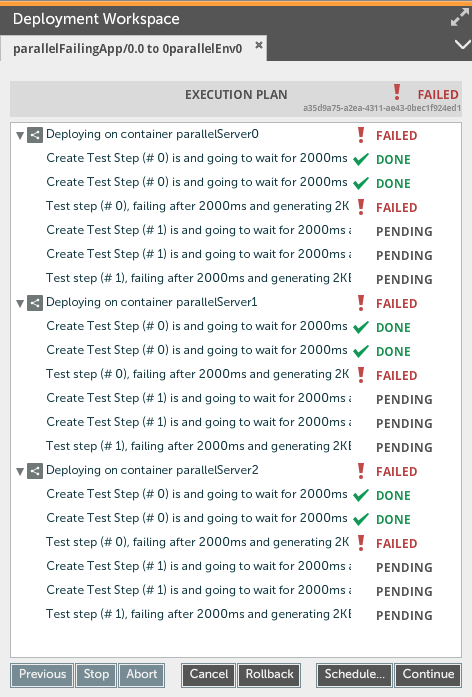
If the error is of a transient nature, the deployment can be restarted with the failed step by pressing the Continue button. If the step is incorrect and should be skipped, select the step, press the Skip button and then continue the deployment with the Continue button. To give up on the deployment altogether, press the Cancel button.
Deployment needs to be reverted. You can roll back a deployment which is either in STOPPED or EXECUTED state by pressing the Rollback button. A new list of steps will appear. Executing these rollback steps will revert the deployment back to the previous version of the deployed application. It will also revert the deployeds created on execution.
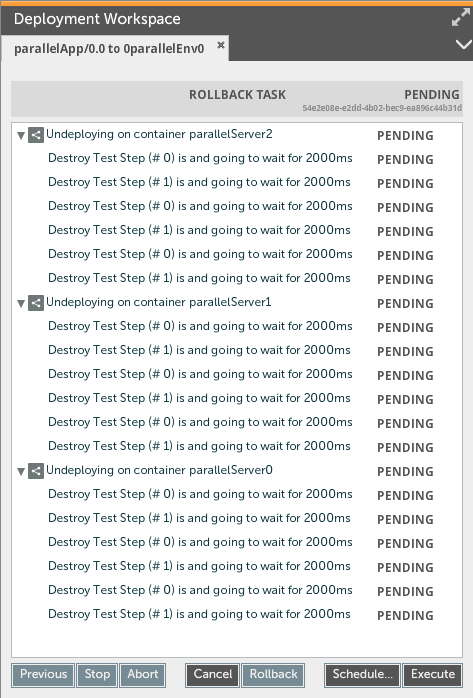
The deployment must be stopped. If you want to gracefully stop a running deployment, press the Stop button. XL Deploy will wait until the currently executing step is finished and then stop the deployment. The deployment can be continued (Continue button) or cancelled (Cancel button).
The deployment must be aborted. If you want to forcefully abort a running deployment (or if stopping the deployment gracefully is not working, for instance due to a hanging script), press the Abort button. XL Deploy will attempt to kill the currently executing step and mark it as Failed. The deployment can then be continued starting with the aborted step (Continue button) or cancelled (Cancel button). The aborted step can also be skipped.
The deployment completes successfully.
Complete the deployment. Press the Close button to close the Deployment Tab.
Upgrading
Once you have performed an initial deployment of your package to an environment, upgrading that deployed application is easy. XL Deploy will take the existing mapping and will try to apply it to the new version.
Start an upgrade. All you have to do is
- Find the package you want to deploy in the Package Browser and drag it into the new deployment tab.
- Find the deployed application you want to upgrade to in the Application Browser and drag it into the new deployment tab.
The order in which you do this is not important.
As an alternative to drag-and-drop, you can use the context menu. For packages, right-click and select "Deploy". For deployed app]ications, use the "Upgrade" menu item.
Check the mapping. XL Deploy will attempt to reuse the deployed items from the initial deployment, including their configuration. If the structure of your package is unchanged and the initial deployment was correct, the reused mappings should suffice and you can continue with the deployment.
If the new package contains a new package member, it will be shown in orange in the left box. You can proceed with the deployment as-is if you do not want to deploy the new package member. Alternatively, create a new deployed item for the package member (see the section Initial Deployment above for details).
If the new package is missing a package member that was in the previous deployment, the deployed item for the missing member will be shown in red in the right box. You can, however, open the deployed item to look at its settings if necessary.
Configure the deployed items. The deployed items will be configured as in the initial deployment. If this configuration needs to be changed, configure the deployed item as described above in Initial Deployment.
From this point on, upgrading is identical to an initial deployment. For more information, see the Initial Deployment section.
Undeploying
To remove the application and all of its components from an environment, you need to undeploy the application. Follow these steps:
- Find the deployed application. In the Deployment Screen, find the environment the application is deployed on in your Deployed Application Browser. If there are a lot of environments or applications, use the filter and search capabilities of the browser component.
- Start an undeployment. Select the option Undeploy from the context-menu of the deployed application. XL Deploy will open a new Undeployment Tab, showing a Deployment Steps page. The page shows the steps generated for the undeployment.
- Review the execution plan. The execution plan contains all steps that XL Deploy will execute to perform your undeployment. For more information regarding execution plan, see Initial Deployment.
- Execute the undeployment. XL Deploy will execute the plan. For more information, see Initial Deployment.
- Complete the deployment. Press the Close button to close the Undeployment Tab.
Scheduling deployments
XL Deploy allows you to schedule a task for execution at a specified later moment in time. You should prepare your deployment task like you would normally do. See the see the XL Deploy Reference Manual for all the possibilities and details of scheduling.
From within the XL Deploy GUI, you would perform the following actions to schedule a deployment:
- Select a Deployment Package and Environment
- Create the desired mappings
- Click Next
- Now instead of clicking Execute, click Schedule.
The XL Deploy GUI will now show the scheduling window. Here you can configure the date and time you want this task to be scheduled. Notice that you need to specify the time using your local timezone.

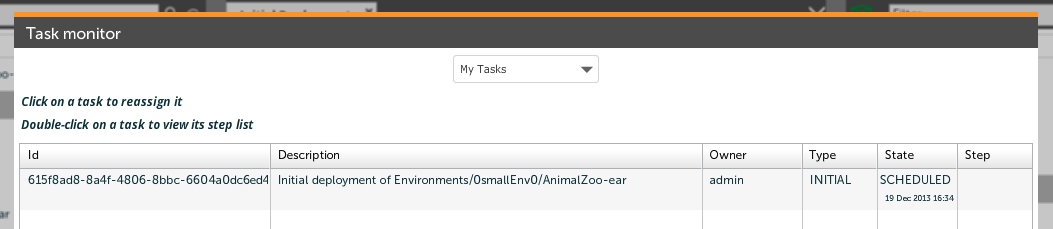
After pressing OK, the task is scheduled and will close. If you want to see all scheduled tasks, you need to open the task monitor. The task monitor will show which tasks are scheduled and when they are scheduled. To reschedule a task, double-click on the task to open it. Now you can change the time and date by using the Schedule button.
Control tasks and discovery tasks can also be scheduled in the same way as deployment tasks. The task monitor will not list control tasks and discovery tasks. These tasks will show up in the repository workspace.
Using the Plan Analyzer
While putting together an initial deployment, an upgrade, or an undeployment, it is possible to gain insight into the generated steps. By clicking the 'Analyze' button, or equivalently by maximizing the deployment workspace so it covers the full screen width, the Plan Analyzer will appear. The Plan Analyzer shows the deployment plan XL Deploy generated based on the deployment configuration. It can be hidden again by clicking the same button (now marked 'Close analyzer').
As you map deployables to containers in the deployment configuration, the Plan Analyzer will update its contents and thus show changes to the generated deployment plan, providing insight into how it is put together. Note that the Plan Analyzer (as opposed to the deployment plan itself, on the screen after clicking the 'Next' button) is 'read-only' in that you cannot yet change the order of the steps, have steps skipped, etc.
This is an example of the Plan Analyzer:
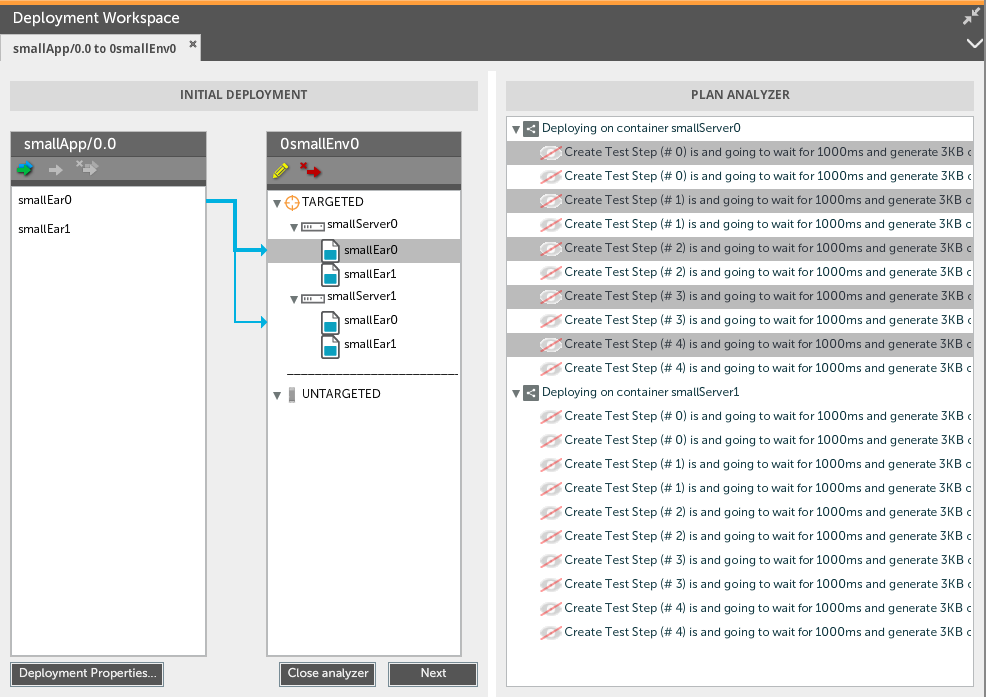
By hovering your mouse over one of the steps, a tooltip will appear mentioning the priority of the step. Clicking the step will highlight the relevant deployed(s) that caused this step to appear. Vice versa, clicking a deployed causes the steps it generates to be highlighted. Doubleclicking a step will show you the script that will be executed for this step, if you have permission to view these.
Monitoring and reassigning deployment tasks
The XL Deploy GUI incorporates a task monitor from which you can get an overview of the deployment tasks in the system. The task monitor is opened from the help menu in the far top right. By default it shows only tasks belonging to the current user, but by selecting 'All tasks' from the dropdown at the top, a full overview can be obtained.
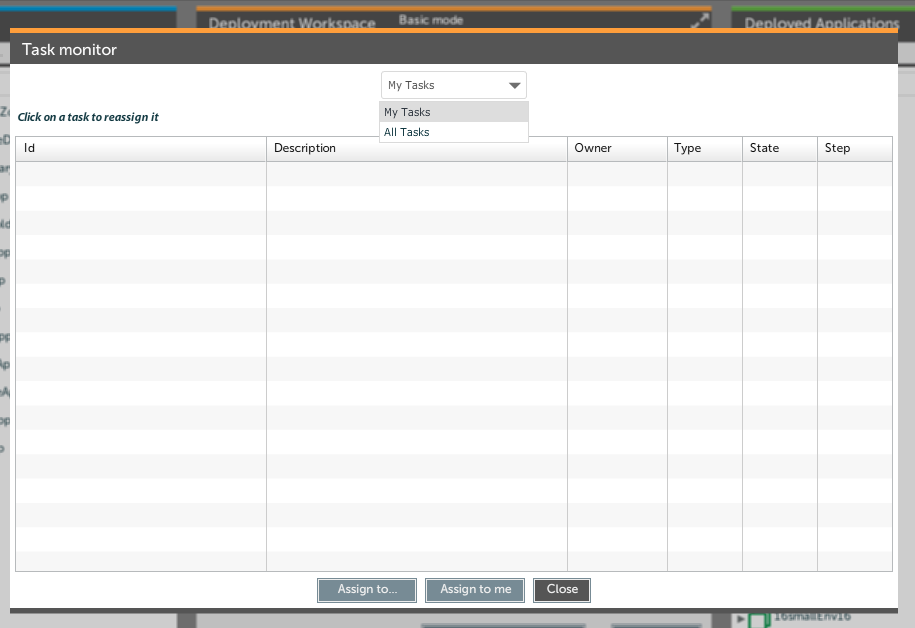
From the task monitor it is possible to reassign tasks. Security-wise there are two different permissions, task#assign and task#takeover, governing the rules who can do what: if a user has task#takeover, he can reassign tasks to himself. This is done by selecting a task and pressing the 'Assign to me' button at the bottom of the task monitor.
The task#assign permission is a stronger permission, allowing the user to reassign any task from anyone to anyone. By pressing the 'Assign to...' button, a popup will appear in which the user name can be filled in to whom the task should be reassigned.
Editing the Repository
XL Deploy stores all of its information in the repository. The Repository screen gives you access to the Configuration Items in the repository, and allows you to edit them manually.
Creating a new CI
To create a new CI in the repository, do the following:
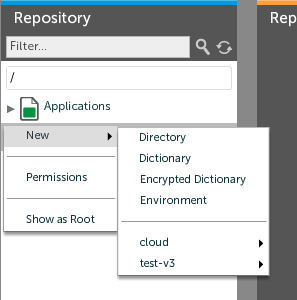
- Select the type of CI to create. In the Repository Browser navigate the repository to find the CI under which you want to create a new CI. Right-click on the CI and select New. A nested menu will appear that will allow you to choose a CI to create. Select the CI type you want to create.
- Create a new CI. The selected CI type will be opened in the CI Editor Tab so you can fill out its properties to create a new CI. Note: the Id field of the CI is a special non-editable property that determines the place of the CI in the repository. For more information about the Id property, see the XL Deploy Reference Manual.
- Save the new CI. Click on the Save button to save the new CI in the repository. XL Deploy will perform validation on the CI to ensure that all properties have appropriate values. An error message is shown if not.
If the CI is an artifact CI representing a binary file, you can upload the file from your local machine into XL Deploy.
Duplicating a CI
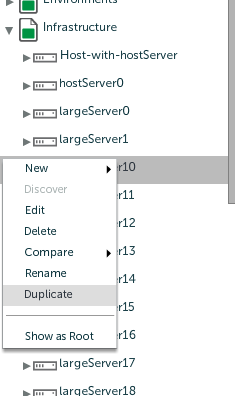
Sometimes it is easier to make a new CI by starting from a copy of an existing CI as a template. For this it is possible to duplicate an existing CI:
- Browse to the existing CI. In the Repository Browser, navigate to the existing CI you want to use as a template for a new CI.
- Right-click the CI. By right-clicking the CI, its context menu will be shown
- Select 'Duplicate'. This makes a deep copy of the existing CI. The copy will have the same name as the original, with the word 'Copy' tacked onto the end.
The duplicate can be modified at will, e.g. by changing its name or its properties.
Modifying a CI
To modify an existing CI, follow these steps:
- Select the CI in the Repository Browser. Navigate the repository to find the CI you want to modify. For more information about the repository structure, see the XL Deploy Reference Manual.
- Edit the CI. Use double click or select Edit from the context-menu on the CI to edit it in the CI Editor Tab.
- Save the CI. Click on the Save button to save the new CI in the repository. XL Deploy will perform validation on the CI to ensure that all properties have appropriate values. An error message is shown if not.
Deleting a CI
To delete an existing CI, follow these steps:
- Select the CI in the Repository Browser. Navigate the repository to find the CI you want to modify. For more information about the repository structure, see the XL Deploy Reference Manual.
- Delete the CI. Select Delete from the context menu. XL Deploy will confirm whether you want to delete the CI and, if yes, the CI will be deleted.
Note that deleting a CI will also delete all nested CIs. For example, by deleting an environment CI, all deployments on that environment will also be deleted. The deployment package that was deployed on the environment, however, will remain under the Applications root node.
Note that you can't recover a deleted CI.
Comparing Configuration Items (CIs)
Comparing against other CIs
Depending on your environment, deploying the same application to multiple environments may use different settings. With all these differences, it is easy to lose track of what is running where and how it is configured. XL Deploy's CI comparison feature makes it easy to spot the differences between two or more deployments.
To compare multiple CIs, follow these steps:
- Select the reference CI in the Repository Browser. The reference CI is the basis for the comparison, the CI that the other CIs are compared against. Select it in the Repository Browser and select Compare > With other CI from the context menu.
- Drag comparison CIs into the Comparison Tab. To add more CIs into the comparison, locate them in the Repository Browser and drag them into the Comparison Tab. XL Deploy will mark the properties that are different in red.
You can only compare CIs that have the same type.
Comparing against previous versions
Whenever you make changes to a CI, XL Deploy creates a record of the previous version of the CI. You can see and compare a CIs current and previous versions with the comparison feature.
First some basic versioning concepts. The current version of a CI is always called 'current' in XL Deploy. Only CIs that are persisted get a version number, starting from 1.0. The date and time reported are the creation or modification date and time of the CI. The user reported is the user that created or modified the CI.
Please note that the comparison will not show properties that are declared "as containment" on child CIs pointing upwards to their parent.
To compare different versions, follow these steps:
- Select the CI you want to compare in the Repository Browser. Select Compare > With previous version from the context menu. If there are previous versions available, a comparison workspace will be displayed. By default, XL Deploy will compare the current version with the previous version.
- Select different versions. You can change the version shown in the left and right hand side of the comparison window by using the version dropdown list.
You can only compare versions of one specific CI against itself. It is not possible to see CI renames and security permission changes in the CI history, this information can be found in the auditing logs.
Control Tasks
Control tasks are actions that can be performed on middleware or middleware resources. When a control task is invoked, XL Deploy starts a task that executes the steps associated with the control task. To trigger a control task on a CI in the repository, do the following:
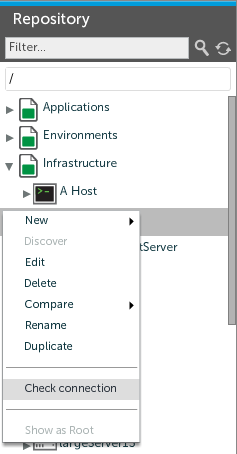
- List the Control Tasks for a CI. In the Repository Browser navigate the repository to find the CI for which you want to trigger a control task. Right-click on the item and select Tasks. A submenu will show a list of possible control tasks.
- Execute the Control Task on a CI. Select the control task from the list you want to trigger. This will invoke the selected action on the CI.
- Fill in parameters. If the control task has parameters, you can to fill them in before you can start the control task.
Discovery
The discovery feature allows you to import an existing infrastructure topology into the XL Deploy repository as CIs. To do so, follow these steps:
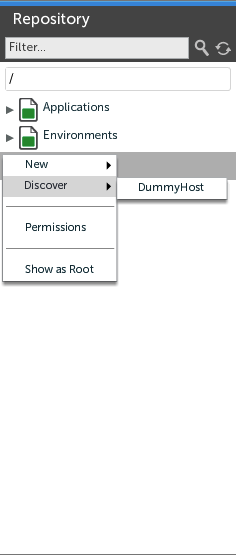
Select the type of CI to discover. In the Repository Browser navigate the repository to find the CI you want to inspect. Right-click on the CI and select Discover. A list will appear that will allow you to choose one or more CIs. Select the CI type you want to discover. Note that CIs of a certain type need to support discovery in order to show up in this menu.
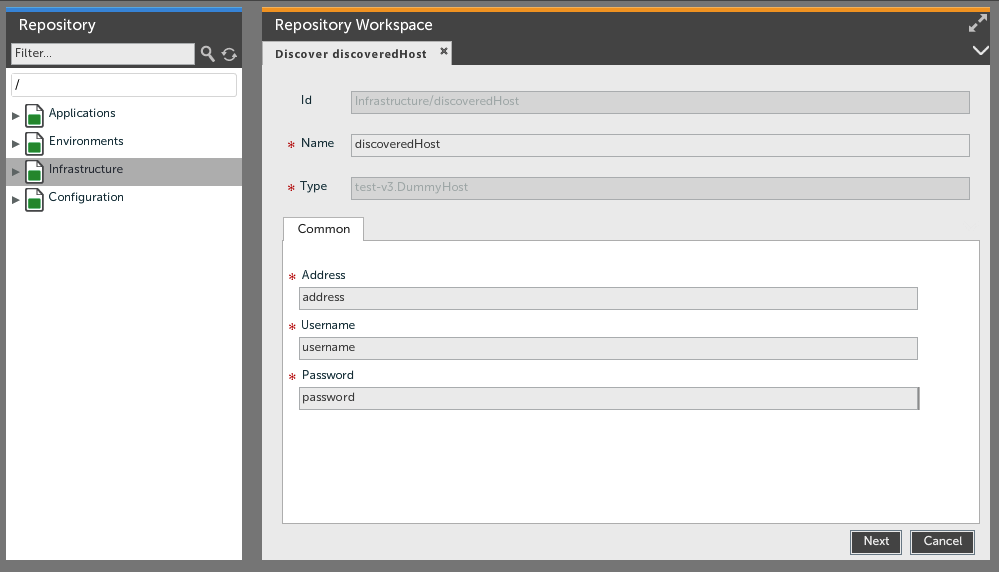
Fill in the required properties. The selected CI type will be opened in a CI Editor Tab so you can enter the properties that are required for discovery. Click on the Next button to generate the Discovery step list.
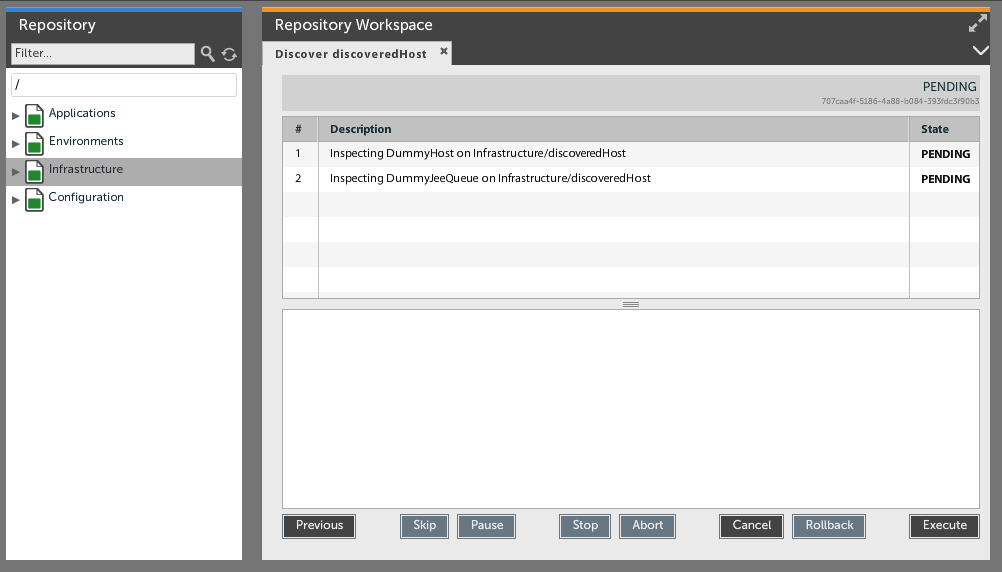
Discovery Steps. Click on the Execute button to initiate discovery. This will start the process that inspects the actual middleware. More steps can be dynamically added as a result of execution of some discovery steps. Note that you can skip steps; however, the discovery process may not give correct results when steps are disabled. When the execution finishes click on the Next button to edit the discovered CIs.
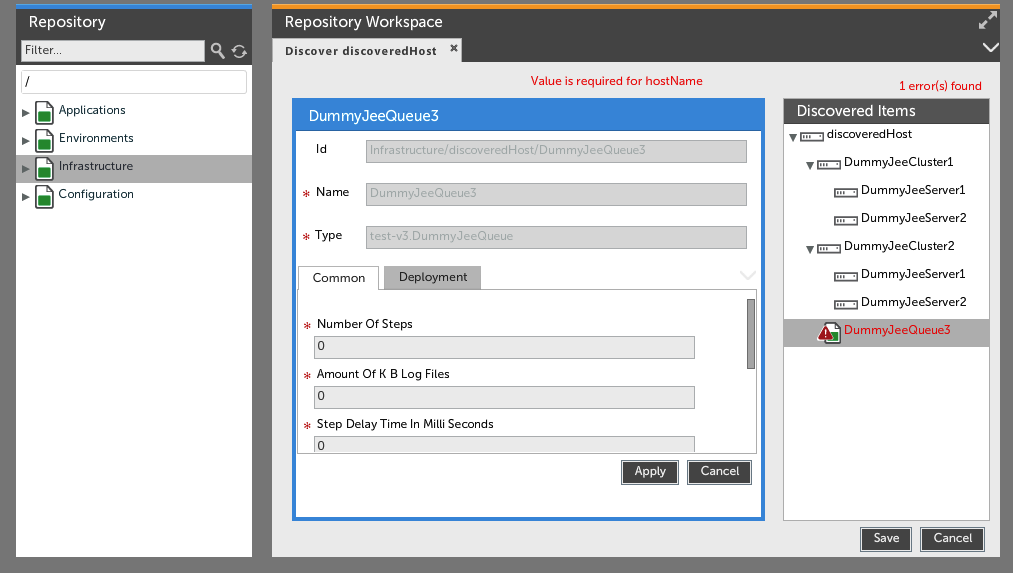
Edit and Save Discovered CIs. The Discovered CIs workspace will show a hierarchical list of discovered CIs on the right. Clicking on a discovered CI will open it in the editor. The discovered CIs are not saved into the XL Deploy repository just yet, giving you the opportunity to review the results and change them when necessary. Validations errors will be marked, and will need to be resolved manually before saving. Properties can be entered and applied individually on each CI before saving the complete list to the repository by clicking the Save button.
Reporting
XL Deploy contains information on all your environments, infrastructure and deployments. Using the reporting functionality, you can gain insight into the state of your environments and applications. The reports are available to all users of XL Deploy.
Dashboard
When opening the Reports section for the first time, XL Deploy will show a high-level overview of your deployment activity.
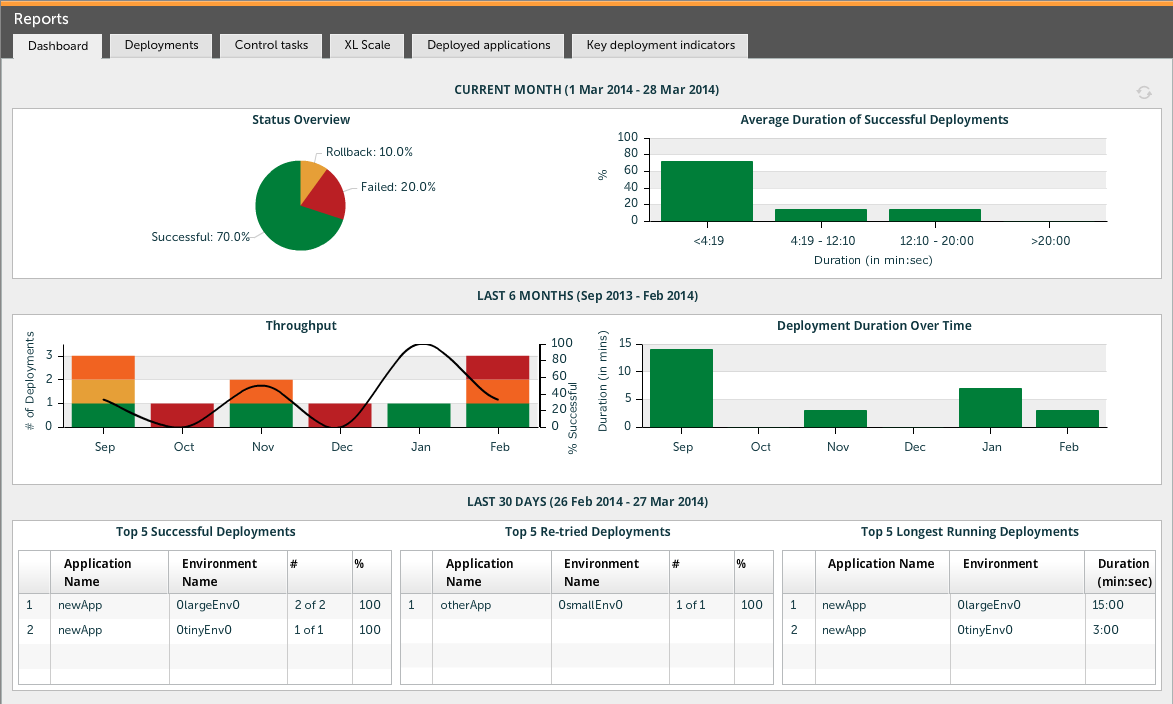
The dashboard consists of three sections that each give a different view of your deployment history:
- Current Month shows information about the current month and gives insight into current deployment conditions.
- Last 6 Months shows trend information about the last 6 complete months.
- Last 30 Days shows information about the past 30 days of deployments.
The following graphs are displayed on the dashboard:
- Status Overview shows how many of the current month's deployments were successful, successful with manual intervention (Retried), failed or is a rollback.
- Average Duration of Successful Deployments shows the average duration of successful deployments as a frequency diagram. It show the duration distribution over all deployments and identifies any outliers.
- Throughput shows the throughput of deployments divided into successful, successful with manual intervention, failed deployments and rollbacks over the last 6 months. The black line indicates the percentage of successful deployments per month.
- Deployment Duration over Time shows the average deployment duration over the last 6 months.
- Top 5 Successful Deployments shows the top 5 applications with most successful deployments over the last 30 days.
- Top 5 Re-tried Deployments shows the top 5 applications with most retries (manual intervention) during deployments over the last 30 days.
- Top 5 Longest Running Deployments shows the top 5 applications with longest running deployments over the last 30 days.
Rollbacks never count towards successul deployments, even if the rollback is executed succesfully.
To refresh the dashboard, press the reload button on the top right corner.
Deployments report
This report shows deployments done in a given date range. It also allows user to aggregate deployments by selected applications and environments. There are three ways to aggregate the data in the report:
No filtering. By default, the report shows all deployments in the date range in tabular format.
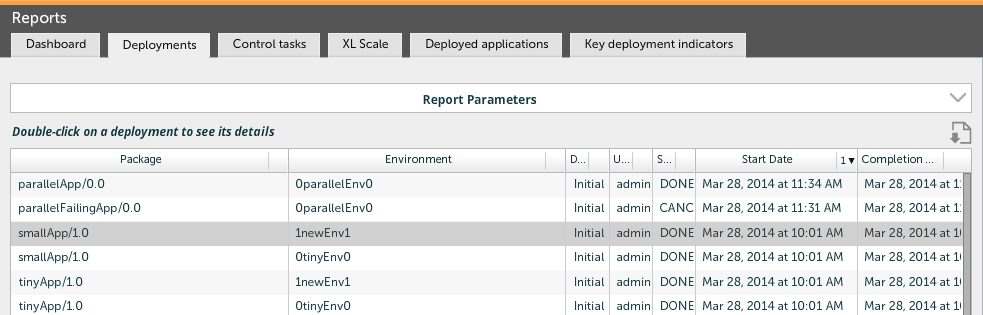
The report shows the following columns:
- Package - The package and version that was deployed.
- Environment - The environment to which it was deployed.
- Deployment Type - The type of the deployment (Initial, Upgrade, Undeployment or Rollback).
- User - The user that performed the deployment.
- Status - The status of the deployment.
- Start Date - The date on which the deployment was started.
- Completion Date - The date on which the deployment was completed.
Double-click on a row to show the deployment steps and logs for that particular deployment.
Filter by. The report allows you to filter on application or environment. Simply select the appropriate filter, and then double-click the desired applications or environments to include them in the report.
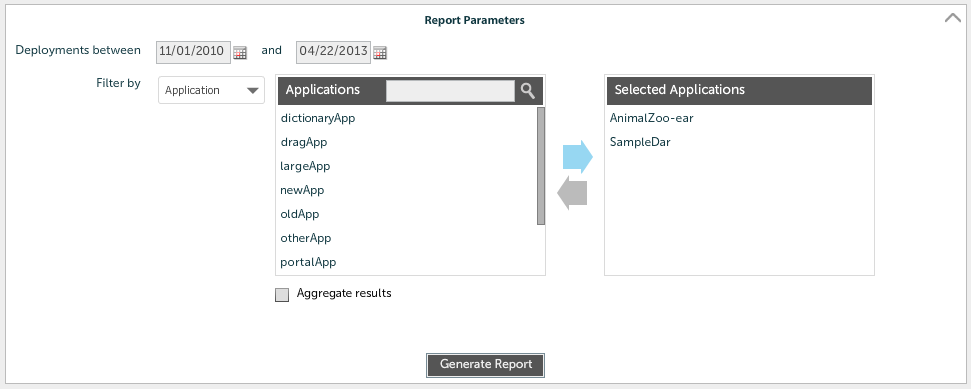
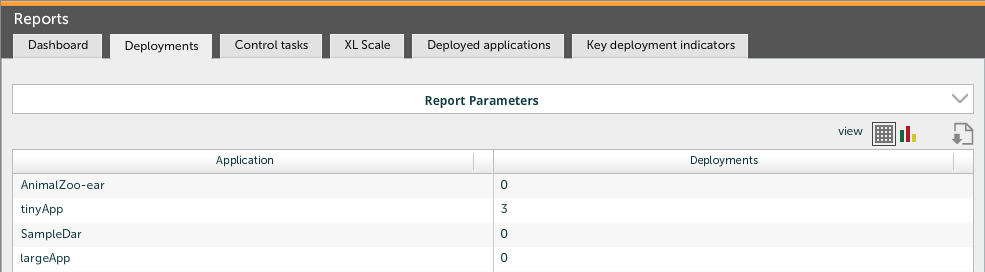
Aggregate results - Select the 'Aggregate results' checkbox to get the total number of deployments for the selected applications or environments. This report can be shown in a grid and a chart view.
In grid view, the report looks like this:
When selecting the chart view, the report is shown as a bar graph, for example:

XL Scale report
Note: The XL Scale report tab is only available if XL Scale is installed.
See the XL Scale manual for more information about XL Scale reports.
Deployed Applications report
This report shows all applications that were deployed in a certain environment at a particular date. The following is an example of such a report:
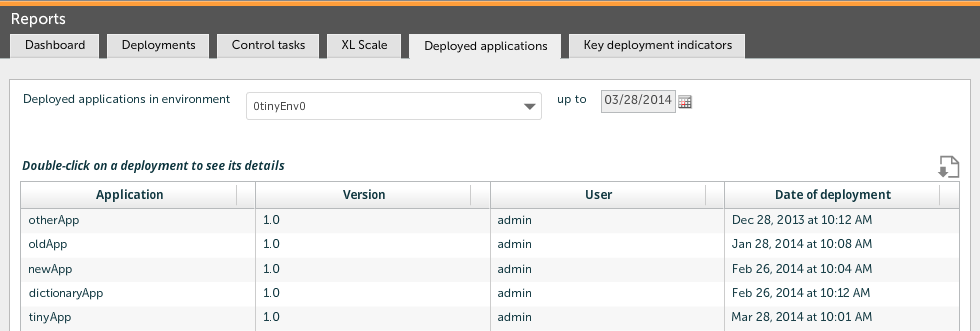
The report shows the following columns:
- Application - The application on the environment.
- Version - The version of the application.
- User - The user that performed the deployment.
- Date of Deployment - The date on which this version of the application was deployed.
Double-click on a row to show the deployment steps and logs for that particular deployment.
Key Deployment Indicators report
This report shows three indicators describing deployment performance:
- Number of successful deployments - This is the total number of deployments that ran successfully (i.e. fully automated).
- Number of retried deployments - This is the total number of deployments that required manual intervention.
- Number of aborted deployments - This is the total number of deployments that was aborted.
- Number of rollbacks - This is the total number of rollbacks.
- Average deployment duration - This is the average duration of the shown deployments.
The Key Deployment Indicators report can show data aggregated in three ways:
No filtering - When selecting this option, the report is shows all deployments in the date range in tabular format, without aggregation. This is an example of such a report:
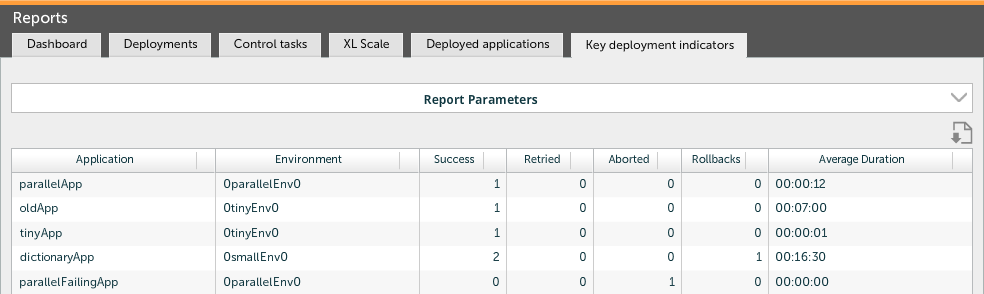
The report shows the following columns:
- Application - The application that was deployed.
- Environment - The environment on which the application was deployed.
- Success - Number of times the deployment has been successful.
- Retried - Number of times the deployment succeeded with manual intervention.
- Aborted - Number of times the deployment aborted.
- Rollbacks - This is the total number of rollbacks.
- Average Duration - Average duration for the deployment.
Filter by. The report allows you to filter on application or environment. Simply select the appropriate filter, and then double-click the desired applications or environments to include them in the report.
Aggregate results - Select the 'Aggregate results' checkbox to get a summary of the key deployment indicators over the selected applications or environments. The report can be shown in a grid and a chart view.
In grid view, the report looks like this:
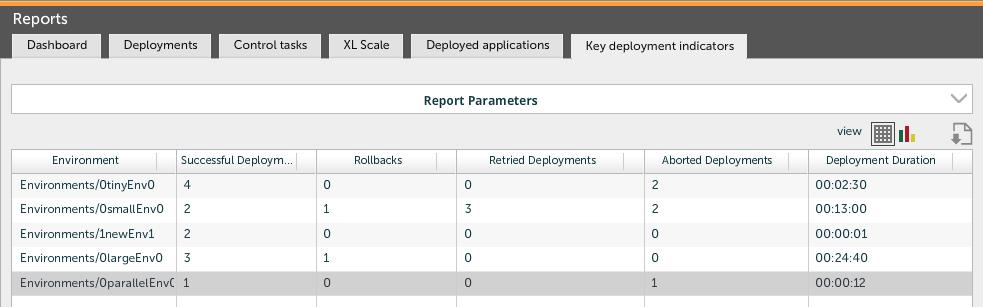
The report shows the following columns:
- Application / Environment - The application being deployed or the environment being deployed to.
- Successful Deployments - Number of times the deployment has been successful.
- Rollbacks - This is the total number of rollbacks.
- Retried Deployments - Number of times the deployment succeeded with manual intervention.
- Aborted Deployments - Number of times the deployment aborted.
- Deployment duration time - Average time for a deployment.
When selecting the chart view, the report is shown as a bar graph, for example:
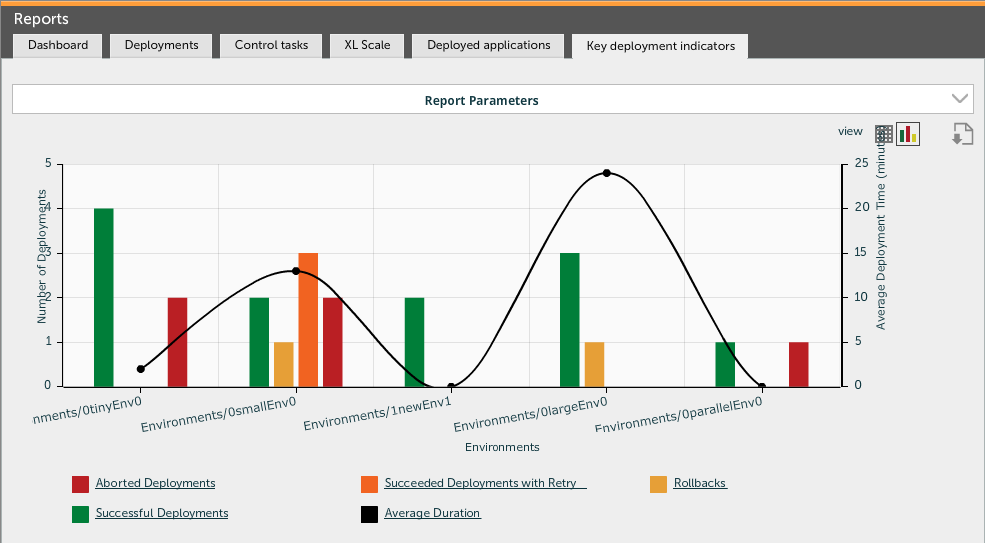
The chart shows the selected applications on the x-axis. The chart has two y-axis -- the left y-axis shows the number of deployments (successful, retried and aborted) and the right y-axis shows the average deployment time.
Exporting to csv format
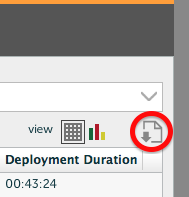
If you want to reuse data from XL Deploy in your own reporting, the report data can be download as a CSV file using the "Export to CSV" button on the top right of the report:
The Admin Screen
The Admin Screen is used to maintain security roles and global permissions in XL Deploy. For more information about XL Deploy security, see the Reference Manual and System Administration Manual.
Global permissions
The global permissions tab is used to assign global permissions to roles. The following screenshot shows an example of the global permissions tab:
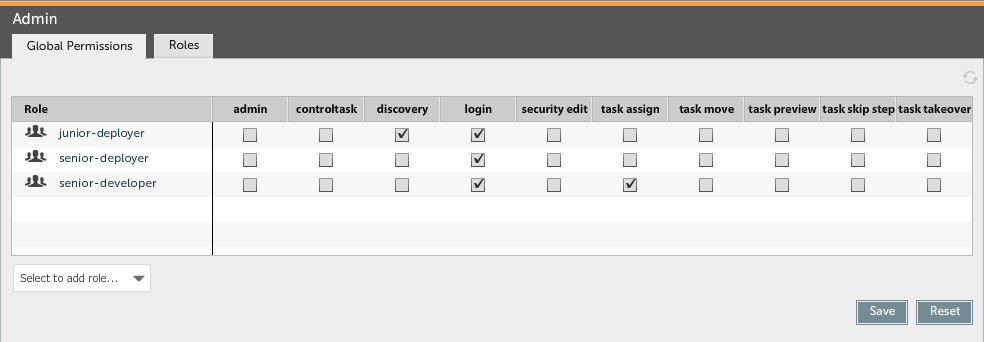
The table displays, for each role, which global permissions are assigned to it. If a permission is assigned to the role, a check mark is shown. If the permission is not assigned, a dot is shown.
To add a role and assign permissions to it, select it from the dropdown list in the bottom-left corner of the table. Click on a dot or check mark to assign or unassign the permission to the role.
Note that changes made to the global permissions table are not stored until you press the Save button.
Roles
The roles tab is used to create and maintain roles in XL Deploy. The following screenshot shows an example of the roles tab:
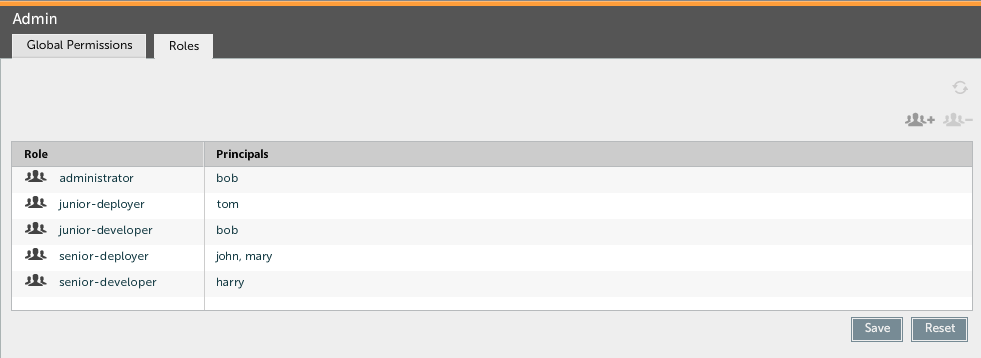
The table displays which principals are member of the role. Principles are entered as a comma-separated list.