Customization Manual
Introduction
This manual describes how to customize XL Deploy for use in your environment.
Out-of-the-box, XL Deploy provides deployment capabilities for several middleware platforms. However, at times XL Deploy may need to integrate with certain environments or deploy to middleware stacks that it does not currently support. Tailoring deployment plans, adding support for new middleware and integrating with other systems are all possible by customizing the XL Deploy system. This manual describes what customization options are present and how to adapt XL Deploy to fit into your environment.
This manual will first give an overview of the different ways of customizing XL Deploy. Then, XL Deploy system architecture is described to show the role of XL Deploy extensions and plugins in the deployment process. Finally, we show how to add custom XL Deploy plugins.
Customization Overview
XL Deploy is designed with extensibility in mind and provides several different ways to modify its behavior. Depending on the extender's skill set and requirements, one or more of these methods can be used to achieve the desired result.
Overall, there are four ways to customize XL Deploy.
- Adding or modifying configuration items (CIs) by customizing the XL Deploy type system
- Adding or modifying CI behavior by customizing a plugin provided by XebiaLabs
- Adding XL Deploy Server functionality by providing server plugpoint implementations (requires Java)
- Adding custom CIs and deployment functionality by writing a new plugin (requires Java)
Each of these types of customizations are described in the remainder of this document.
Customizing the XL Deploy Type System
Today's middleware products are complicated and support lots of configuration options. XL Deploy plugins represent this middleware to the XL Deploy system. If a plugin wants to be a direct representation of the options in the middleware, it will quickly grow very large and unwieldy. XL Deploy provides a better way.
Customizing XL Deploy is possible by providing new state (modifying existing CIs or defining new CIs) and by providing new behavior (by modifying existing scripts or adding new scripts). This section describes how to modify XL Deploy state. To learn how to add new behavior to the product, take a look at the manual for the plugin to be modified or the Generic Model Plugin Manual to define a new plugin.
Synthetic Properties
XL Deploy's type system allows an extender to customize any CI by changing it's definition. Properties can be added, hidden or changed. These new properties are called synthetic properties since they are not defined in a Java class. The properties and changes are defined in an XML file called synthetic.xml which is added to the XL Deploy classpath. Changes to the types are loaded when the XL Deploy server starts and can be used to perform deployments.
Modifying Existing CIs
Types existing in XL Deploy can be modified to contain additional synthetic properties. These properties become a part of the CI type and can be specified in the deployment package and shown in the XL Deploy GUI.
There are several reasons to modify a CI:
- A CI property is always given the same value in your environment. Using synthetic properties, the property can be given a default value and hidden from the user in the GUI.
- There are additional properties of an existing CI that you want to specify. For example, suppose there is a CI representing a deployed datasource for a specific middleware platform. The middleware platform allows the user to specify a connection pool size and connection timeout and XL Deploy supports the connection pool size out of the box. In this case, modifying the CI to add a synthetic property allows the user to specify the connection timeout.
Note: to use the newly defined property in a deployment, XL Deploy's behavior must be modified. To learn how to add new behavior to the product, take a look at the manual for the plugin to be modified or the Generic Model Plugin Manual to define a new plugin.
The following information can be specified when modifying a CI:
| Property | Required | Meaning |
|---|---|---|
| type | Yes | Specifies the CI type to modify |
Additionally, any property that is modified is listed as a nested property element. For each property, the following information can be specified:
| Property | Required | Meaning |
|---|---|---|
| name | Yes | The name of the property to modify |
| kind | No | The type of the property to modify. Possible values are: `enum`, `boolean`, `integer`, `string`, `ci`, `set_of_ci`, `set_of_string`, `map_string_string`, `list_of_ci`, `list_of_string`, `date` (internal use only) |
| description | No | Describes the property |
| category | No | Categorizes the property. Each category is shown in a separate tab in the XL Deploy GUI |
| label | No | Sets the property's label. If set, the label is shown in the XL Deploy GUI instead of the name |
| required | No | Indicates whether the property is required or not |
| password | No | Indicates whether the property stores a password. If so, the property value is masked in the XL Deploy GUI and CLI |
| size | No | Only relevant for properties of kind `string`. Specifies the property size. Possible values are: `default`, `small`, `medium`, `large`. Large text fields will be shown as a textarea in the XL Deploy GUI |
| default | No | Specifies the default value of the property |
| enum-class | No | Only relevant for properties of kind `enum`. The enumeration class that contains the possible values for this property |
| referenced-type | No | Only relevant for properties of kind `ci`, `set_of_ci` or `list_of_ci`. The type of the referenced CI. |
| as-containment | No | Only relevant for properties of kind `ci`, `set_of_ci` or `list_of_ci`. Indicates whether the property is modeled as containment in the repository. If true, the referenced CI or CIs are stored under the parent CI |
| hidden | No | Indicates whether the property is hidden. Hidden properties don't show up in the XL Deploy GUI. Note that a hidden property must have a default value |
| transient | No | Indicates whether the property is persisted in the repository or not |
| inspectionProperty | No | Indicates that this property is used for inspection (discovery). |
Here are some examples of modifying a CI.
Hiding a CI Property
The following XML snippet hides the connectionTimeoutMillis property for Hosts from the UI and gives it a default value:
<type-modification type="base.Host">
    <property name="connectionTimeoutMillis" kind="integer" default="1200000" hidden="true" />
</type-modification>
Extending a CI
For example, you could add a notes field to a CI to record notes:
<type-modification type="overthere.Host">
    <property name="notes" kind="string"/>
</type-modification>
Defining new CIs
It is also possible to define new CIs using this mechanism. By specifying a new type, its base (either a concrete Java class or another synthetic type) and namespace, a new type will become available in XL Deploy. This means the CI type can be a part of deployment packages and created in the Repository browser. Each of the three categories of CIs (deployables, deployeds and containers) can be defined this way.
The following information can be specified when defining a new type:
| Property | Required | Meaning |
|---|---|---|
| type | Yes | The CI type name |
| extends | Yes | The parent CI type that this CI type inherits from |
| description | No | Describes the new CI |
| virtual | No | Indicates whether the CI is virtual (used to group together common properties) or not. Virtual CIs can not be used in a deployment package |
| deployable-type | No | Only relevant for deployed CIs. The type of deployable CI type that this CI type deploys |
| container-type | No | Only relevant for deployed CIs. The type of CI container that this CI type is deployed to |
| generate-deployable | No | Only relevant for deployed CIs. The type of deployable CI to be generated. This property is specified as a nested element |
For each defined CI, zero or more properties can be specified. See the section above for more information about how to specify a property.
Here is an example for each of the CI categories.
Defining a Deployable CI
Usually, deployable CIs are generated by XL Deploy (see the generate-deployable element above). The following XML snippet defines a tomcat.DataSource CI and lets XL Deploy generate the deployable ( tomcat.DataSourceSpec ) for it:
<type type="tomcat.DataSource" extends="tomcat.JndiContextElement" deployable-type="jee.DataSourceSpec"
          description="DataSource installed to a Tomcat Virtual Host or the Common Context">
        <generate-deployable type="tomcat.DataSourceSpec" extends="jee.DataSourceSpec"/>
        <property name="driverClassName"
                  description="The fully qualified Java class name of the JDBC driver to be used."/>
        <property name="url"
                  description="The connection URL to be passed to our JDBC driver to establish a connection."/>
</type>
It is also possible to copy default values from the deployed type definition to the generated deployable type. Here is an example:
<type type="tomcat.DataSource" extends="tomcat.JndiContextElement" deployable-type="jee.DataSourceSpec"
          description="DataSource installed to a Tomcat Virtual Host or the Common Context">
        <generate-deployable type="tomcat.DataSourceSpec" extends="jee.DataSourceSpec" copy-default-values="true"/>
        <property name="driverClassName"
                  description="The fully qualified Java class name of the JDBC driver to be used."
                  default="{{DATASOURCE_DRIVER}}/">
        <property name="url"
                  description="The connection URL to be passed to our JDBC driver to establish a connection."
                  default="{{DATASOURCE_URL}}/">
</type>
NOTE: Properties that are either hidden, or of kind ci, list_of_ci or set_of_ci will not be copied to the deployable.
The following snippet shows an example of defining a deployable manually:
<type type="acme.CustomWar" extends="jee.War">
    <property name="startApplication" kind="boolean" required="true"/>
</type>
Defining a Container CI
This XML snippet shows how to define a new container CI:
<type type="tc.Server" extends="generic.Container">
    <property name="home" default="/tmp/tomcat"/>
</type>
Defining a Deployed CI
This XML snippet shows how to define a new deployed CI:
<type type="tc.WarModule" extends="udm.BaseDeployedArtifact" deployable-type="jee.War"
      container-type="tc.Server">
    <generate-deployable type="tc.War" extends="jee.War"/>
    <property name="changeTicketNumber" required="true"/>
    <property name="startWeight" default="1" hidden="true"/>
</type>
The tc.WarModule CI (a deployed) is generated when a tc.War (a deployable) is deployed to a tc.Server (a container). The new CI inherits all properties from the udm.BaseDeployedArtifact CI and adds the required property changeTicketNumber. The startWeight property is hidden from the user with a default value of 1.
Defining an Embedded CI
An embedded CI is a CI that is embedded (part of) another CI (see the Reference Manual for details). The following XML snippet shows how to define an embedded CI that represents a portlet contained in a WAR file. The tc.Portlet embedded CI can be embedded in the tc.WarModule deployed CI, also shown:
<type type="tc.WarModule" extends="udm.BaseDeployedArtifact" deployable-type="jee.War"
      container-type="tc.Server">
    <property name="changeTicketNumber" required="true"/>
    <property name="startWeight" default="1" hidden="true"/>
    <property name="portlets" kind="set_of_ci" referenced-type="tc.Portlet" as-containment="true"/>
</type>

<type type="tc.War" extends="jee.War">
    <property name="changeTicketNumber" required="true"/>
    <property name="startWeight" default="1" hidden="true"/>
    <property name="portlets" kind="set_of_ci" referenced-type="tc.Portlet" as-containment="true"/>
</type>

<type type="tc.Portlet" extends="udm.BaseEmbeddedDeployed" deployable-type="tc.PortletSpec" container-type="tc.WarModule">
    <generate-deployable type="tc.PortletSpec" extends="udm.BaseEmbeddedDeployable" />
</type>
The tc.WarModule has a portlets property that contains a set of tc.Portlet embedded CIs.
In a deployment package, a tc.War CI and it's tc.PortletSpec CIs can be specified. When a deployment is configured, a tc.WarModule deployed is generated, complete with all it's tc.Portlet portlets deployeds.
See the Packaging Manual for more information on how to include the embedded CIs in the manifest.
Defining Synthetic Methods
In addition to defining CIs, it is also possible to define methods on CIs. Each method can be executed on an instance of a CI via the GUI or CLI. Methods are used to implement control tasks, actions on CIs to control the middleware. An example is starting or stopping of a server. The CI itself is responsible for implementing the specified method, either in Java (see the section "Writing a Plugin" below) or synthetically when extending an existing plugin such as the Generic Model Plugin.
This XML snippet shows how to define a control task:
<type type="tc.DeployedDataSource" extends="generic.ProcessedTemplate" deployable-type="tc.DataSource"
      container-type="tc.Server">
    <generate-deployable type="tc.DataSource" extends="generic.Resource"/>
    ...
    <method name="ping" description="Test whether the datasource is available"/>
</type>
The ping method defined above can be invoked on an instance of the tc.DeployedDataSource CI through the server REST interface, GUI or CLI. The implementation of the ping method is part of the tc.DeployedDataSource CI.
Defining Validation Rules
It is possible to add validation rules to properties and CIs in the synthetic.xml. Out of the box, XL Deploy comes with the regex validation rule, which can be used to define naming conventions using regular expressions.
This XML snippet shows how to add a validation rule:
<type type="tc.WarModule" extends="ud.BaseDeployedArtifact" deployable-type="jee.War"
       container-type="tc.Server">
    <property name="changeTicketNumber" required="true">
        <rule type="regex" pattern="^JIRA-[0-9]+$"
           message="Ticket number should be of the form JIRA-[number]"/>
    </property>
</type>
The validation will throw an error, when the tc.WarModule is being saved in XL Deploy with a value that is not of the form JIRA-[number].
Customizing Provided Plugins
Using the type system, the XL Deploy plugins provided by XebiaLabs can be customized. New CI properties or scripts can be added to supplement the functionality delivered by the plugin. More information about this can be found in the respective plugin manuals. XL Deploy's Generic Model Plugin can be used as a basis to build a new plugin. See the Generic Model Plugin Manual for more information.
Customizing XL Deploy using Java
In addition to customizing XL Deploy using the XML-based type system, XL Deploy allows further customization using the Java programming language. By implementing a server plugpoint, certain XL Deploy server functionality can be changed to adapt the product to your needs. And if you want to use XL Deploy with new middleware, you can implement a custom plugin. This section describes these two options after diving into the XL Deploy architecture.
XL Deploy Architecture
XL Deploy features a modular architecture that allows components to be changed and extended while maintaining a consistent system. The following diagram provides a high-level overview of the system architecture:

XL Deploy's central component is referred to as the core and contains the following functionality:
- The Unified Deployment Engine which determines what is required to perform a deployment
- Storage and retrieval of deployment packages
- Executing and storing of deployment tasks
- Security
- Reporting
The XL Deploy core is accessed using a REST service. The product ships with two clients of the REST service, a graphical user interface (GUI) built in Flex that runs in browsers using Flash, and a command-line interface (CLI) that interprets Jython.
Support for various middleware platforms is provided in the form of XL Deploy plugins. These plugins add capabilities to XL Deploy and may be delivered by XebiaLabs or custom-built by users of XL Deploy.
XL Deploy and Plugins
A XL Deploy plugin is a component that provides the XL Deploy server with a way to interact with a specific piece of middleware. It allows the XL Deploy core to remain independent of the middleware it connects with. At the same time, it allows plugin writers to extend XL Deploy in a way that seamlessly integrates with the rest of XL Deploy's functionality. Existing XL Deploy plugins can be extended to customize XL Deploy for your environment. It's even possible to write a new XL Deploy plugin from scratch.
To integrate with the XL Deploy core, the plugins adhere to a well-defined interface. This interface specifies the contract between the XL Deploy plugin and the XL Deploy core, making it clear what each can expect of the other. The XL Deploy core is the active party in this collaboration and invokes the plugin whenever needed. For its part, the XL Deploy plugin replies to requests it is sent. When the XL Deploy server starts, it scans the classpath and loads each XL Deploy plugin it finds, readying it for interaction with the XL Deploy core. The XL Deploy core does not change loaded plugins or load any new plugins after it has started.
At runtime, multiple plugins will be active at the same time. It is up to the XL Deploy core to integrate the various plugins and ensure they work together to perform deployments. There is a well-defined process (described below) that invokes all plugins involved in a deployment and turns their contributions into one consistent deployment plan. The execution of the deployment plan is handled by the XL Deploy core.
Plugins can define the following items:
- Deployable - Configuration Items (CIs) that are part of a package and that can be deployed
- Container - CIs that are part of an environment and that can be deployed to
- Deployed - CIs that represent the end result of the deployment of a deployable CI to a container CI
- A recipe describing how to deploy deployable CIs to container CIs
- Validation rules to validate CIs or properties of CIs
These concepts are captured in Java interfaces that can be used to write plugins. See the section on "Writing a plugin in Java" below. First we will describe the steps that are involved when doing a deployment in XL Deploy.
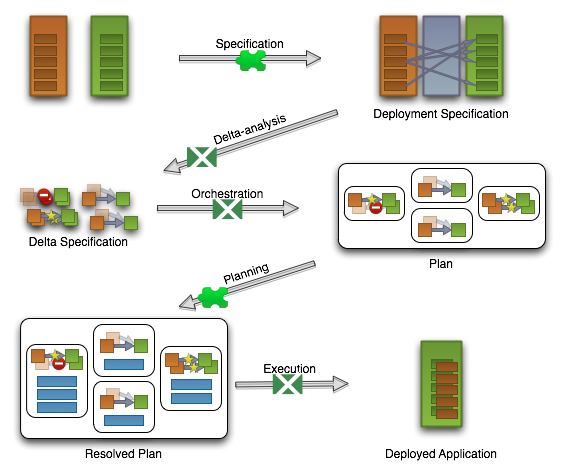
Preparing and Performing Deployments in XL Deploy
Performing a deployment in XL Deploy consists of a number of stages that, together, ensure that the deployment package is deployed and configured on the environment. Some of these activities are performed by the XL Deploy core, while others are performed by the plugins.
This is the list of stages:
- Specification: This stage creates a deployment specification that defines which deployables (deployment package members) are to be deployed to which containers (environment members) and how they should be configured.
- Delta Analysis: Analyzes the differences between the deployment specification and the current state of the middleware resulting in a delta specification, a list of changes to the middleware state that transforms the current situation into the situation described by the deployment specification. The deltas represent operations needed on the deployed items in the deployment. There are four defined operations:
- CREATE when deploying an item for the first time
- MODIFY when upgrading an item
- DESTROY when undeploying an item
- NOOP when there is no change
- Orchestration: Splits the delta specification into independent subspecifications that can be planned and executed in isolation. Creates a deployment plan containing nested subplans.
- Planning: Adds steps to each subplan that, when executed, perform the actions needed to execute the actual deployment.
- Execution: Executes the complete deployment plan to perform the deployment.
Deployments and Plugins
The following diagram depicts the way in which a plugin is involved in a deployment:
The transitions that are covered by a puzzle-piece are the ones that interact with the plugins, while the XL Deploy logo indicates that the transition is handled by the XL Deploy core.
The following sections describe how plugins are involved in the above mentioned activities. The plugin is involved in the Specification and Planning stages, these will be detailed below.
The Specification Stage
In the Specification stage, the deployment to be executed is specified. This includes selecting the deployment package and members to be deployed, as well as mapping each package member to the environment members that they should be deployed to.
Specifying CIs
The XL Deploy plugin defines which CIs the XL Deploy core can use to create deployments. When a plugin is loaded into the XL Deploy core, XL Deploy scans the plugin for CIs and adds these to its CI registry. Based on the CI information in the plugin, XL Deploy will categorize each CI as either a deployable CI (defining the what of the deployment) or a container CI (defining the where of the deployment).
Specifying Relationships
Where the deployable CI represents the passive resource or artifact, the deployed CI represents the active version of the deployable CI when it has been deployed in a container. By defining deployed CIs, the plugin indicates which combinations of deployable and container are supported.
Configuration
Each deployed CI represents a combination of a deployable CI and a container CI. It is important to note that one deployable CI can be deployed to multiple container CIs. For instance, an EAR file can be deployed to two application servers. In a deployment, this is modeled as multiple deployed CIs.
Sometimes it is desirable to configure a deployable CI differently depending on the container CI or environment it is deployed to. This can be done by configuring the properties of the deployed CI differently.
Configuring the deployed CIs is handled in the XL Deploy core. Users perform this task either via the GUI or via the CLI. A delpoyit plugin can influence this process by providing default values for its properties.
Result
The result of the Specification stage is a deployment specification, containing deployed CIs that describe which deployable CIs are mapped to which container CIs with the needed configuration.
The Planning Stage
In the Planning stage, the deployment specification and its subplans that were created in the Orchestration stage are processed.
During this stage, the XL Deploy core performs the following procedure:
- Preprocessing
- Contributor processing
- Postprocessing
During each part of this procedure, the XL Deploy plugin is invoked so it can contribute (add) required deployment steps to the subplan.
Preprocessing
Preprocessing allows the plugin to contribute steps to the very beginning of the plan. During preprocessing, all preprocessors defined in the plugin are invoked in turn. Each preprocessor has full access to the delta specification. As such, the preprocessor can contribute steps based on the entire deployment. Examples of such steps are sending an email before starting the deployment or performing pre-flight checks on CIs in that deployment.
Deployed CI processing
Deployed CIs contain both the data and the behavior to make a deployment happen. Each of the deployed CIs that is part of the deployment can contribute steps to ensure that they are deployed or configured correctly.
Steps in a deployment plan must be specified in the correct order for the deployment to succeed. Furthermore, the order of these steps must be coordinated among an unknown number of plugins. To achieve this, XL Deploy weaves all the separate resulting steps from all the plugins together by looking at the order property (a number) they specify.
For example, suppose we have a container CI representing a WAS application server called WasServer. This CI contains the data describing a WAS server (things like host, application directory, etc.) as well as the behavior to manage it. During a deployment to this WasServer, the WasServer CI contributes steps with order 10 to stop the WasServer. Also, it would contribute steps with order 90 to restart it. In the same deployment, a deployable CI called WasEar (representing the WAS EAR file) contributes steps to install itself with order 40. The resulting plan would weave the install of the EAR file (40) in between the stop (10) and start (90) steps.
This mechanism allows steps (behavior) to be packaged together with the CIs that contribute them. Also, CIs defined by separate plugins can work together to produce a well-ordered plan.
XL Deploy uses the following default orders:
- PRE_FLIGHT (0)
- STOP_ARTIFACTS (10)
- STOP_CONTAINERS (20)
- UNDEPLOY_ARTIFACTS (30)
- DESTROY_RESOURCES (40)
- CREATE_RESOURCES (60)
- DEPLOY_ARTIFACTS (70)
- START_CONTAINERS (80)
- START_ARTIFACTS (90)
- POST_FLIGHT (100)
Postprocessing
Postprocessing is similar to preprocessing, but allows a plugin to add one or more steps to the very end of a plan. A postprocessor could for instance add a step to send a mail once the deployment has been completed.
Result
The Planning stage results in a deployment plan that contains all steps necessary to perform the deployment. The deployment plan is ready to be executed.
Implementing server plugpoints
Functionality in the XL Deploy Server can be customized by using plugpoints. Plugpoints are specified and implemented in Java. On startup, XL Deploy scans its classpath for implementations of its plugpoints in the com.xebialabs or ext.deployit packages and prepares them for use. There is no additional configuration required.
The XL Deploy Server supports the following plugpoints:
- protocol: specify a new method for connecting to remote hosts
- deployment package importer: allow XL Deploy to import deployment packages in a custom format
- orchestrator: control the way XL Deploy combines plans to generate the overall deployment workflow
- event listener: specify a listener for XL Deploy notifications and commands
Defining Protocols
A protocol in XL Deploy is a method for making a connection to a host. Overthere, XL Deploy's remote execution framework, uses protocols to build a connection with a target machine. Protocol implementations are read by Overthere when XL Deploy starts.
Classes implementing a protocol must adhere to two requirements:
- the class must implement the OverthereConnectionBuilder interface
- the class must have the @Protocol annotiation
The OverthereConnectionBuilder interface specifies only one method, connect. This method creates and returns a subclass of OverthereConnection representing a connection to the remote host. The connection must provide access to files (OverthereFile instances) that XL Deploy uses to execute deployments.
For more information, see the Overthere project.
Defining Importers and ImportSources
An importer is a class that turns a source into a collection of XL Deploy entities. Both the import source as well as the importer can be customized. XL Deploy comes with a default importer that understands the DAR package format (see the Packaging Manual for details).
Import sources are classes implementing the ImportSource interface and can be used to obtain a handle to the deployment package file to import. Import sources can also implement the ListableImporter interface, which indicates they can produce a list of possible files that can be imported. The user can make a selection out of these options to start the import process.
When the import source has been selected, all configured importers in XL Deploy are invoked in turn to see if any importer is capable of handling the selected import source (the canHandle method). The first importer that indicates it can handle the package is used to perform the import. XL Deploy's default importer is used as a fallback.
First, the preparePackage method is invoked. This instructs the importer to produce a PackageInfo instance describing the package metadata. This data is used by XL Deploy to determine whether the user requesting the import has sufficient rights to perform it. If so, the importer's importEntities method is invoked, allowing the importer to read the import source, create deployables from the package and return a complete ImportedPackage instance. XL Deploy will handle storing of the package and contents.
Defining Orchestrators
An orchestrator is a class that performs the Orchestration stage described above. The orchestrator is invoked after the delta-analysis phase and before the planning stage and implements the Orchestrator interface containing a single method:
Orchestration orchestrate(DeltaSpecification specification);
For example, this is the (Scala) implementation of the default orchestrator:
@Orchestrator.Metadata (name = "default", description = "The default orchestrator")
class DefaultOrchestrator extends Orchestrator {
  def orchestrate(specification: DeltaSpecification) = interleaved(getDescriptionForSpec(specification), specification.getDeltas)
}
It takes all delta specifications and puts them together in a single, interleaved plan. This results in a deployment plan that is ordered solely on the basis of the step's order property.
In addition to the default orchestrator, XL Deploy also contains the following orchestrators (see also the Reference manual):
- sequential-by-container and parallel-by-container orchestrator. These orchestrators groups steps that deal with the same container together, enabling deployments across a farm of middleware.
- sequential-by-composite-package and parallel-by-composite-package orchestrators. These orchestrators groups steps per contained package together. The order of the member packages in the composite package is preserved.
- sequential-by-deployment-group and parallel-by-deployment-group orchestrators. These orchestrators use the deployment group synthetic property on a container to group steps for all containers with the same deployment group. These orchestrators are provided by a separate plugin that comes bundled with XL Deploy inside the
availablePlugins/directory.
The following orchestrators have been DEPRECATED, please do not use them in new deployments. Their behaviour is the same as the suggested replacements:
- container-by-container-serial: use _sequential_bycontainer instead.
- composite-package: use _sequential_by_compositepackage instead.
- _groupbased: use sequential-by-deployment-group instead.
Defining Event Listeners
The XL Deploy Core sends events that listeners can act upon. There are two types of events in XL Deploy system:
- Notifications -- Events that indicate that XL Deploy has executed a particular action
- Commands -- Events that indicate XL Deploy is about to to execute a particular action
The difference is that commands are fired before an action takes place, while notifications are fired after an action takes place.
Listening for notifications
Notifications indicate a particular action has occurred in XL Deploy. Some examples of notifications in XL Deploy are:
- The system is started or stopped
- A user logs into or out of the system
- A CI is created, updated, moved or deleted
- A security role is created, updated or deleted
- A task (deployment, undeployment, control task or discovery) is started, cancelled or aborted
Notification event listeners are Java classes that have the @DeployitEventListener annotation and have one or more methods annotated with the T2 event bus @Subscribe annotation.
For example, this is the implementation of a class that logs all notifications it receives:
import nl.javadude.t2bus.Subscribe;

import com.xebialabs.deployit.engine.spi.event.AuditableDeployitEvent;
import com.xebialabs.deployit.engine.spi.event.DeployitEventListener;
import com.xebialabs.deployit.plugin.api.udm.ConfigurationItem;

/**
 * This event listener logs auditable events using our standard logging facilities.
 */
@DeployitEventListener
public class TextLoggingAuditableEventListener {

    @Subscribe
    public void log(AuditableDeployitEvent event) {
        logger.info("[{}] - {} - {}", new Object[] { event.component, event.username, event.message });
    }

    private static Logger logger = LoggerFactory.getLogger("audit");
}
Listening for commands
Commands indicate that XL Deploy has been asked to perform a particular action. Some examples of commands in XL Deploy are:
- A request to create a CI or CIs has been received
- A request to update a CI has been received
- A request to delete a CI or CIs has been received
Command event listeners are Java classes that have the @DeployitEventListener annotation and have one or more methods annotated with the T2 event bus @Subscribe annotation. Command event listeners have the option of vetoing a particular command which causes it to not be executed. Vetoing event listeners indicate that they have the ability to veto the command in the Subscribe annotation and veto the command by throwing a VetoException from the event handler method.
As an example, this listener class listens for update CI commands and optionally vetoes them:
@DeployitEventListener
public class RepositoryCommandListener {

    public static final String ADMIN = "admin";

    @Subscribe(canVeto = true)
    public void checkWhetherUpdateIsAllowed(UpdateCiCommand command) throws VetoException {
        checkUpdate(command.getUpdate(), newHashSet(command.getRoles()), command.getUsername());
    }

    private void checkUpdate(final Update update, final Set<String> roles, final String username) {
        if(...) {
            throw new VetoException("UpdateCiCommand vetoed");
        }
    }
}
Writing a plugin
Writing a custom plugin is the most powerful way to extend XL Deploy. It uses XL Deploy's Java plugin API which is also used by all of the plugins provided by XebiaLabs. The plugin API specifies a contract between XL Deploy core and a plugin that ensures that a plugin can safely contribute to the calculated deployment plan. To understand the plugin API, it is helpful to learn about the XL Deploy system architecture and how the plugins are involved in performing a deployment. The following sections assume the read has this background information.
UDM and Java
The UDM concepts are represented in Java by interfaces:
- Deployable classes represent deployable CIs.
- Container classes represent container CIs.
- Deployed classes represent deployed CIs.
In addition to these types, plugins also specify the behavior required to perform the deployment. That is, which actions (steps) are needed to ensure that a deployable ends up in the container as a deployed. In good OO-fashion, this behavior is part of the Deployed class.
Let's look at the mechanisms available to plugin writers in each of the two deployment phases, Specification and Planning.
Specifying a Namespace
All of the CIs in XL Deploy are part of a namespace to distinguish them from other, similarly named CIs. For instance, CIs that are part of the UDM plugin all use the udm namespace (such as udm.Deployable).
Plugins implemented in Java must specify their namespace in a source file called package-info.java. This file provides package-level annotations and is required to be in the same package as your CIs.
This is an example package-info file:
@Prefix("yak")
package com.xebialabs.deployit.plugin.test.yak.ci;

import com.xebialabs.deployit.plugin.api.annotation.Prefix;
Specification
This section describes Java classes used in defining CIs that are used in the Specification stage.
udm.ConfigurationItem and udm.BaseConfigurationItem
The udm.BaseConfigurationItem is the base class for all the standard CIs in XL Deploy. It provides the syntheticProperties map and a default implementation for the name of a CI.
udm.Deployable and udm.BaseDeployable
The udm.BaseDeployable is the default base class for types that are deployable to udm.Container CIs. It does not add any additional behavior
udm.EmbeddedDeployable and udm.BaseEmbeddedDeployable
The udm.BaseEmbeddedDeployable is the default base class for types that can be nested under a udm.Deployable CI, and which participate in the deployment of the udm.Deployable to a udm.Container. It does not add any additional behavior.
udm.Container and udm.BaseContainer
The udm.BaseContainer is the default base class for types that can contain udm.Deployable CIs. It does not add any additional behavior
udm.Deployed and udm.BaseDeployed
The udm.BaseDeployed is the default base class for types that specify which udm.Deployable CI can be deployed onto which udm.Container CI.
udm.EmbeddedDeployed and udm.BaseEmbeddedDeployed
The udm.BaseEmbeddedDeployed is the default base class for types that are nested under a udm.Deployed CI. It specifies which udm.EmbeddedDeployable can be nested under which udm.Deployed or udm.EmbeddedDeployed CI.
Additional UDM concepts
In addition to these base types, the UDM defines a number of implementations with higher level concepts that facilitate deployments.
- udm.Environment: The Environment is the target for a deployment in XL Deploy. It has members of type udm.Container
- udm.Application: The Application is a grouping of multiple udm.DeploymentPackage CIs that can each be the source of a deployment (for example: application = PetClinic; version = 1.0, 2.0, ...)
- udm.DeploymentPackage: A deployment package has a set of udm.Deployable CIs, and it is the source for a deployment in XL Deploy.
- udm.DeployedApplication: The DeployedApplication resembles the deployment of a udm.DeploymentPackage to a udm.Environment with a number of specific udm.Deployed CIs
- udm.Artifact: An implementation of a udm.Deployable which resembles a 'physical' artifact on disk (or memory)
- udm.FileArtifact: A udm.Artifact which points to a single file
- udm.FolderArtifact: A udm.Artifact which points to a directory structure
Mapping Deployables to Containers
When creating a deployment, the deployables in the package are targeted to one or more containers. The deployable on the container is represented as a deployed. Deployeds are defined by the deployable CI type and container CI type they support. Registering a deployed CI in XL Deploy informs the system that the combination of the deployable and container is possible and how it is to be configured. Once such a CI exists, XL Deploy users can create them in the GUI by dragging the deployable to the container.
When you drag a deployable that contains embedded-deployables to a container, XL Deploy will create an deployed with embedded-deployeds.
Deployment-level properties
It is also possible to set properties on the deployment (or undeployment) operation itself rather than on the individual deployed. The properties are specified by modifying udm.DeployedApplication in the synthetic.xml.
Here's an example:
<type-modification type="udm.DeployedApplication">
   <property name="username" transient="true"/>
   <property name="password" transient="true" password="true"/>
   <property name="nontransient" required="false" category="SomeThing"/>
</type-modification>
Here, username and password are required properties and need to be set before deployment plan is generated. This can be done in the UI by clicking on the Deployment Properties… button before starting a deployment.
In the CLI, properties are set on the deployment.deployedApplication:
d = deployment.prepareInitial('Applications/AnimalZoo-ear/1.0', 'Environments/myEnv')
d.deployedApplication.username = 'scott'
d.deployedApplication.password = 'tiger'
Deployment-level properties may be defined as transient, in which case the value will not be stored after deployment. This is useful for user names and password for example. On the other hand, non-transient properties will be available afterwards when doing an update or undeployment.
Analogous to the copying of values of properties from the deployable to the deployed, XL Deploy will copy properties from the udm.DeploymentPackage to the deployment level properties of the udm.DeployedApplication.
Planning
During planning a Deployment plugin can contribute steps to the deployment plan. Each of the mechanisms that can be used is described below.
@PrePlanProcessor and @PostPlanProcessor
The @PrePlanProcessor and @PostPlanProcessor annotations can be specified on a method to define a pre- or postprocessor. The pre- or postprocessor takes an optional order attribute which defaults to '100'; lower order means it is earlier, higher order means it is later in the processor chain. The method should take a DeltaSpecification and return either a Step, List of Step or null, the name can be anything, so you can define multiple pre- and postprocessors in one class. See these examples:
@PrePlanProcessor
public Step preProcess(DeltaSpecification specification) { ... }

@PrePlanProcessor
public List<Step> foo(DeltaSpecification specification) { ... }

@PostPlanProcessor
public Step postProcess(DeltaSpecification specification) { ... }

@PostPlanProcessor
public List<Step> bar(DeltaSpecification specification) { ... }
As a pre- or postprocessor is instantiated when it is needed, it should have a default constructor. Any fields on the class are not set, so the annotated method should not rely on them being set.
@Create, @Modify, @Destroy, @Noop
Deployeds can contribute steps to a deployment in which it is present. The methods that are invoked should also be specified in the udm.Deployed CI. It should take a DeploymentPlanningContext (to which one or more Steps can be added with specific ordering) and a Delta (specifying the operation that is being executed on the CI). The return type of the method should be void.
The method is annotated with the operation that is currently being performed on the Deployed CI. The following operations are available:
@Createwhen deploying a member for the first time@Modifywhen upgrading a member@Destroywhen undeploying a member@Noopwhen there is no change
In the following example, the method createEar() is called for both a create and modify operation of the DeployedWasEar.
public class DeployedWasEar extends BaseDeployed<Ear, WasServer> {
    ...

    @Create @Modify
    public void createEar(DeploymentPlanningContext context, Delta delta) {
        // do something with my field and add my steps to the result
        // for a particular order
        context.addStep(new CreateEarStep(this));
    }
}
Note: These methods cannot occur on udm.EmbeddedDeployed CIs. The EmbeddedDeployed CIs do not add any additional behavior, but can be checked by the owning udm.Deployed and that can generate steps for the EmbeddedDeployed CIs.
@Contributor
A @Contributor contributes steps for the set of Deltas in the current subplan being evaluated. The methods annotated with @Contributor can be present on any Java class which has a default constructor. The generated steps should be added to the collector argument context.
@Contributor
public void contribute(Deltas deltas, DeploymentPlanningContext context) { ... }
The DeploymentPlanningContext
Both a contributor and specific contribution methods receive a DeploymentPlanningContext object as a parameter. The context is used to add steps to the deployment plan, but it also provides some additional functionality the plugin can use:
getAttribute()/setAttribute(): contributors can add information to the planning context during planning. This information will be available during the entire planning phase and can be used to communicate between contributors or with the core.getDeployedApplication(): this allows contributors to access the deployed application that the deployeds are a part of.getRepository(): contributors can access the XL Deploy repository to determine additional information they may need to contribute steps. The repository can be read from and written to during the planning stage.
Checkpoints
As a plugin author, you typically execute multiple steps when your CI is created, destroyed or modified. You can let XL Deploy know when the action performed on your CI is complete, so that XL Deploy can store the results of the action in it's repository. If the deployment plan fails halfway through, XL Deploy can generate a customized rollback plan that contains steps to rollback only those changes that are already committed.
XL Deploy must be told to add a checkpoint after a step that completes the operation on the CI. Once the step completes successfully, XL Deploy will checkpoint (commit to the repository) the operation on the CI (the destroy operation will remove it, the create operation will create it and the modify operation updates it) and generate rollback steps for it if needed.
Here's an example of adding a checkpoint:
@Create
public void executeCreateCommand(DeploymentPlanningContext ctx, Delta delta) {
    ctx.addStepWithCheckpoint(new ExecuteCommandStep(order, this), delta);
}
This informs XL Deploy to add the specified step and to add a create checkpoint. Here's another example:
@Destroy
public void destroyCommand(DeploymentPlanningContext ctx, Delta delta) {
    if (undoCommand != null) {
        DeployedCommand deployedUndoCommand = createDeployedUndoCommand();
        ctx.addStepWithCheckpoint(new ExecuteCommandStep(undoCommand.getOrder(), deployedUndoCommand), delta);
    } else {
        ctx.addStepWithCheckpoint(new NoCommandStep(order, this), delta);
    }
}
XL Deploy will add a destroy checkpoint after the created step.
Checkpoints with the modify action on CIs are a bit more complicated since a modify operation is frequently implemented as a combination of destroy (remove the old version of the CI) and a create (create the new version). In this case, we need to tell XL Deploy to add a checkpoint after the step removing the old version as well as a checkpoint after creating the new one. More specifically, we need to tell XL Deploy that the first checkpoint of the modify operation is really a destroy checkpoint. This is how that looks:
@Modify
public void executeModifyCommand(DeploymentPlanningContext ctx, Delta delta) {
    if (undoCommand != null && runUndoCommandOnUpgrade) {
        DeployedCommand deployedUndoCommand = createDeployedUndoCommand();
        ctx.addStepWithCheckpoint(new ExecuteCommandStep(undoCommand.getOrder(), deployedUndoCommand), delta, Operation.DESTROY);
    }

    ctx.addStepWithCheckpoint(new ExecuteCommandStep(order, this), delta);
}
Note that additional parameter Operation.DESTROY in the addStepWithCheckpoint invocation that lets XL Deploy know the checkpoint is a destroy checkpoint even though the delta passed in represents a modify operation.
The final step uses the modify operation from the delta to indicate the CI is now present and.
Control Tasks
CIs can also define control tasks. Control tasks allow actions to be executed on CIs and can be invoked from the GUI or the CLI. Control tasks specify a list of steps to be executed in order. Control tasks can be parameterized in two ways:
- by specifying arguments to the control task in the control task configuration
- by allowing the user to specify parameters to the control task during control task execution
Arguments are configured in the control task definition in the synthetic.xml file. Arguments are specified as attributes on the synthetic method definition XML and are passed as-is to the control task. Parameters are specified by defining a parameters CI type. See the next section for more information about defining and using control task parameters.
Control tasks can be implemented in different ways:
In Java as methods annotated with the @ControlTask annotation. The method returns a List<Step> that the server will execute when it is invoked:
@ControlTask(description = "Start the Apache webserver")
public List<Step> start() {
    // Should return actual steps here
    return newArrayList();
}
In Java as a delegate which is bound via synthetic XML. Delegate is an object with a default constructor which contains one or more methods annotated with @Delegate. Those can be used to generate steps for control tasks.
class MyControlTasks {

    public MyControlTasks() {}

    @Delegate(name="startApache")
    public List<Step> start(ConfigurationItem ci, String method, Map<String, String> arguments) {
        // Should return actual steps here
        return newArrayList();
    }
}

...

<type-modification type="www.ApacheHttpdServer">
    <method name="startApache" label="Start the Apache webserver" delegate="startApache" argument1="value1" argument2="value2"/>
</type-modification>
When the start method above is invoked, the arguments argument1 and argument2 will be provided in the arguments parameter map.
Control Tasks with Parameters
Control tasks can have parameters. Parameters can be passed to the task that is started. In this way the control task can use these values during execution. Parameters are normal CI's, but need to extend the udm.Parameters CI. This is an example CI that can be used as control task parameter:
<type type="www.ApacheParameters" extends="udm.Parameters">
    <property name="force" kind="boolean" />
</type>
This example Parameters CI contains only one property named force of kind boolean. To define a control task with parameters on a CI, use the parameters-type attribute to specify the CI type:
<type-modification type="www.ApacheHttpdServer">
    <method name="start" />
    <method name="stop" parameters-type="www.ApacheParameters" />
    <method name="restart">
        <parameters>
            <parameter name="force" kind="boolean" />
        </parameters>
    </method>
</type-modification>
The stop method uses the www.ApacheParameters Parameters CI we just defined. The restart method has an inline definition for it's parameters. This is a short notation for creating a Parameters definition. The inline parameters definition is equal to using www.ApacheParameters.
Parameters can also be defined in Java classes. To do this you need to specify the parameterType element of the ControlTask annotation. The ApacheParameters class is a CI and remember that it needs to extend the udm Parameters class.
@ControlTask(parameterType = "www.ApacheParameters")
public List<Step> startApache(final ApacheParameters params) {
    // Should return actual steps here
    return newArrayList();
}
If you want to use the Parameters in a delegate, your delegate method specify an additional 4th parameter of type Parameters:
@SuppressWarnings("unchecked")
@Delegate(name = "methodInvoker")
public static List<Step> invokeMethod(ConfigurationItem ci, final String methodName, Map<String, String> arguments, Parameters parameters) {
    // Should return actual steps here
    return newArrayList();
}
Discovery
XL Deploy's discovery mechanism is used to discover existing middleware and create them as CIs in the repository.
Do the following to enable discovery in your plugin:
- Indicate that the CI type is discoverable (can be used as the starting point of the discovery process) by giving it the annotation
Metadata(inspectable = true). - Indicate where in the repository tree the discoverable CI should be placed by adding an as-containment reference to the parent CI type. This also means that the context menu for the parent CI type will show the Discover menu item for your CI type.
For example, to indicate that a CI is stored under a overthere.Host CI in the repository, define the following field in your CI:
@Property(asContainment=true)
private Host host;
- Implement an inspection method that inspects the environment for an instance of your CI. This method needs to add an inspection step to the given context.
For example:
@Inspect
public void inspect(InspectionContext ctx) {
    CliInspectionStep step = new SomeInspectionStep(...);
    ctx.addStep(step);
}
SomeInspectionStep should do two things: inspect properties of the current CIs and discover new ones. Those should be registered in InspectionContext with inspected(ConfigurationItem item) and discovered(ConfigurationItem item) methods respectively.
Validation rules
Next to defining CIs, new validation rules can also be defined in Java. These can then be used to annotate CIs or their properties so that XL Deploy can perform validations.
This is an example of a property validation rule called static-content that validates that a string kind field has a specific fixed value:
import com.xebialabs.deployit.plugin.api.validation.Rule;
import com.xebialabs.deployit.plugin.api.validation.ValidationContext;
import com.xebialabs.deployit.plugin.api.validation.ApplicableTo;
import com.xebialabs.deployit.plugin.api.reflect.PropertyKind;

import java.lang.annotation.ElementType;
import java.lang.annotation.Retention;
import java.lang.annotation.RetentionPolicy;
import java.lang.annotation.Target;

@ApplicableTo(PropertyKind.STRING)
@Retention(RetentionPolicy.RUNTIME)
@Rule(clazz = StaticContent.Validator.class, type = "static-content")
@Target(ElementType.FIELD)
public @interface StaticContent {
    String content();

    public static class Validator
           implements com.xebialabs.deployit.plugin.api.validation.Validator<String> {
        private String content;

        @Override
        public void validate(String value, ValidationContext context) {
            if (value != null && !value.equals(content)) {
                context.error("Value should be %s but was %s", content, value);
            }
        }
    }
}
A validation rule consists of an annotation, in this case @StaticContent, which is associated with an implementation of com.xebialabs.deployit.plugin.api.validation.Validator<T>. They are associated using the @com.xebialabs.deployit.plugin.api.validation.Rule annotation. Each method of the annotation needs to be present in the validator as a property with the same name, see the content field and property above. It is possible to limit the kinds of properties that a validation rule can be applied to by annotating it with the @ApplicableTo annotation and providing that with the allowed property kinds.
When you've defined this validation rule, you can use it to annotate a CI like such:
public class MyLinuxHost extends BaseContainer {
    @Property
    @StaticContent(content = "/tmp")
    private String temporaryDirectory;
}
Or you can use it in synthetic XML in the following way:
<type name="ext.MyLinuxHost" extends="udm.BaseContainer">
    <property name="temporaryDirectory">
        <rule type="static-content" content="/tmp"/>
    </property>
</type>
Plugin versioning
Plugins, like all software, change. To support plugin changes, it is important to keep track of each plugin version as it is installed in XL Deploy. This makes it possible to detect when a plugin version changes and allows XL Deploy to take specific action, if required. XL Deploy keeps track of plugin versions by scanning each plugin jar for a file called plugin-version.properties. This file contains the plugin name and it's current version.
For example:
plugin=sample-plugin
version=3.7.0
This declares the plugin to be the sample-plugin, version 3.7.0..
Repository upgrades
Sometimes, when changes occur in a plugin's structure (properties added, removed or renamed, the structure of CI trees updated), the XL Deploy repository must be migrated from the old to the new structure. Plugins contain upgrade classes for this.
Upgrade classes are Java classes that upgrade data in the repository that was produced by a previous version of the plugin to the current version of the plugin. XL Deploy scans the plugin JAR file for upgrade classes when it loads the plugin. When found, the current plugin version is compared with the plugin version registered in the XL Deploy repository. If the current version is higher than the previous version, the upgrade is executed. If the plugin was never installed before, the upgrade is not run.
An upgrade class extends the following base class:
public abstract class Upgrade implements Comparable<Upgrade> {

    public abstract boolean doUpgrade(RawRepository repository) throws UpgradeException;
    public abstract Version upgradeVersion();

    ...
}
The two methods each upgrade must implement are:
public abstract Version upgradeVersion();
This method returns the version of the upgrade. This is the version the upgrade migrates to. That is, after it has run, XL Deploy registers that this is the new current version.
Method
public abstract boolean doUpgrade(RawRepository repository) throws UpgradeException;
is the workhorse of the upgrade. Here, the class has access to the repository to perform any rewrites necessary.
When XL Deploy boots, it scans for upgrades to run. If it detects any, the boot process is stopped to report this fact to the user and to prompt them to make a backup of the repository first in case of problems. The user has the option to stop XL Deploy at this time if he does not want to perform the upgrade now. Otherwise, XL Deploy continues to boot and executes all upgrades sequentially.
Packaging your plugin
Plugins are distributed as standard Java archives (JAR files). Plugin JARs are put in the XL Deploy server plugins directory, which is added to the XL Deploy server classpath when it boots. XL Deploy will scan its classpath for plugin CIs and plugpoint classes and load these into its registry. These classes must be in the com.xebialabs or ext.deployit packages. The CIs are used and invoked during a deployment when appropriate.
Synthetic extension files packaged in the JAR file will be found and read. If there are multiple extension files present, they will be combined and the changes from all files will be combined.
Appendices
Sample Java Plugin
This example describes some classes from a test plugin we use at XebiaLabs, the Yak plugin.
We'll use the following sample deployment in this example
- The YakApp 1.1 deployment package.
- The application contains two deployables: "yakfile1" and "yakfile2". Both are of type YakFile.
- An environment that contains one container: "yakserver", of type YakServer.
- An older version of the application, YakApp/1.0, is already deployed on the container.
- YakApp/1.0 contains an older version of yakfile1, but yakfile2 is new in this deployment.
Deployable: YakFile
The YakFile is a deployable CI representing a file. It extends the built-in BaseDeployableFileArtifact class.
package com.xebialabs.deployit.plugin.test.yak.ci;

import com.xebialabs.deployit.plugin.api.udm.BaseDeployableFileArtifact;

public class YakFile extends BaseDeployableFileArtifact {
}
In our sample deployment, both yakfile1 and yakfile2 are instances of this Java class.
Container: YakServer
The YakServer is the container that will be the target of our deployment.
package com.xebialabs.deployit.plugin.test.yak.ci;

// imports omitted...

@Metadata(root = Metadata.ConfigurationItemRoot.INFRASTRUCTURE)
public class YakServer extends BaseContainer {

    @Contributor
    public void restartYakServers(Deltas deltas, DeploymentPlanningContext result) {
        for (YakServer yakServer : serversRequiringRestart(deltas.getDeltas())) {
            result.addStep(new StopYakServerStep(yakServer));
            result.addStep(new StartYakServerStep(yakServer));
        }
    }

    private static Set<YakServer> serversRequiringRestart(List<Delta> operations) {
        Set<YakServer> servers = new TreeSet<YakServer>();
        for (Delta operation : operations) {
            if (operation.getDeployed() instanceof RestartRequiringDeployedYakFile && operation.getDeployed().getContainer() instanceof YakServer) {
                servers.add((YakServer) operation.getDeployed().getContainer());
            }
        }
        return servers;
    }
}
This class shows several interesting features:
- The YakServer extends the built-in BaseContainer class.
- The @Metadata annotation specifies where in the XL Deploy repository the CI will be stored. In this case, the CI will be stored under the Infrastructure node. (see the XL Deploy Reference Manual for more information on the repository).
- The
restartYakServers()method annotated with @Contributor is invoked when any deployment takes place (also deployments that may not necessarily contain an instance of the YakServer class). The methodserversRequiringRestart()searches for any YakServer instances that are present in the deployment and that requires a restart. For each of these YakServer instances, a StartYakServerStep and StopYakServerStep is added to the plan.
When the restartYakServers method is invoked, the deltas parameter contains operations for both yakfile CIs. If either of the yakfile CIs was an instance of RestartRequiringDeployedYakFile, a start step would be added to the deployment plan.
Deployed: DeployedYakFile
The DeployedYakFile represents a YakFile deployed to a YakServer, as reflected in the class definition. The class extends the built-in BaseDeployed class.
package com.xebialabs.deployit.plugin.test.yak.ci;

// imports omitted...

public class DeployedYakFile extends BaseDeployedArtifact<YakFile, YakServer> {

   @Modify
   @Destroy
   public void stop(DeploymentPlanningContext result) {
     logger.info("Adding stop artifact");
     result.addStep(new StopDeployedYakFileStep(this));
   }

   @Create
   @Modify
   public void start(DeploymentPlanningContext result) {
     logger.info("Adding start artifact");
     result.addStep(new StartDeployedYakFileStep(this));
   }

   @Create
   public void deploy(DeploymentPlanningContext result) {
     logger.info("Adding deploy step");
     result.addStep(new DeployYakFileToServerStep(this));
   }

   @Modify
   public void upgrade(DeploymentPlanningContext result) {
     logger.info("Adding upgrade step");
     result.addStep(new UpgradeYakFileOnServerStep(this));
   }

   @Destroy
   public void destroy(DeploymentPlanningContext result) {
     logger.info("Adding undeploy step");
     result.addStep(new DeleteYakFileFromServerStep(this));
   }

   private static final Logger logger = LoggerFactory.getLogger(DeployedYakFile.class);
}
This class shows how to use the @Contributor to contribute steps to a deployment that includes a configured instance of the DeployedYakFile. Each annotated method annotated is invoked when the specified operation is present in the deployment for the YakFile.
In our sample deployment, yakfile1 already exists on the target container CI so a MODIFY delta will be present in the delta specification for this CI, causing the stop, start and upgrade methods to be invoked on the CI instance. Because yakfile2 is new, a CREATE delta will be present, causing the start, and deploy method to be invoked on the CI instance.
Step: StartYakServerStep
Steps are the actions that will be executed when the deployment plan is started.
package com.xebialabs.deployit.plugin.test.yak.step;

import com.xebialabs.deployit.plugin.api.flow.ExecutionContext;
import com.xebialabs.deployit.plugin.api.flow.Step;
import com.xebialabs.deployit.plugin.api.flow.StepExitCode;
import com.xebialabs.deployit.plugin.test.yak.ci.YakServer;

@SuppressWarnings("serial")
public class StartYakServerStep implements Step {

   private YakServer server;

   public StartYakServerStep(YakServer server) {
     this.server = server;
   }

   @Override
   public String getDescription() {
     return "Starting " + server;
   }

   @Override
   public StepExitCode execute(ExecutionContext ctx) throws Exception {
     return StepExitCode.SUCCESS;
   }


   public YakServer getServer() {
     return server;
   }

   @Override
   public int getOrder() {
     return 90;
   }
}